Telegram Channel ထည့်သွင်းခြင်း
စမလုပ်ခင် လိုအပ်တာတွေ
| လိုအပ်ချက် | အသုံးပြုရတဲ့အကြောင်း |
|---|---|
| Telegram account | bot နဲ့ storage channel ဖန်တီးဖို့ |
@BotFather | Telegram bot ဖန်တီးဖို့ |
| Telegram channel | files တွေကို သိမ်းမယ့် နောက်ဆုံးနေရာ |
@userinfobot | channel Chat ID ရှာဖို့ |
ဘယ်နေရာမှာ ထည့်မလဲ
- System Settings ကိုဖွင့်ပါ။
- Upload Settings ကိုသွားပါ။
- ညာဘက်အပေါ်ထောင့်က Add Channel ကိုနှိပ်ပါ။
Telegramကိုရွေးပါ။
Field Reference
| Field | အသုံးပြုပုံ | Required |
|---|---|---|
| Channel name | ဒီ channel ကိုမှတ်မိလွယ်စေမယ့်အမည်၊ ဥပမာ Telegram Primary။ | Required |
| Active | ဒီ channel ကို enable/disable လုပ်ရန်။ | Recommended |
| Bot Token | Telegram bot ရဲ့ token။ | Required |
| Session ID (Chat ID) | Telegram channel ရဲ့ ID။ | Required |
| Relay Proxy URL (optional) | Telegram access မတည်ငြိမ်တဲ့အခါပဲသုံးပါ။ https:// ပါတဲ့ full proxy URL ထည့်ပါ။ | Optional |
| Remark | နောက်ပိုင်း maintenance အတွက် မှတ်ချက်။ | Optional |
Setup Steps
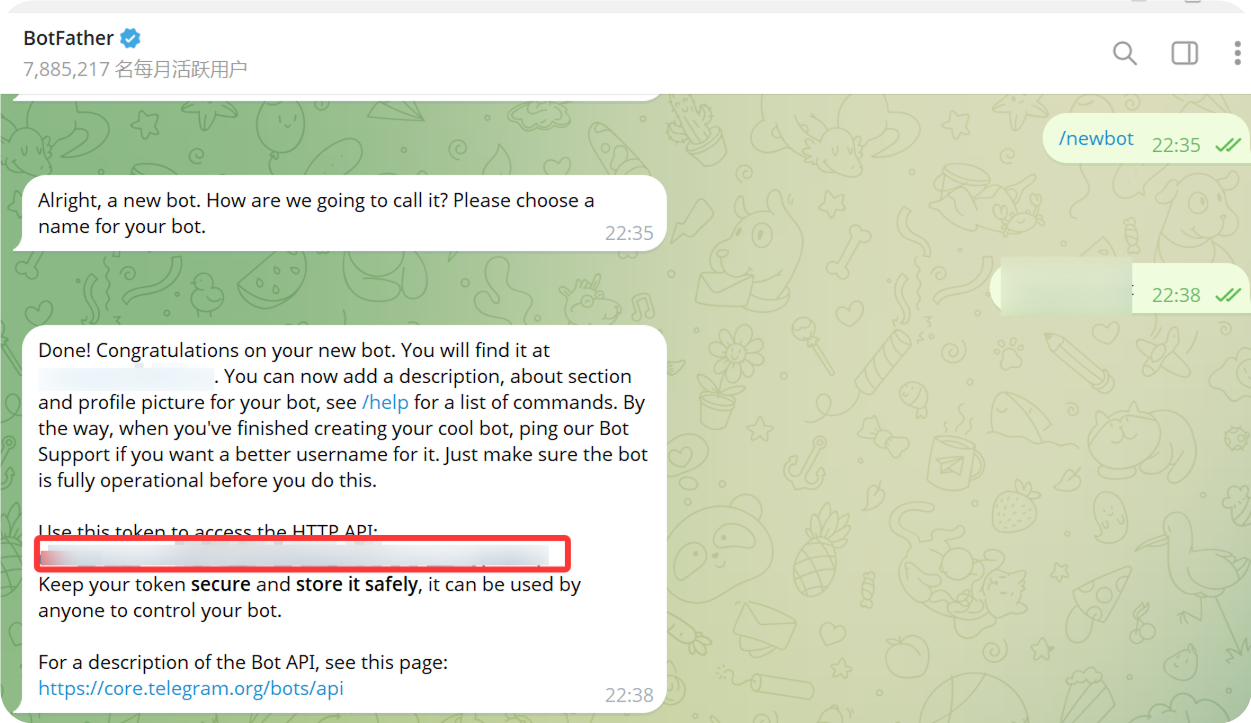
1. Telegram Bot ဖန်တီးပါ
- Telegram ကိုဖွင့်ပြီး
@BotFatherကိုရှာပါ။ - chat ကိုဖွင့်ပြီး
Startကိုနှိပ်ပါ။ /newbotပို့ပါ။- prompt အတိုင်း bot display name ထည့်ပါ။
- prompt အတိုင်း bot username ထည့်ပါ။ username က များသောအားဖြင့်
botနဲ့ဆုံးရပါမယ်။ - bot ဖန်တီးပြီးရင်
@BotFatherက bot token ပြန်ပေးပါမယ်။
ဒီ token ကို ImgBed ထဲက Bot Token မှာထည့်ရပါမယ်။
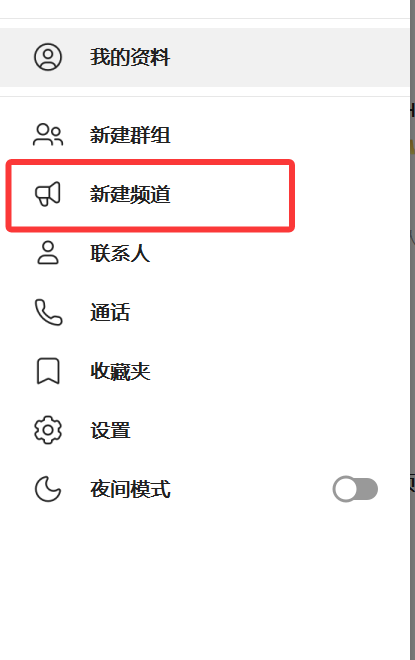
2. Channel ဖန်တီးပါ
- Telegram မှာ New Channel ကိုနှိပ်ပါ။
- channel name ထည့်ပါ။
- channel ဖန်တီးမှုကိုပြီးအောင်လုပ်ပါ။
public channel နဲ့ private channel နှစ်မျိုးလုံးသုံးနိုင်ပါတယ်။
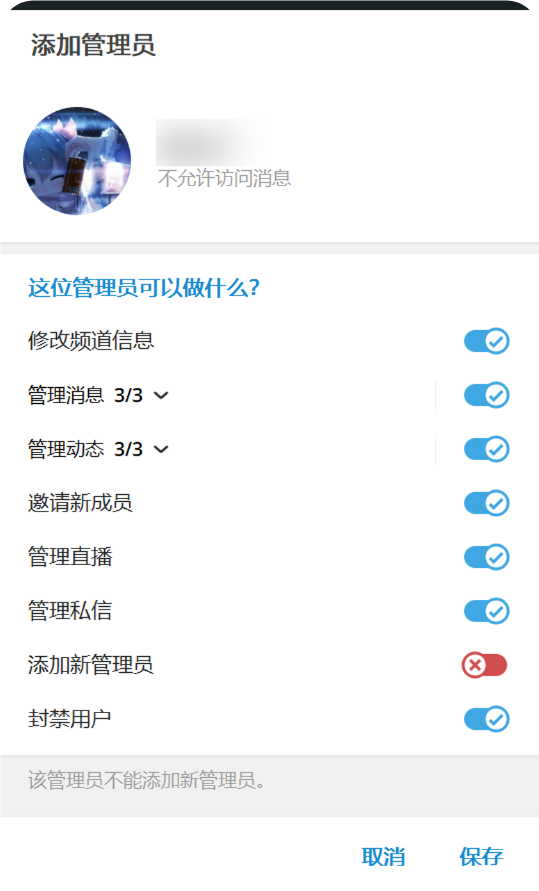
3. Bot ကို Channel ထဲထည့်ပါ
- ဖန်တီးထားတဲ့ channel ကိုဖွင့်ပါ။
- channel settings ကိုဖွင့်ပါ။
- member သို့မဟုတ် administrator ထည့်တဲ့နေရာကိုဖွင့်ပါ။
- ဖန်တီးထားတဲ့ bot username ကိုရှာပါ။
- bot ကို channel ထဲထည့်ပါ။
upload ပိုယုံကြည်စိတ်ချရအောင် bot ကို administrator permissions ပေးတာကောင်းပါတယ်။
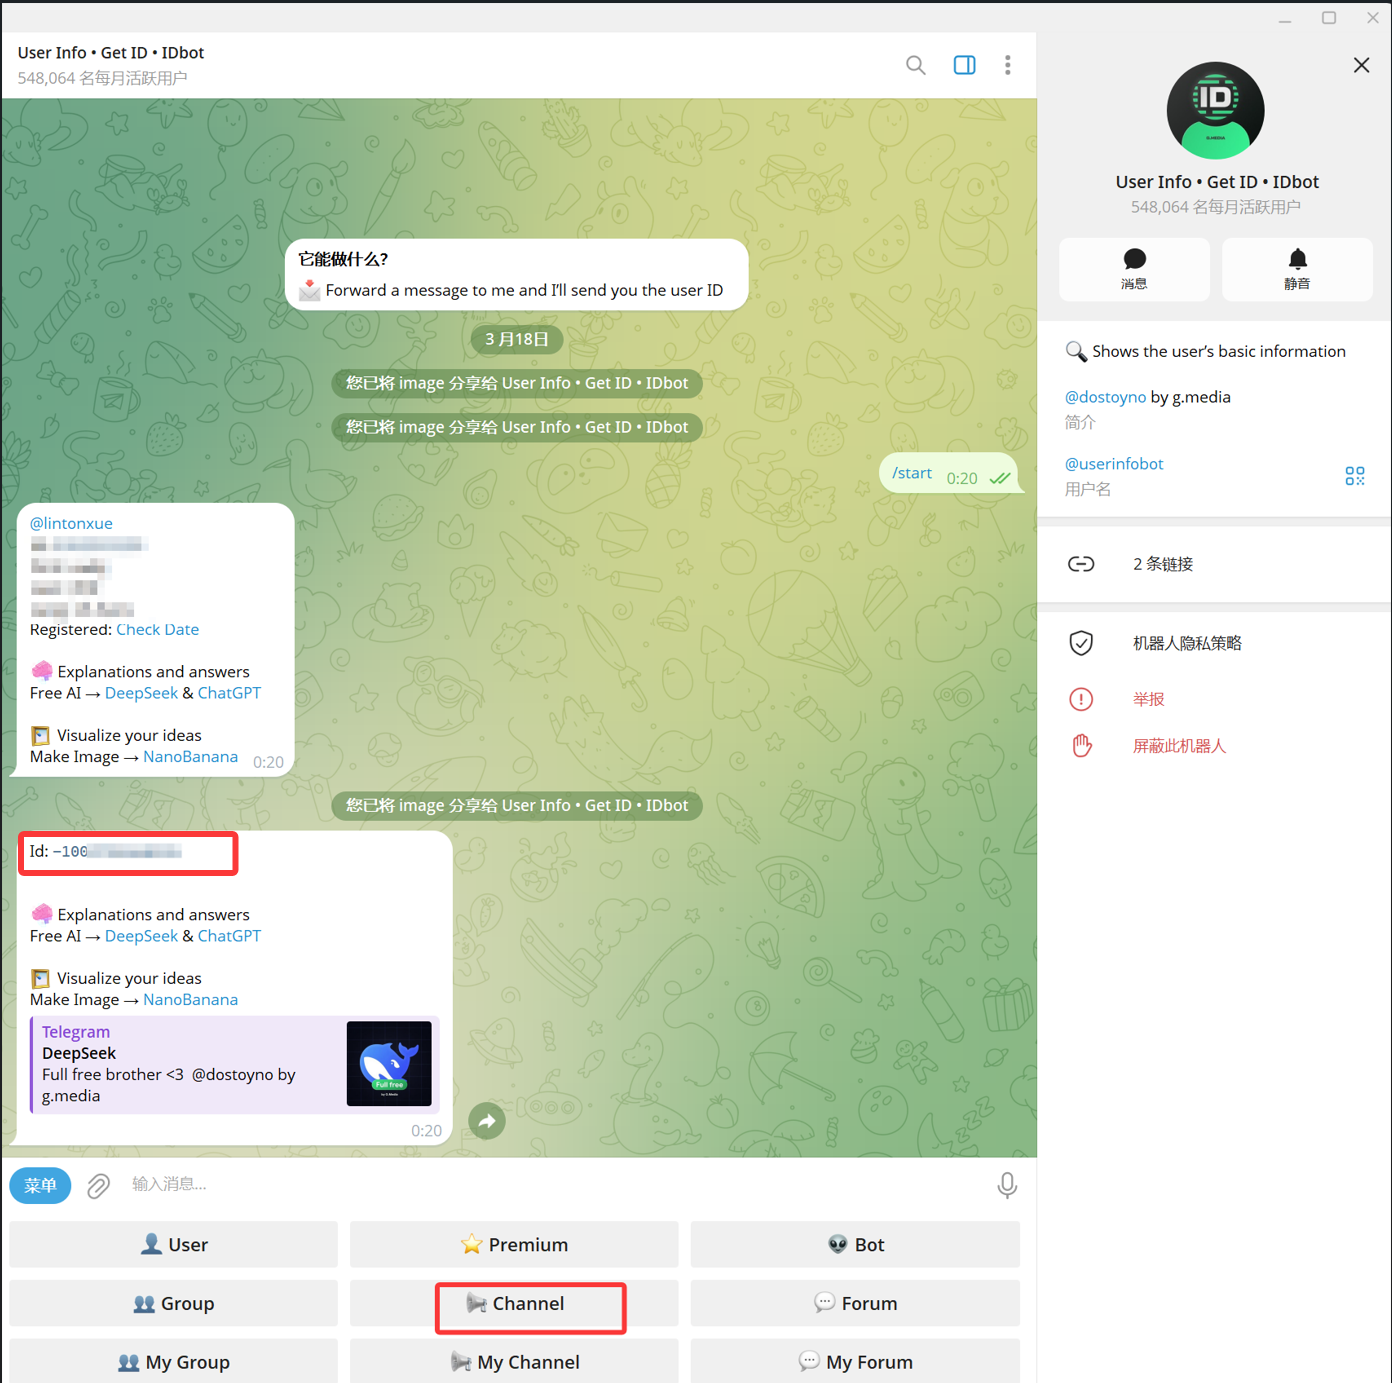
4. User Info - Get ID - IDbot ဖြင့် Channel ID ရယူပါ
- Telegram မှာ
@userinfobotကိုရှာပါ။ display name က များသောအားဖြင့်User Info - Get ID - IDbotဖြစ်ပါတယ်။ - chat ကိုဖွင့်ပြီး
Startနှိပ်ပါ။ - bot ပေးတဲ့ options ထဲက
Channelကိုရွေးပါ။ - message picker ထဲမှာ target channel ကိုရွေးပြီး
@userinfobotကိုပို့ပါ။ @userinfobotက result ပြန်ပေးရင်Id: -100...အနေနဲ့ပြထားတဲ့ number ကို copy လုပ်ပါ။
-100 နဲ့စတဲ့ number က ImgBed မှာလိုအပ်တဲ့ Session ID (Chat ID) ဖြစ်ပါတယ်။
5. ImgBed မှာ Telegram Channel ဖြည့်ပါ
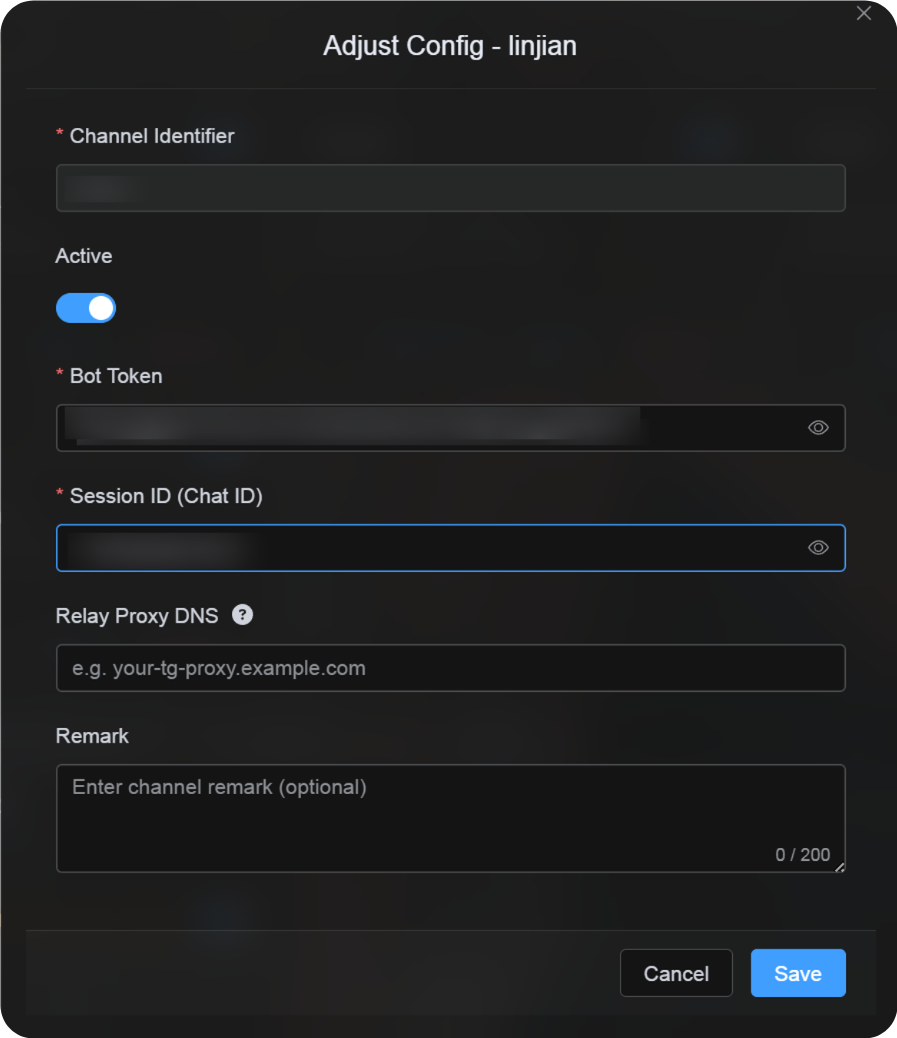
channel configuration dialog ကိုပြန်သွားပြီး fields တွေကို ဒီလိုဖြည့်ပါ:
| UI Field | Value |
|---|---|
| Channel Identifier | custom channel name၊ ဥပမာ TelegramPrimary။ |
| Active | Recommended။ |
| Bot Token | @BotFather ကရတဲ့ bot token။ |
| Session ID (Chat ID) | @userinfobot ကပြန်ပေးတဲ့ -100... number။ |
| Relay Proxy URL (optional) | လိုအပ်မှသာ၊ ဥပမာ https://your-tg-proxy.example.com။ |
| Remark | optional notes။ |
ပြီးရင် Save ကိုနှိပ်ပါ။
စစ်ဆေးနည်း
| Check | စစ်ဆေးပုံ |
|---|---|
| Channel card appears | Save ပြီးနောက် Upload Settings မှာ Telegram channel card ပေါ်လာရပါမယ်။ |
| Channel can be enabled | Active switch က on အနေအထားမှာရှိရပါမယ်။ |
| Configuration is saved | detail view မှာ Bot Token နဲ့ Chat ID သိမ်းထားတာမြင်ရပါမယ်။ |
| Upload works | test image တစ်ခု upload လုပ်ပြီး target Telegram channel ထဲပေါ်လာလားစစ်ပါ။ |
Quick Checklist
text
@BotFather နဲ့ bot ဖန်တီးပါ
-> Bot Token သိမ်းပါ
-> Telegram channel ဖန်တီးပါ
-> bot ကို channel ထဲထည့်ပြီး administrator permissions ပေးပါ
-> @userinfobot ကိုရှာပြီး Channel ရွေးပါ
-> channel ထဲက message တစ်ခုကို @userinfobot ဆီ forward လုပ်ပါ
-> ပြန်လာတဲ့ Id: -100... ကို copy လုပ်ပါ
-> ImgBed မှာ Bot Token နဲ့ Chat ID ထည့်ပါ
-> Save လုပ်ပြီး test image upload လုပ်ပါ
References
- Telegram bots: https://core.telegram.org/bots
- Telegram Bot API: https://core.telegram.org/bots/api