Cloudflare R2 Channel ထည့်သွင်းခြင်း
ဘယ်အချိန်မှာ သုံးသင့်လဲ
Cloudflare R2 ကို ဒီအခြေအနေတွေမှာသုံးပါ:
- ImgBed site ကို Cloudflare ပေါ်မှာ deploy လုပ်ထားပြီး files တွေကို အဲ့ဒီ Cloudflare account ထဲက R2 bucket မှာသိမ်းချင်လျှင်။
- S3 endpoint, access key, secret key ကို သီးခြား configure မလုပ်ချင်လျှင်။
- reads/writes တွေကို Worker သို့မဟုတ် Pages R2 binding မှတစ်ဆင့် setup နည်းနည်းနဲ့သွားစေချင်လျှင်။
အတိုချုပ်:
R2 channel ကို ImgBed admin panel ထဲမှာ manual မဖန်တီးပါ။ Cloudflare project ကို R2 bucket နဲ့အရင် bind လုပ်ရပြီး binding variable name က img_r2 ဖြစ်ရပါမယ်။
စမလုပ်ခင် လိုအပ်တာတွေ
- Cloudflare account။
- ရှိပြီးသား R2 bucket။
- ImgBed deploy လုပ်ထားတဲ့ Cloudflare project ကို manage လုပ်နိုင်တဲ့ permission။
Cloudflare မှာ Configure လုပ်ပါ
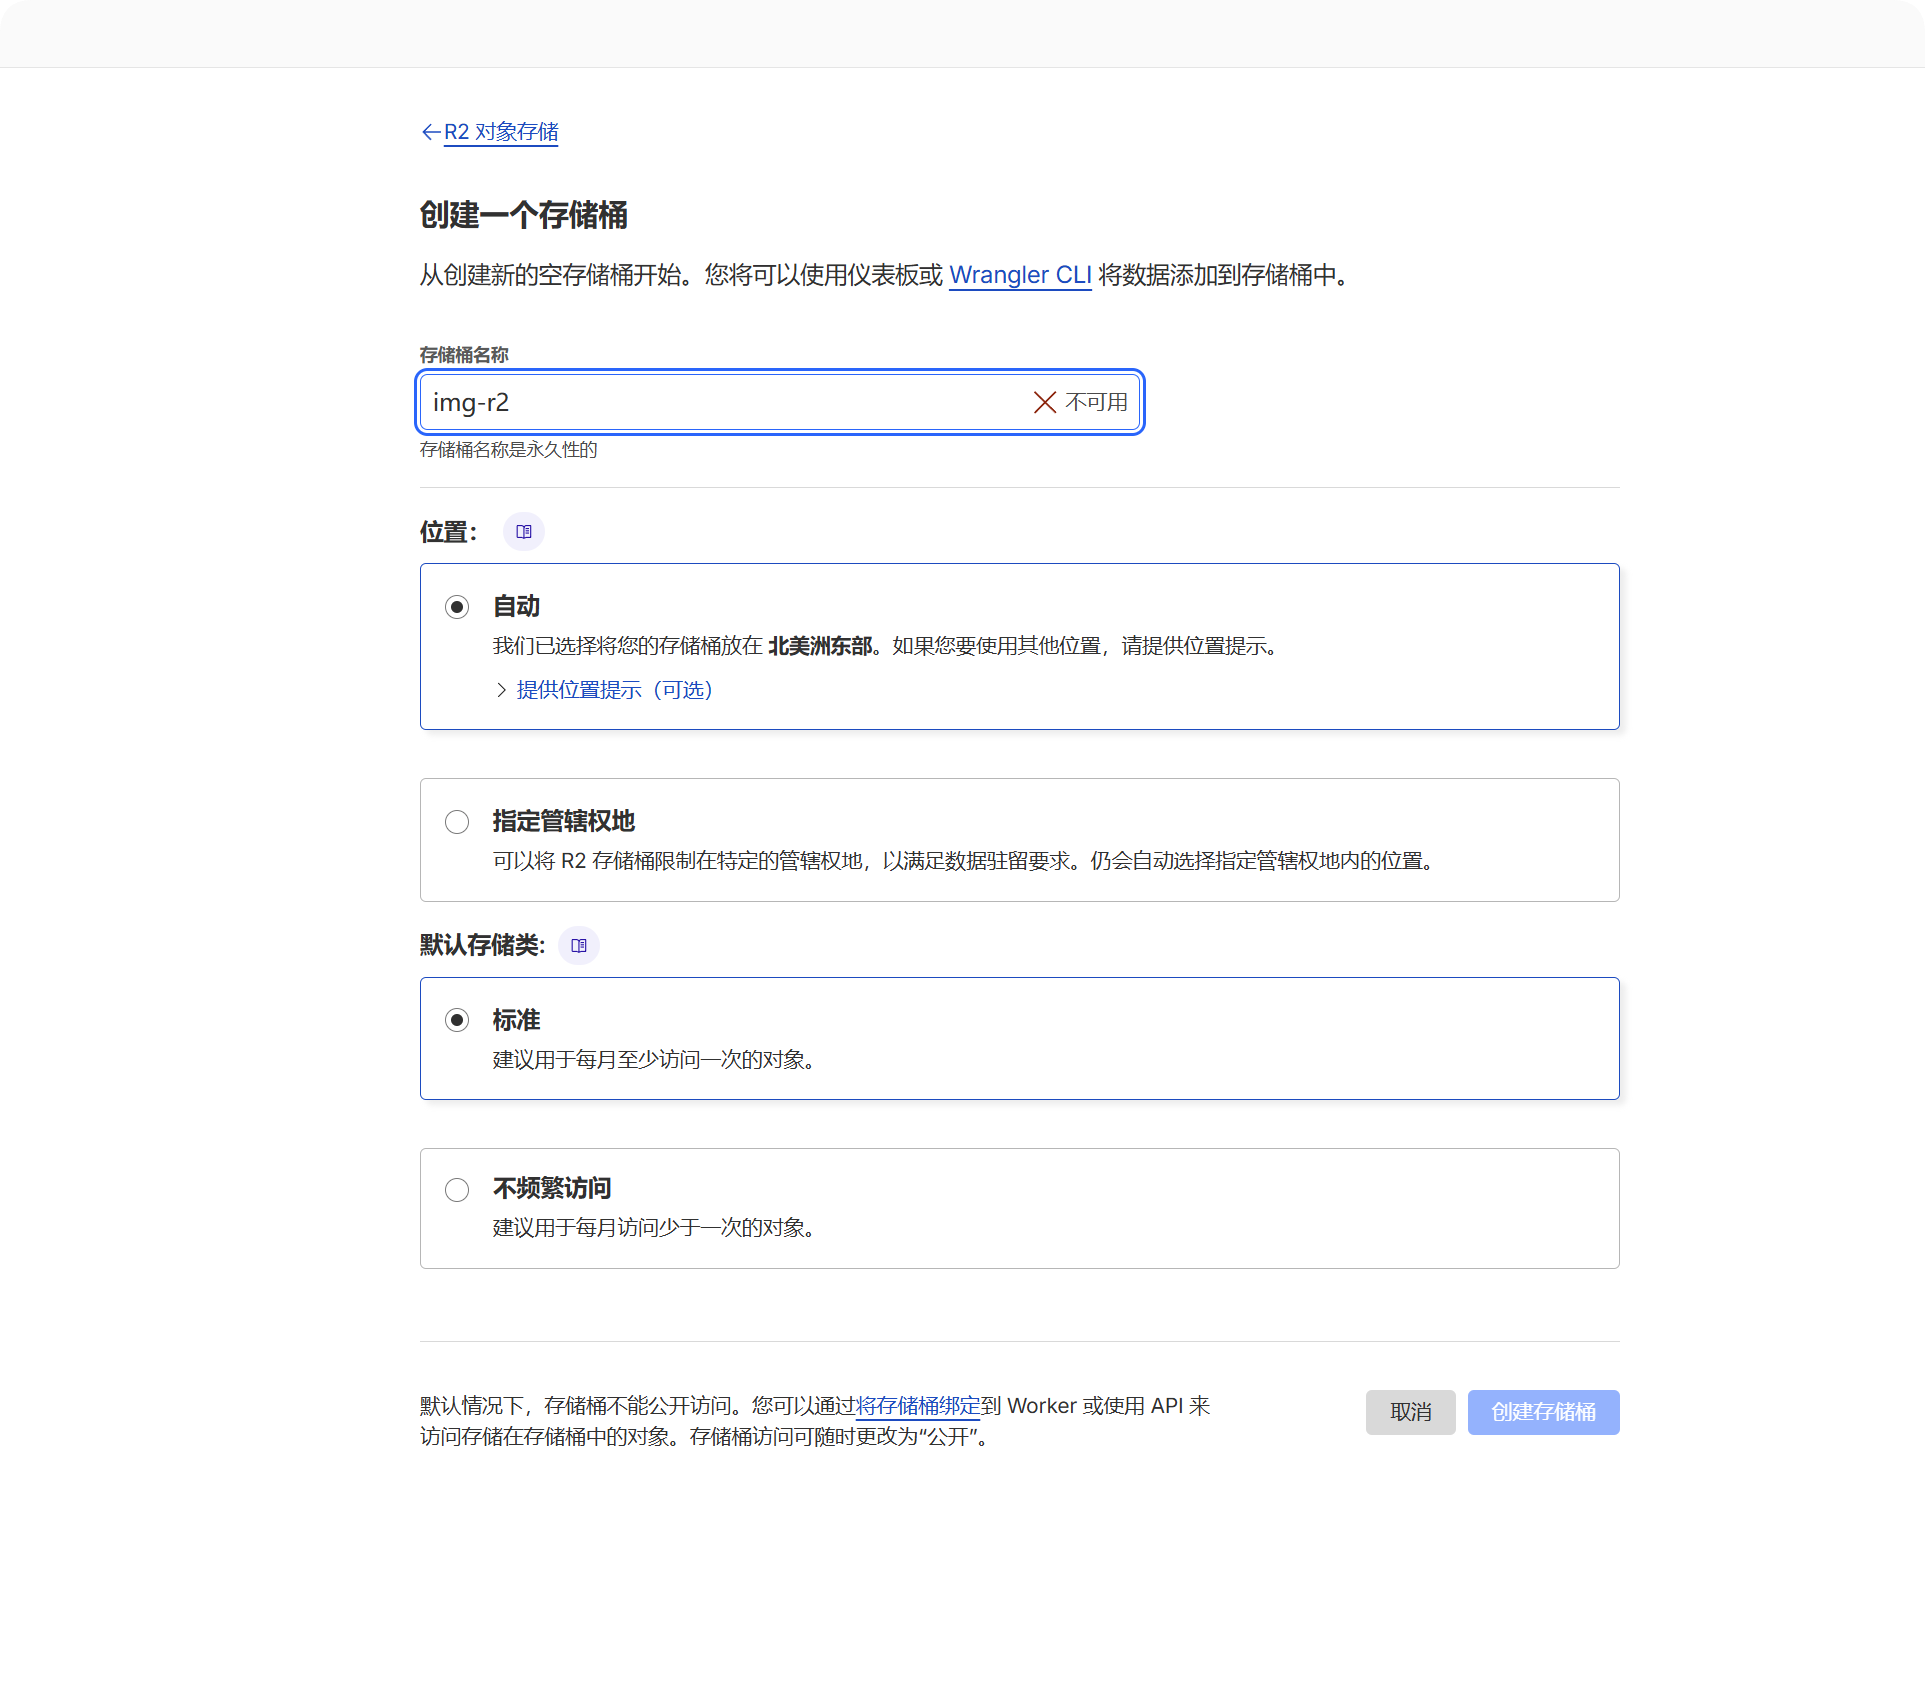
1. R2 Bucket ဖန်တီးပါ
- Cloudflare Dashboard ထဲ log in ဝင်ပါ။
R2 Object Storageကိုဖွင့်ပါ။- Create bucket ကိုနှိပ်ပါ။
- bucket name ရွေးပါ၊ ဥပမာ
imgbed။
uploaded files တွေကို ဒီ bucket ထဲမှာသိမ်းပါမယ်။
2. Bucket ကို ImgBed Project နဲ့ Bind လုပ်ပါ
deployment type အလိုက် binding location ရွေးပါ:
| Deployment Type | Binding Location |
|---|---|
| Pages | Current Pages project -> Settings -> Functions -> R2 bucket bindings |
| Worker | Current Worker -> Settings -> Bindings -> R2 bucket bindings |
binding ထည့်တဲ့အခါ အရေးကြီးတဲ့ fields:
| Field | Value |
|---|---|
| Variable name | img_r2 |
| R2 bucket | ဖန်တီးထားတဲ့ bucket ကိုရွေးပါ။ |
Variable name က တိတိကျကျ img_r2 ဖြစ်ရပါမယ်။ R2 files upload/read/delete အားလုံးက ဒီ binding name ပေါ်မူတည်ပါတယ်။
3. Project ကို Redeploy လုပ်ပါ
binding save ပြီးနောက် ImgBed ကို redeploy လုပ်ပါ။ ဒါမှ Worker သို့မဟုတ် Pages runtime က img_r2 ကို access လုပ်နိုင်ပါမယ်။
ImgBed မှာ ဘာမြင်ရမလဲ
R2 binding ရရှိပြီးနောက် ဖွင့်ပါ:
- System Settings။
- Upload Settings။
Cloudflare R2channel။
system က fixed channel တစ်ခုကို အလိုအလျောက်ဖန်တီးပါမယ်:
| Field | Fixed Value |
|---|---|
| Channel name | Cloudflare R2 |
| Channel type | cfr2 |
| Storage mode | binding |
| Configuration source | Environment binding |
ဒါက fixed binding channel ဖြစ်ပါတယ်။ ဖန်တီးဖို့ Add Channel ကိုနှိပ်စရာမလိုပါ၊ regular channel လို delete လုပ်လို့မရပါ။
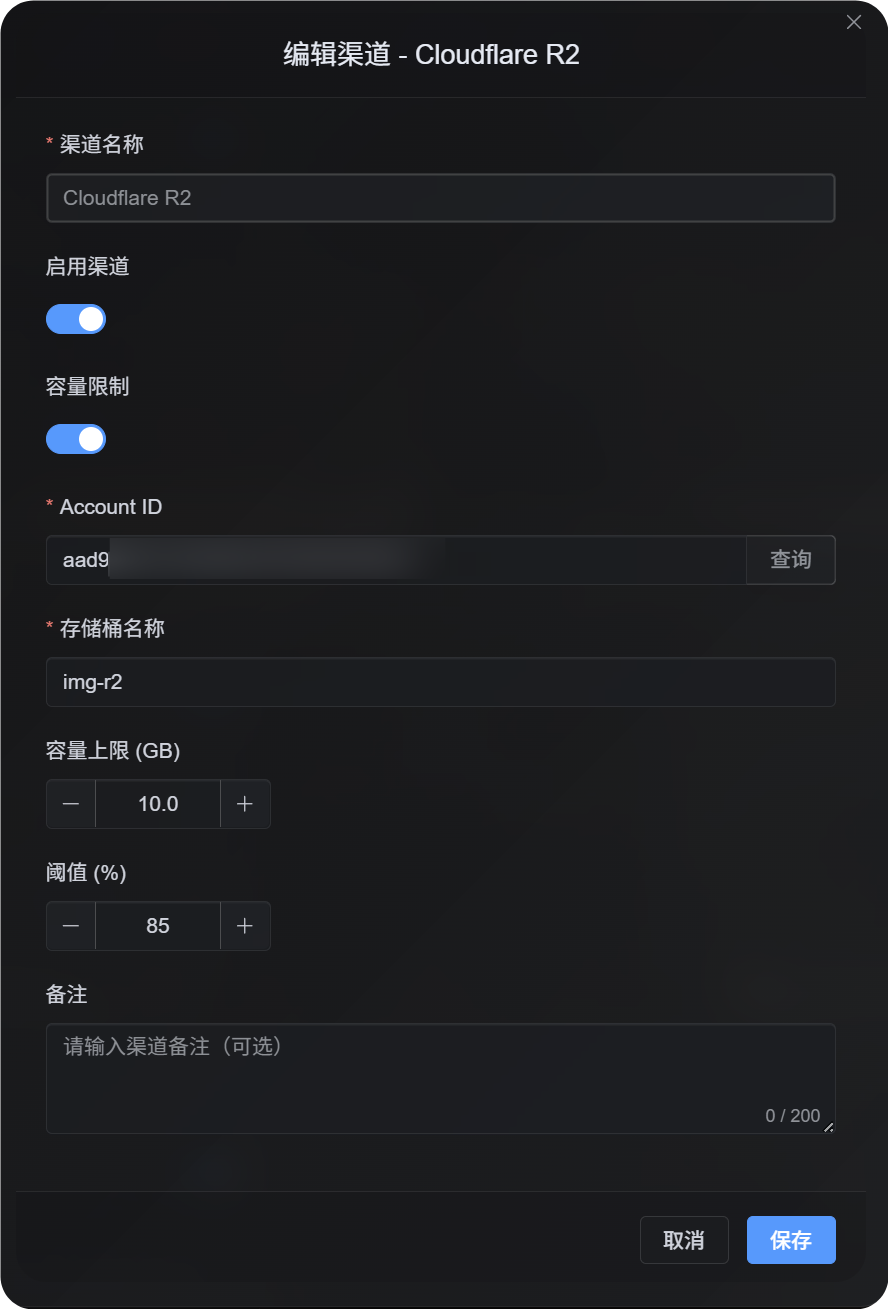
Admin Panel မှာ ပြင်လို့ရတဲ့ Fields
| Field | အသုံးပြုပုံ | Required |
|---|---|---|
| Enable channel | R2 က upload selection ထဲပါမပါထိန်းချုပ်သည်။ | Yes |
| Account ID | quota limits enabled ဖြစ်ပြီး official R2 usage query လုပ်ချင်တဲ့အခါသာသုံးသည်။ | Recommended when quota limits are enabled |
| Bucket name | quota limits enabled ဖြစ်ပြီး official R2 usage query လုပ်ချင်တဲ့အခါသာသုံးသည်။ | Recommended when quota limits are enabled |
| Quota limit | capacity အပေါ်မူတည်ပြီး R2 channel ကို upload selection ထဲပါစေမပါစေထိန်းချုပ်သည်။ | No |
| Threshold | usage က သတ်မှတ်ထားတဲ့ percentage ရောက်ပြီးနောက် ဒီ channel ထဲရေးတာရပ်စေသည်။ | Required when quota limits are enabled |
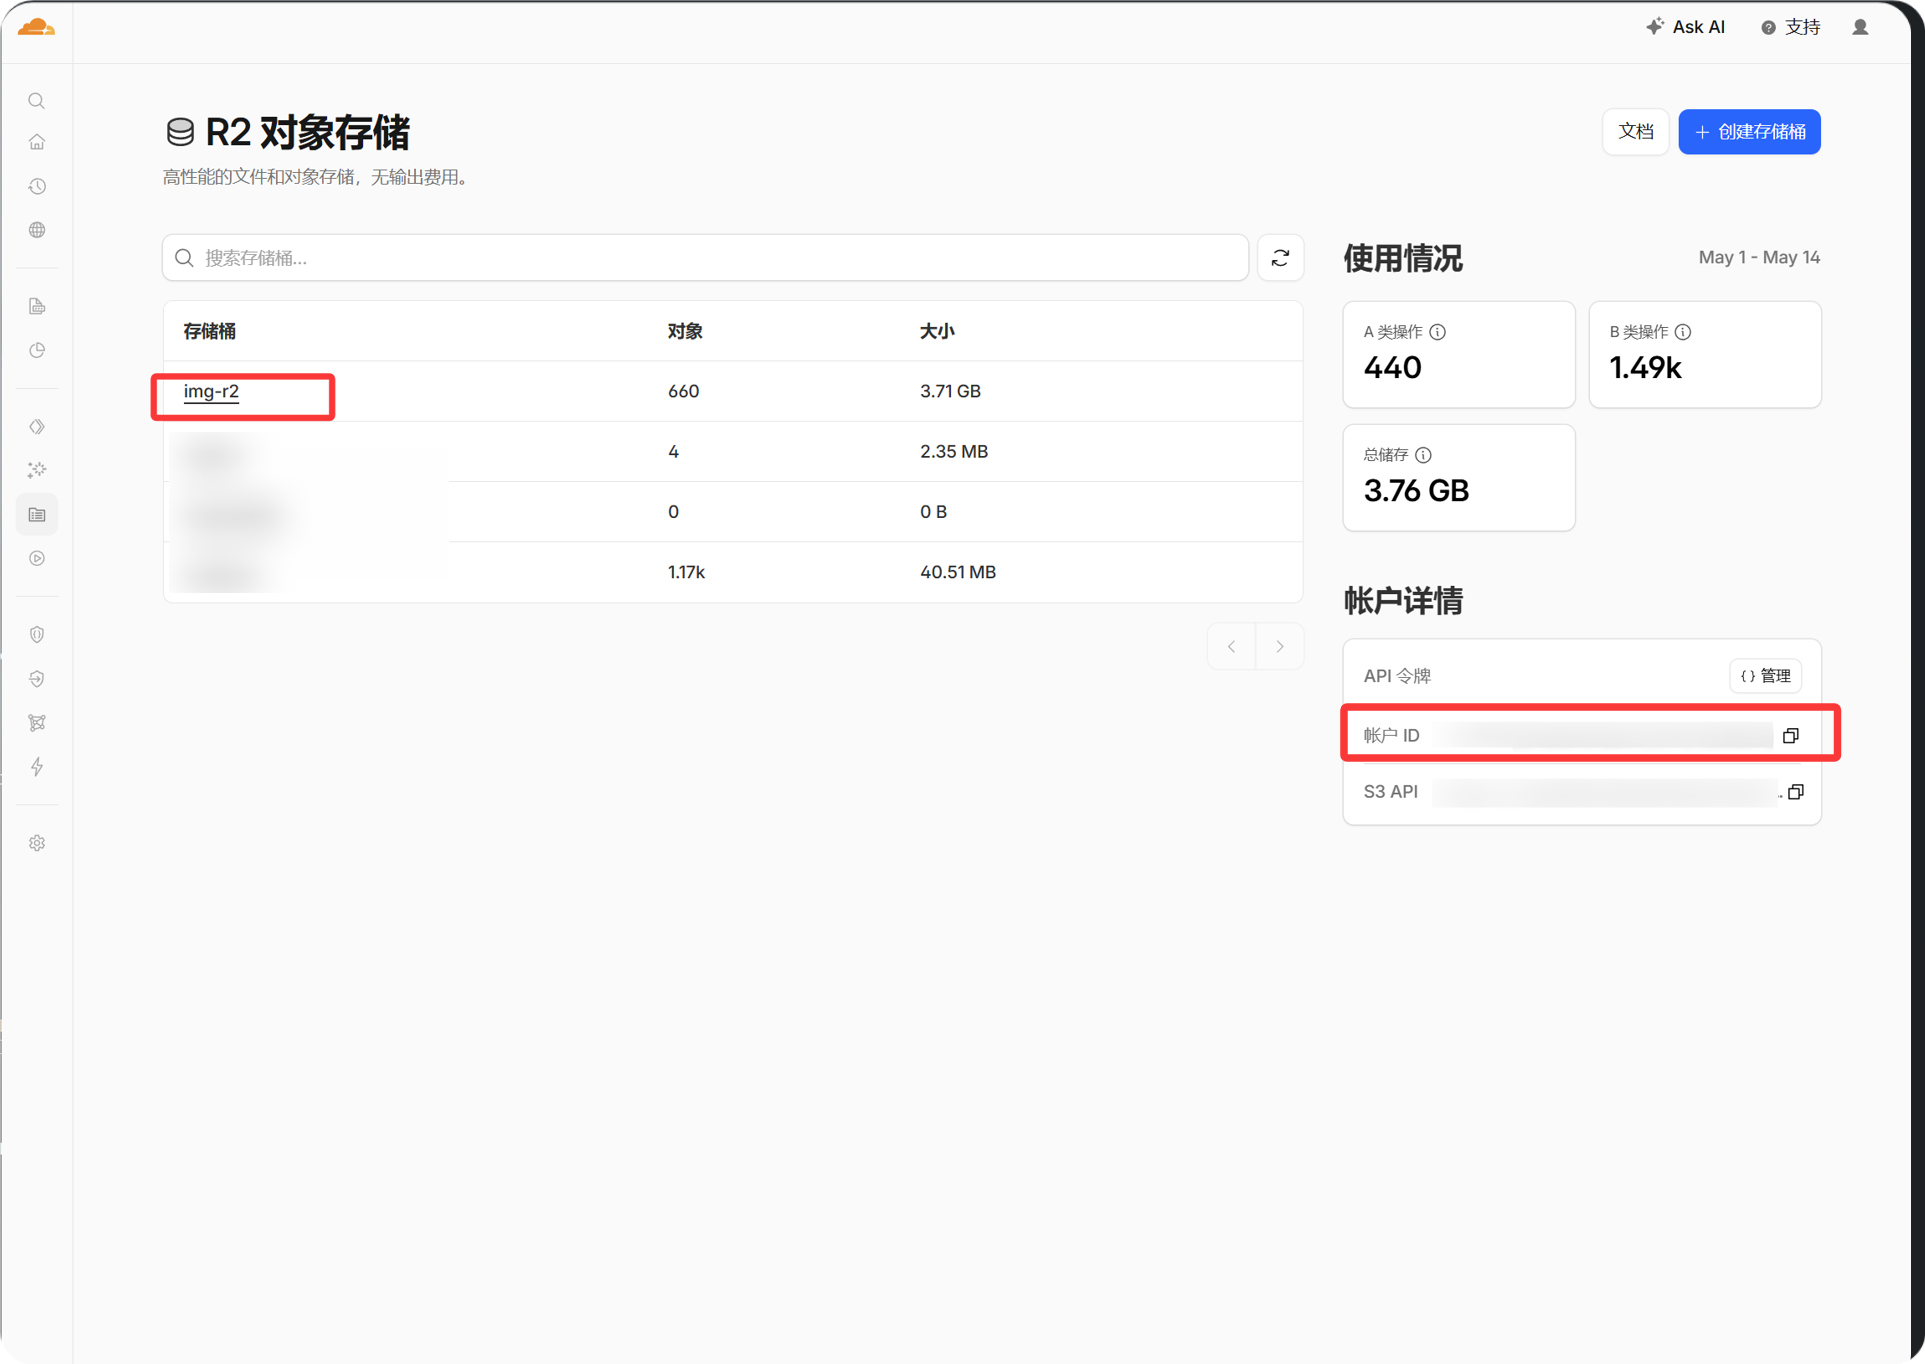
Account ID ကို Cloudflare dashboard ထဲက account information panel မှ copy လုပ်နိုင်ပါတယ်။ ImgBed က R2 quota usage ကို query/enforce လုပ်စေချင်မှသာဖြည့်ပါ။
Setup Steps
- Cloudflare မှာ R2 bucket ဖန်တီးပါ။
- ImgBed project အတွက် Cloudflare settings ကိုဖွင့်ပါ။
- R2 bucket binding ထည့်ပါ။
Variable nameကိုimg_r2လို့ထားပါ။- ဖန်တီးထားတဲ့ R2 bucket ကိုရွေးပါ။
- binding ကို save လုပ်ပြီး ImgBed ကို redeploy လုပ်ပါ။
- ImgBed -> System Settings -> Upload Settings ကိုပြန်သွားပါ။
Cloudflare R2channel ပေါ်လာပြီး enabled ဖြစ်လား confirm လုပ်ပါ။
R2 ကို capacity အပေါ်မူတည်ပြီး upload selection ထဲပါစေချင်လျှင် quota limit ကို enable လုပ်ပြီး Account ID, bucket name, quota limit, threshold တို့ကိုဖြည့်ပြီး save လုပ်ပါ။
စစ်ဆေးနည်း
- fixed
Cloudflare R2channel က Upload Settings မှာပေါ်လာရပါမယ်။ - channel card မှာ enabled ဖြစ်ကြောင်းပြရပါမယ်။
- test file သေးသေးတစ်ခု upload အောင်မြင်ပြီး returned link ဖွင့်လို့ရရပါမယ်။
- file ဖွင့်တဲ့အခါ
R2 database binding is not configuredပြရင် runtime ကimg_r2binding မရထားပါ။ Cloudflare မှာ binding name စစ်ပြီး project ကို redeploy လုပ်ပါ။