Cloudflare R2 Channel சேர்க்கவும்
எப்போது பயன்படுத்துவது
Cloudflare R2 பயன்படுத்தலாம், நீங்கள்:
- ImgBed site ஏற்கனவே Cloudflare-ல் deploy செய்து, அதே Cloudflare account-இன் R2 bucket-ல் files சேமிக்க விரும்பினால்.
- தனியாக S3 endpoint, access key, secret key அமைக்க விரும்பவில்லை என்றால்.
- Worker அல்லது Pages R2 binding மூலம் குறைந்த setup-இல் reads/writes செல்ல வேண்டும் என்றால்.
சுருக்கமாக:
R2 channel ImgBed admin panel-ல் manual ஆக உருவாக்கப்படாது. முதலில் Cloudflare project-க்கு R2 bucket bind செய்ய வேண்டும்; binding variable name கண்டிப்பாக img_r2 ஆக இருக்க வேண்டும்.
தொடங்குவதற்கு முன் தேவையானவை
- Cloudflare account.
- ஏற்கனவே உருவாக்கப்பட்ட R2 bucket.
- ImgBed deploy செய்யப்பட்ட Cloudflare project-ஐ manage செய்ய permission.
Cloudflare-ல் Configure செய்யவும்
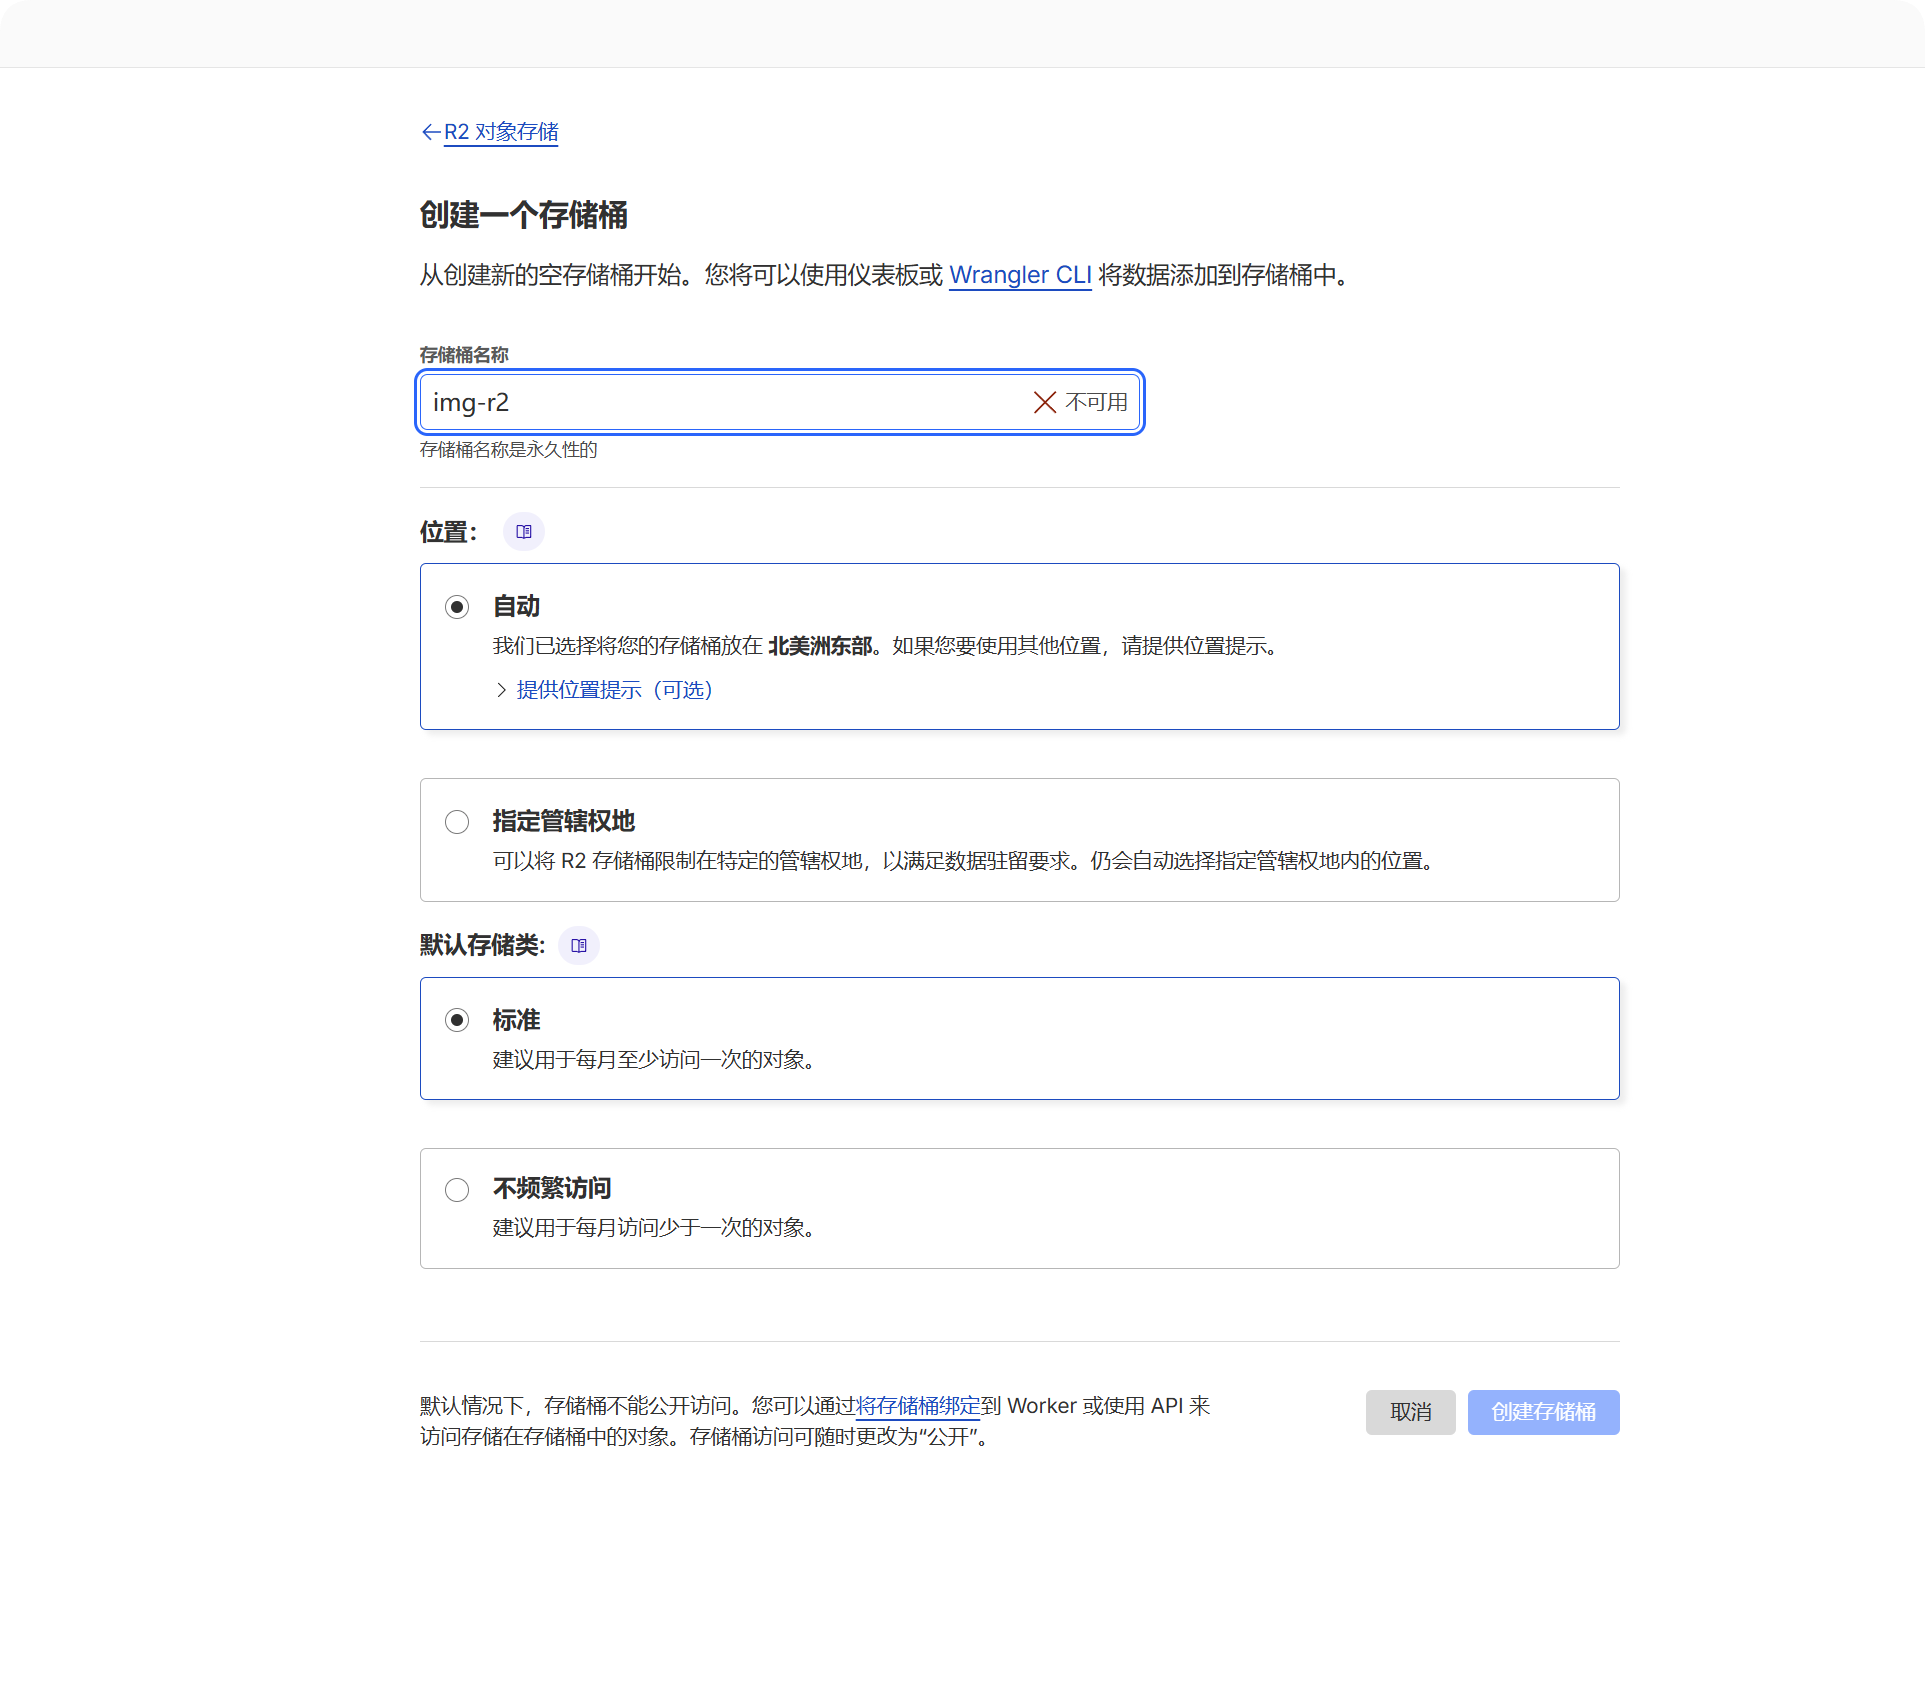
1. R2 Bucket உருவாக்கவும்
- Cloudflare Dashboard-ல் log in செய்யவும்.
R2 Object Storageதிறக்கவும்.- Create bucket கிளிக் செய்யவும்.
- bucket name தேர்வு செய்யவும், உதா.
imgbed.
uploaded files இந்த bucket-ல் சேமிக்கப்படும்.
2. Bucket-ஐ ImgBed Project-க்கு Bind செய்யவும்
deployment type அடிப்படையில் binding location தேர்வு செய்யவும்:
| Deployment Type | Binding Location |
|---|---|
| Pages | Current Pages project -> Settings -> Functions -> R2 bucket bindings |
| Worker | Current Worker -> Settings -> Bindings -> R2 bucket bindings |
binding add செய்யும் போது முக்கிய fields:
| Field | Value |
|---|---|
| Variable name | img_r2 |
| R2 bucket | நீங்கள் உருவாக்கிய bucket-ஐ தேர்வு செய்யவும். |
Variable name சரியாக img_r2 ஆகவே இருக்க வேண்டும். R2 files upload, read, delete அனைத்தும் இந்த binding name-ஐ சார்ந்தவை.
3. Project-ஐ மீண்டும் Deploy செய்யவும்
binding save செய்த பிறகு ImgBed-ஐ redeploy செய்யவும். அப்போதுதான் Worker அல்லது Pages runtime img_r2 அணுக முடியும்.
ImgBed-ல் என்ன தெரியும்
R2 binding கிடைத்த பிறகு திறக்கவும்:
- System Settings.
- Upload Settings.
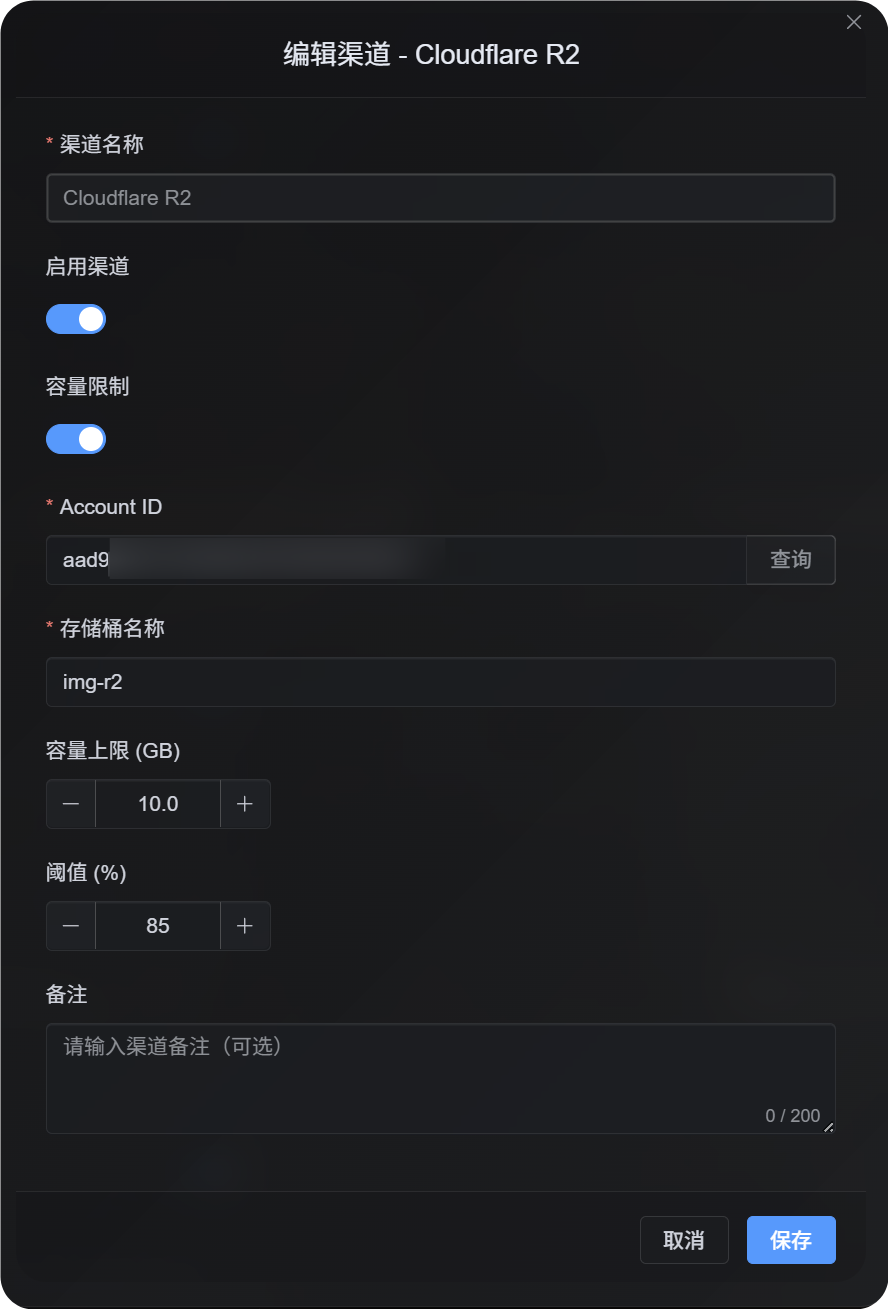
Cloudflare R2channel.
system ஒரு fixed channel-ஐ தானாக உருவாக்கும்:
| Field | Fixed Value |
|---|---|
| Channel name | Cloudflare R2 |
| Channel type | cfr2 |
| Storage mode | binding |
| Configuration source | Environment binding |
இது fixed binding channel. இதை உருவாக்க Add Channel கிளிக் செய்ய வேண்டியதில்லை; regular channel போல delete செய்யவும் முடியாது.
Admin Panel-ல் திருத்தக்கூடிய Fields
| Field | பயன்பாடு | Required |
|---|---|---|
| Enable channel | R2 upload selection-ல் பங்கேற்க வேண்டுமா என்பதை கட்டுப்படுத்தும். | Yes |
| Account ID | quota limits enabled ஆகும் போது official R2 usage query செய்ய மட்டும். | Recommended when quota limits are enabled |
| Bucket name | quota limits enabled ஆகும் போது official R2 usage query செய்ய மட்டும். | Recommended when quota limits are enabled |
| Quota limit | capacity அடிப்படையில் இந்த R2 channel upload selection-ல் பங்கேற்க வேண்டுமா என்பதை கட்டுப்படுத்தும். | No |
| Threshold | usage குறிப்பிட்ட percentage அடைந்த பிறகு இந்த channel-ல் write செய்வதை நிறுத்தும். | Required when quota limits are enabled |
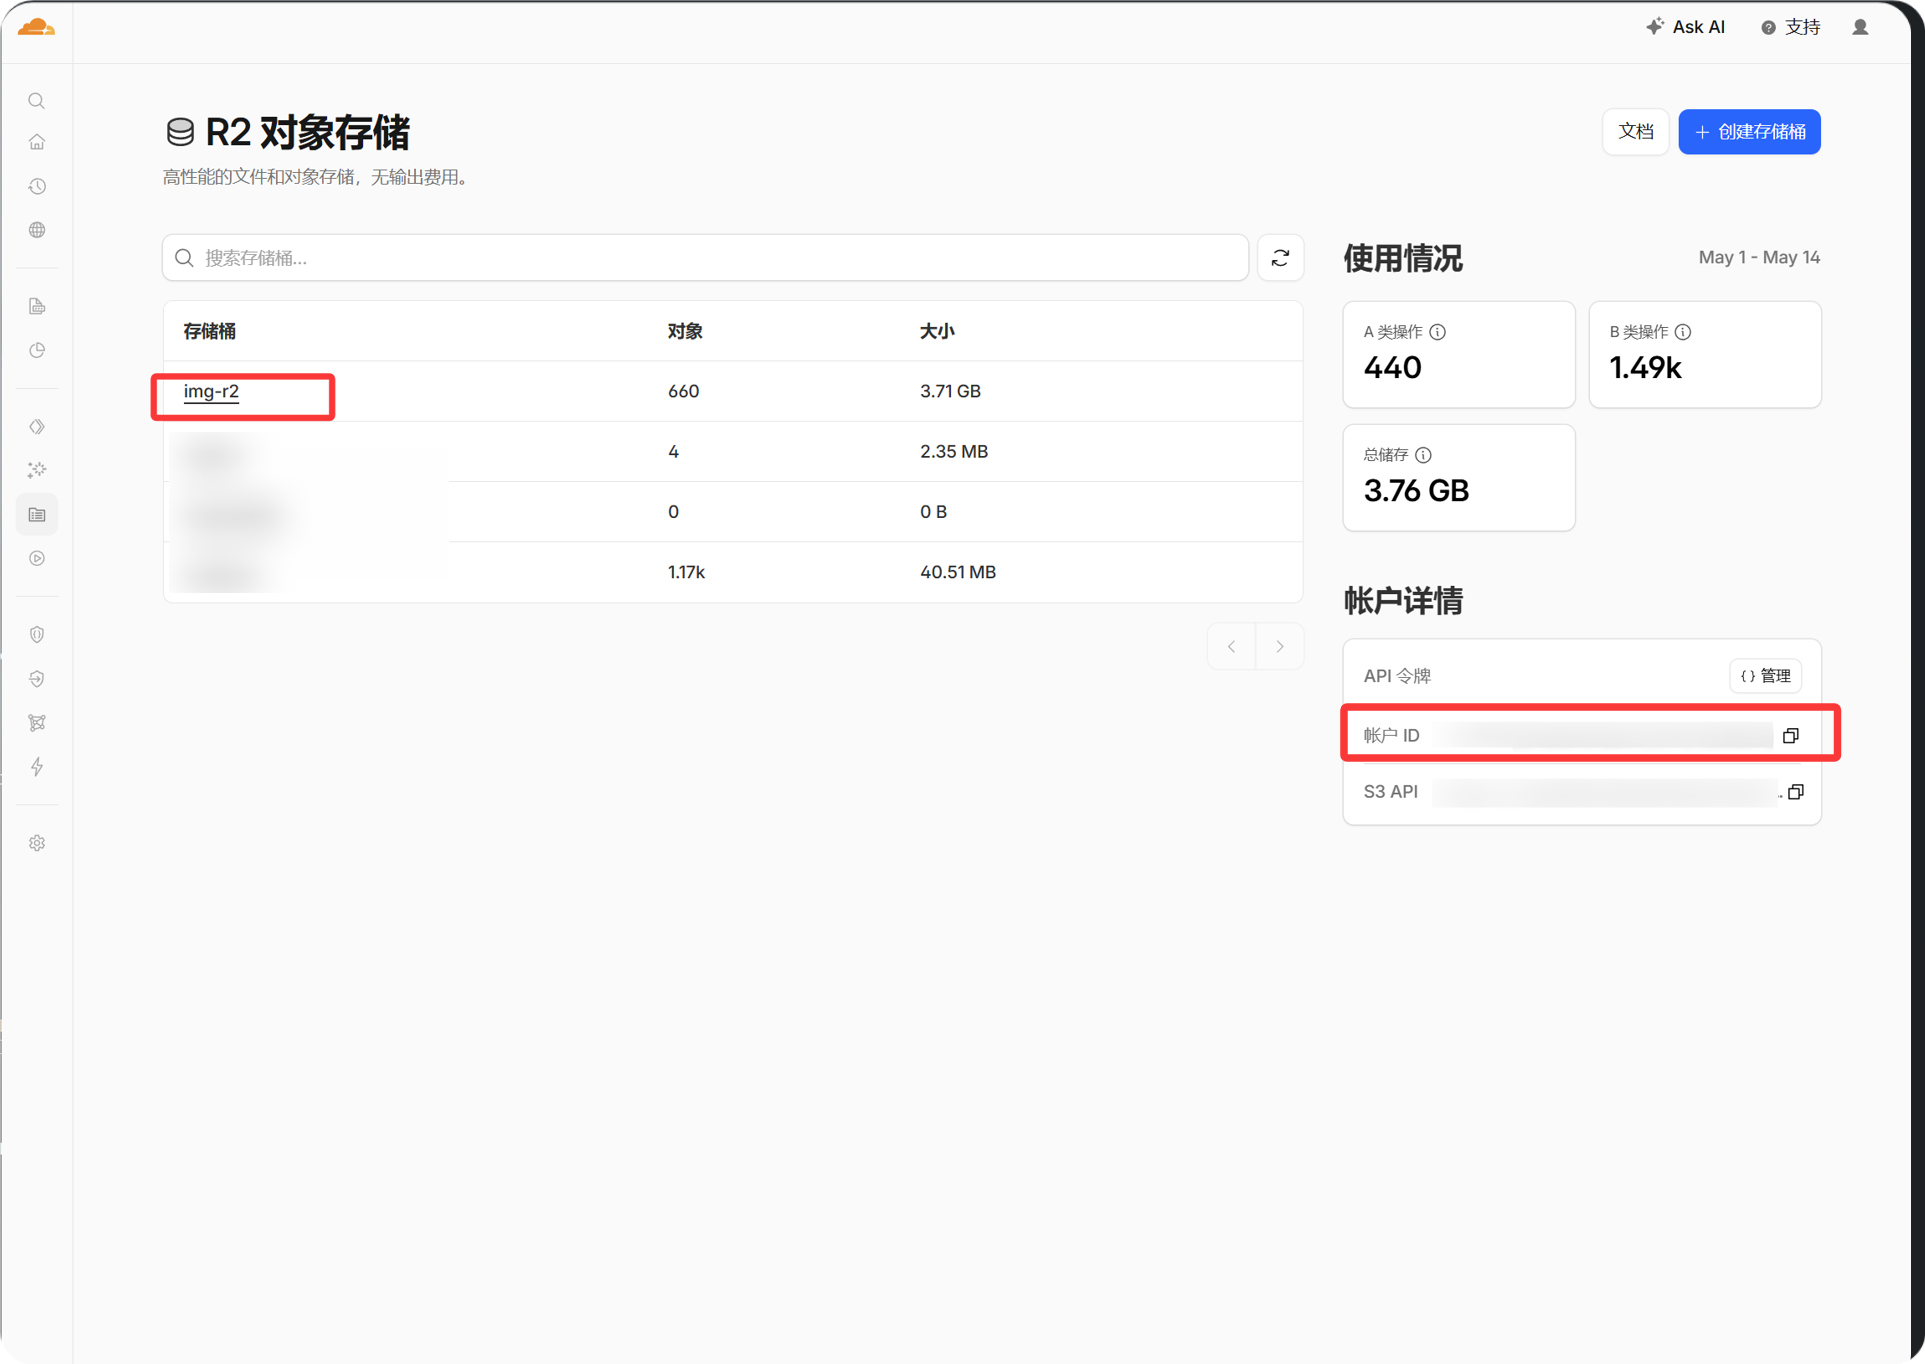
Cloudflare dashboard-ல் account information panel-இல் இருந்து Account ID copy செய்யலாம். ImgBed R2 quota usage query/enforce செய்ய வேண்டும் என்றால் மட்டும் நிரப்பவும்.
Setup Steps
- Cloudflare-ல் R2 bucket உருவாக்கவும்.
- ImgBed project-க்கான Cloudflare settings திறக்கவும்.
- R2 bucket binding add செய்யவும்.
Variable name-ஐimg_r2ஆக அமைக்கவும்.- உருவாக்கிய R2 bucket தேர்வு செய்யவும்.
- binding save செய்து ImgBed redeploy செய்யவும்.
- ImgBed -> System Settings -> Upload Settings-க்கு திரும்பவும்.
Cloudflare R2channel தெரிகிறதா, enabled ஆக உள்ளதா பார்க்கவும்.
capacity அடிப்படையில் R2 upload selection-ல் பங்கேற்க வேண்டும் என்றால் quota limit enable செய்து Account ID, bucket name, quota limit, threshold நிரப்பி save செய்யவும்.
Verify செய்வது
- fixed
Cloudflare R2channel Upload Settings-ல் தெரியும். - channel card enabled என காட்டும்.
- சிறிய test file upload ஆகி returned link திறக்கும்.
- file திறக்கும் போது
R2 database binding is not configuredவந்தால் runtime-க்குimg_r2binding கிடைக்கவில்லை. Cloudflare-ல் binding name சரிபார்த்து project redeploy செய்யவும்.