Discord Channel சேர்க்கவும்
தொடங்குவதற்கு முன் தேவையானவை
| தேவை | பயன்பாடு |
|---|---|
| Discord account | server, channel, developer application உருவாக்க |
| Discord server | bot channel அணுகுவதற்கு முன் server-ல் join ஆக வேண்டும் |
| Text channel | images மற்றும் files இந்த channel-க்கு அனுப்பப்படும் |
| Discord Developer Portal | application, bot உருவாக்கி Bot Token பெற |
எங்கு சேர்ப்பது
- System Settings திறக்கவும்.
- Upload Settings-க்கு செல்லவும்.
- மேல் வலது மூலையில் Add Channel கிளிக் செய்யவும்.
Discordதேர்வு செய்யவும்.
Field Reference
| Field | பயன்பாடு | Required |
|---|---|---|
| Channel name | இந்த channel-க்கு பெயர், உதா. Discord Primary. | Required |
| Bot Token | Discord bot token. | Required |
| Channel ID | target text channel ID. | Required |
| Proxy URL (optional) | Discord CDN access unstable என்றால் மட்டும். https:// உடன் full URL. | Optional |
Setup Steps
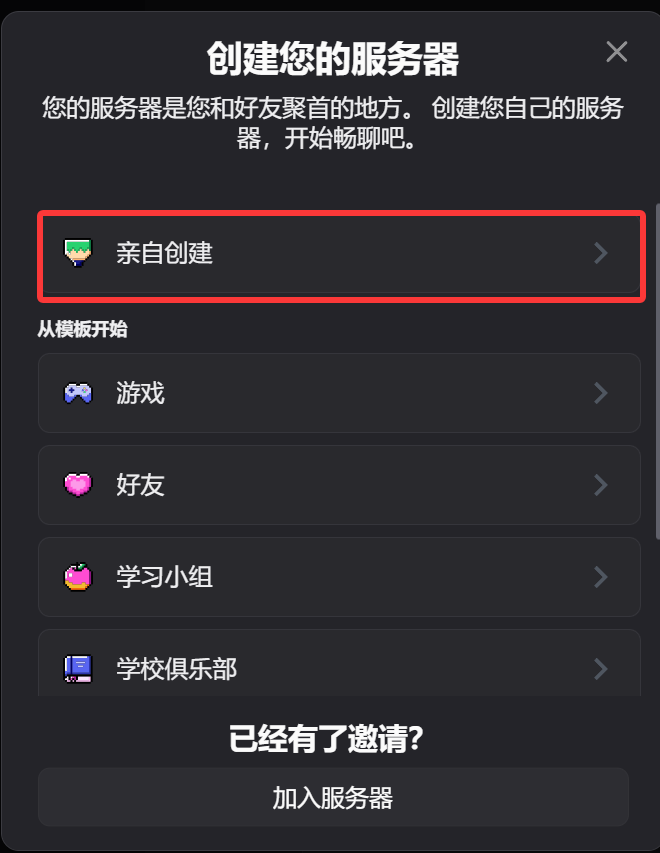
1. Discord Server மற்றும் Text Channel உருவாக்கவும்
- Discord திறக்கவும்.
- புதிய server உருவாக்கவும், அல்லது உங்களுடைய existing server பயன்படுத்தவும்.
- அந்த server-ல் text channel உருவாக்கவும்.
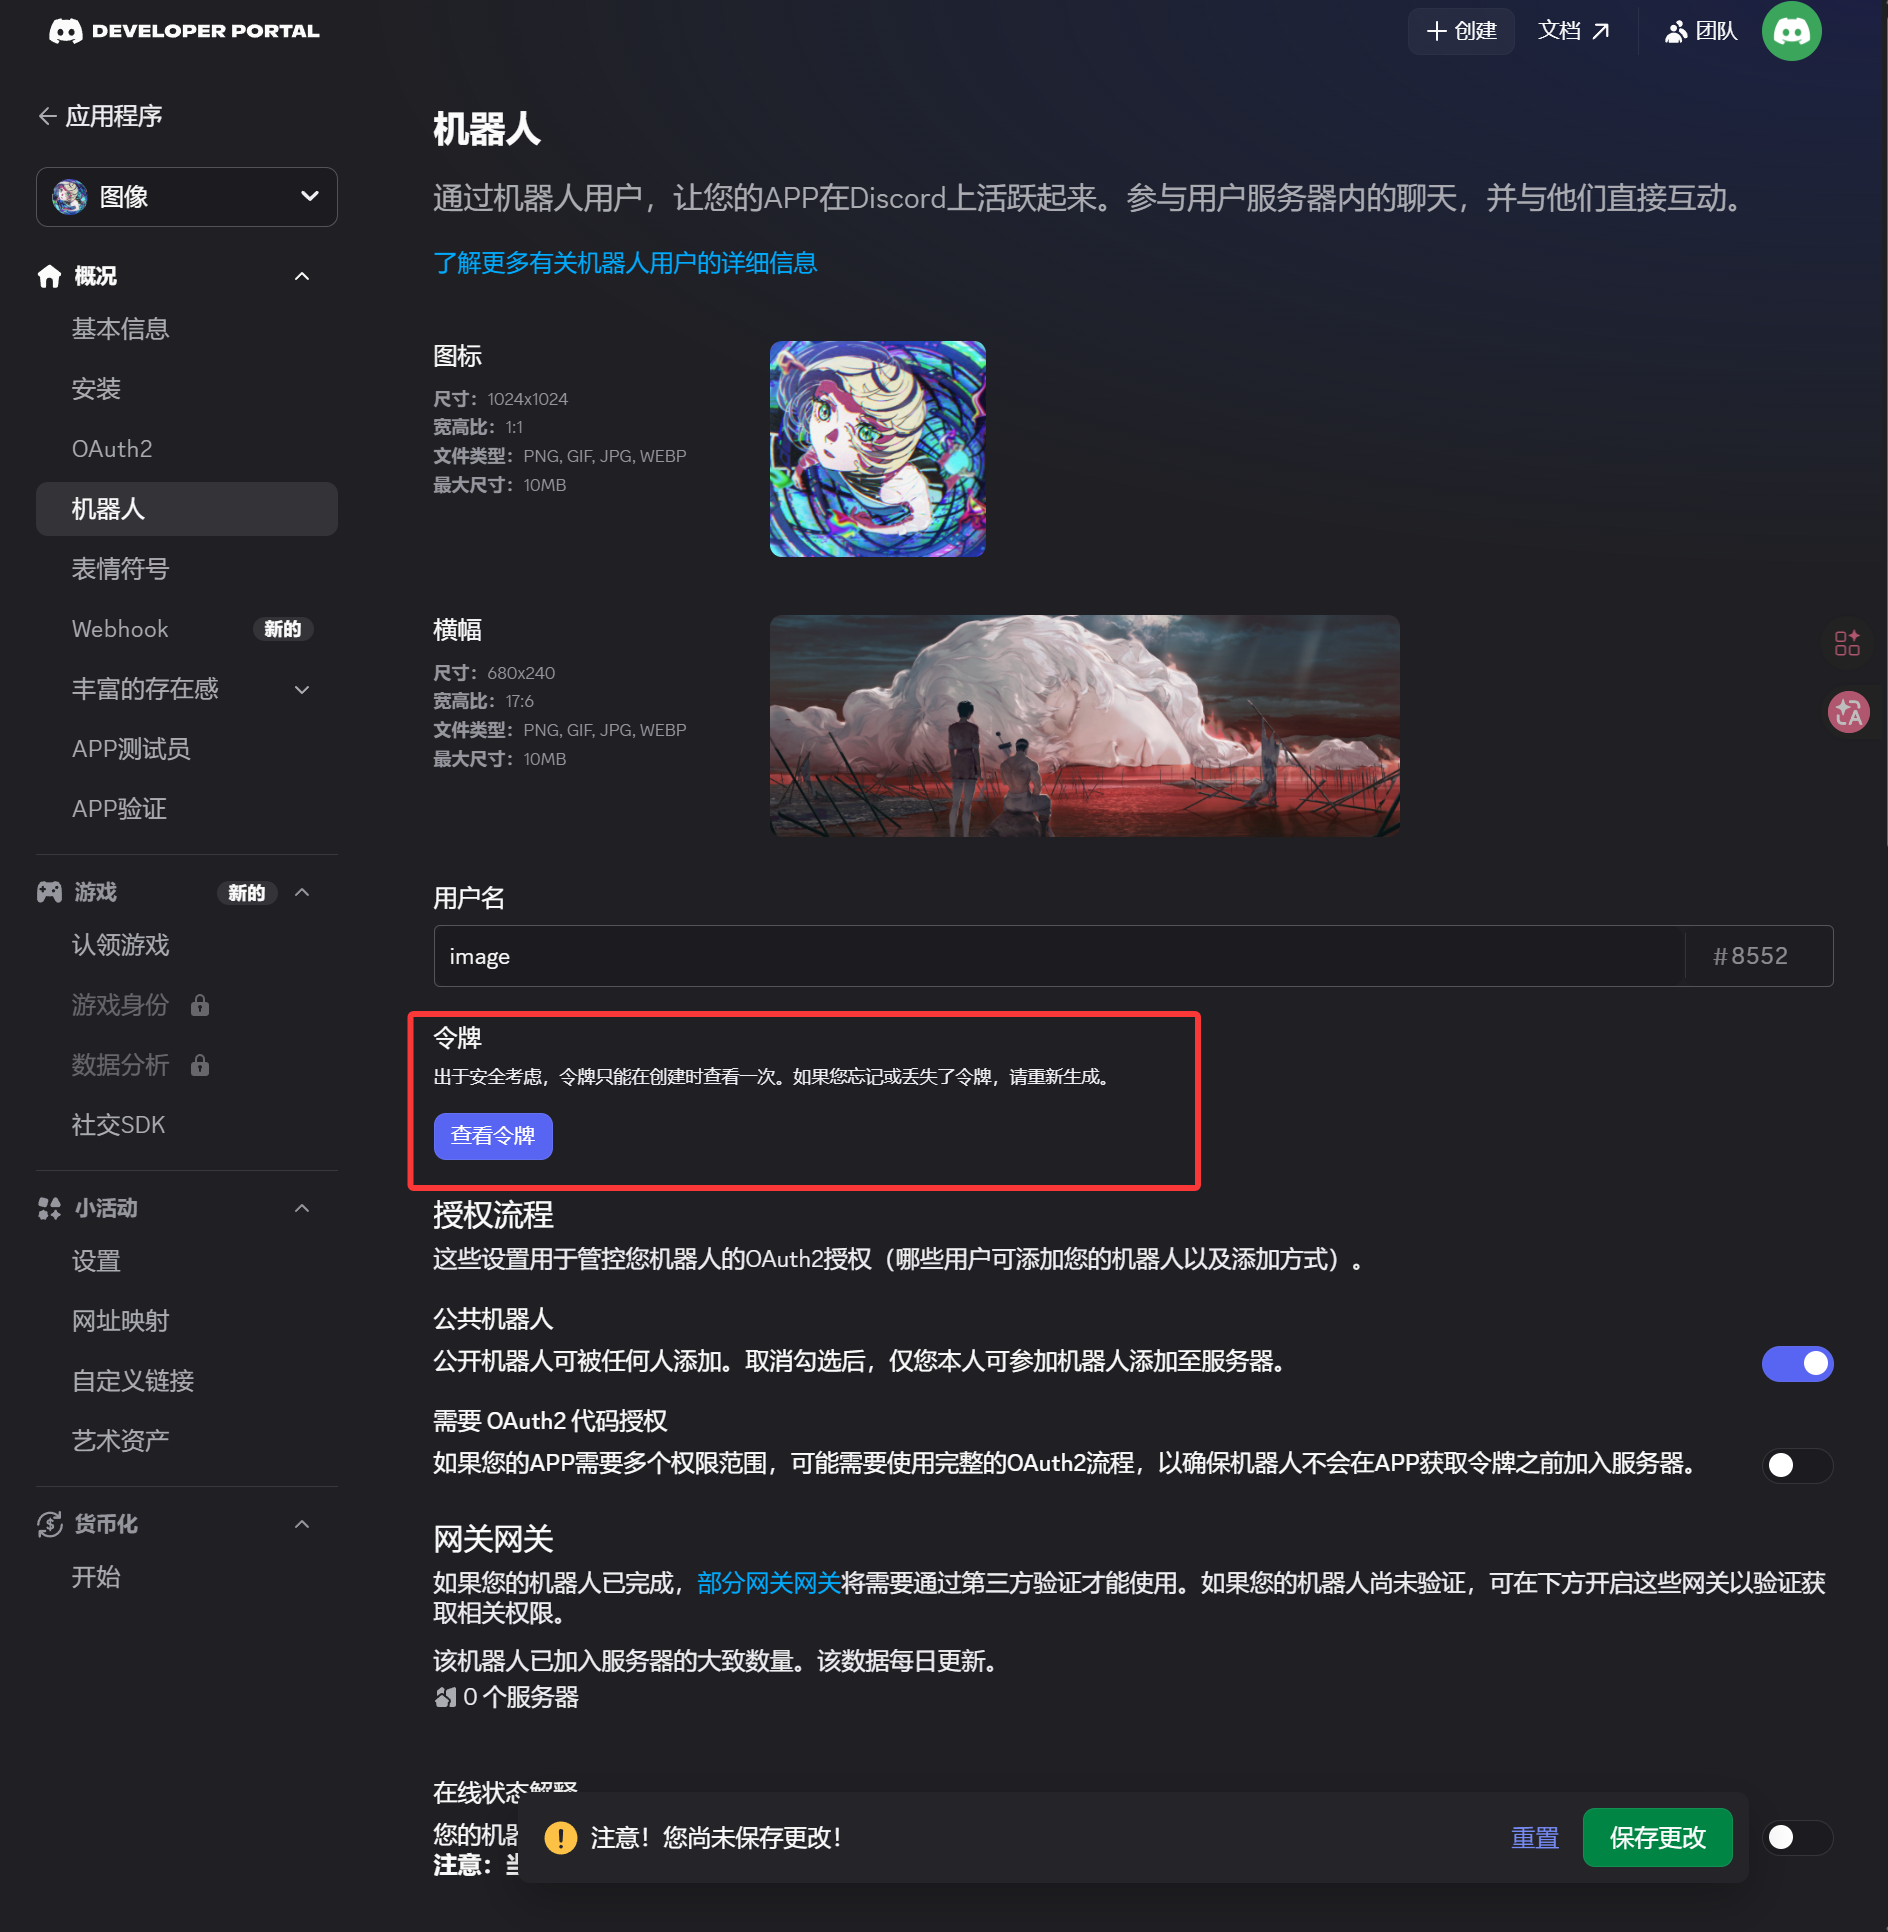
2. Discord Developer Portal-ல் Bot உருவாக்கவும்
- Discord Developer Portal திறக்கவும்:
https://discord.com/developers/applications New Applicationகிளிக் செய்யவும்.- application name உள்ளிட்டு create செய்யவும்.
- left sidebar-ல்
Botpage திறக்கவும். Botpage-ல் token generate அல்லது reset செய்யவும்.- token சேமிக்கவும்.
இந்த token தான் ImgBed-ல் Bot Token.
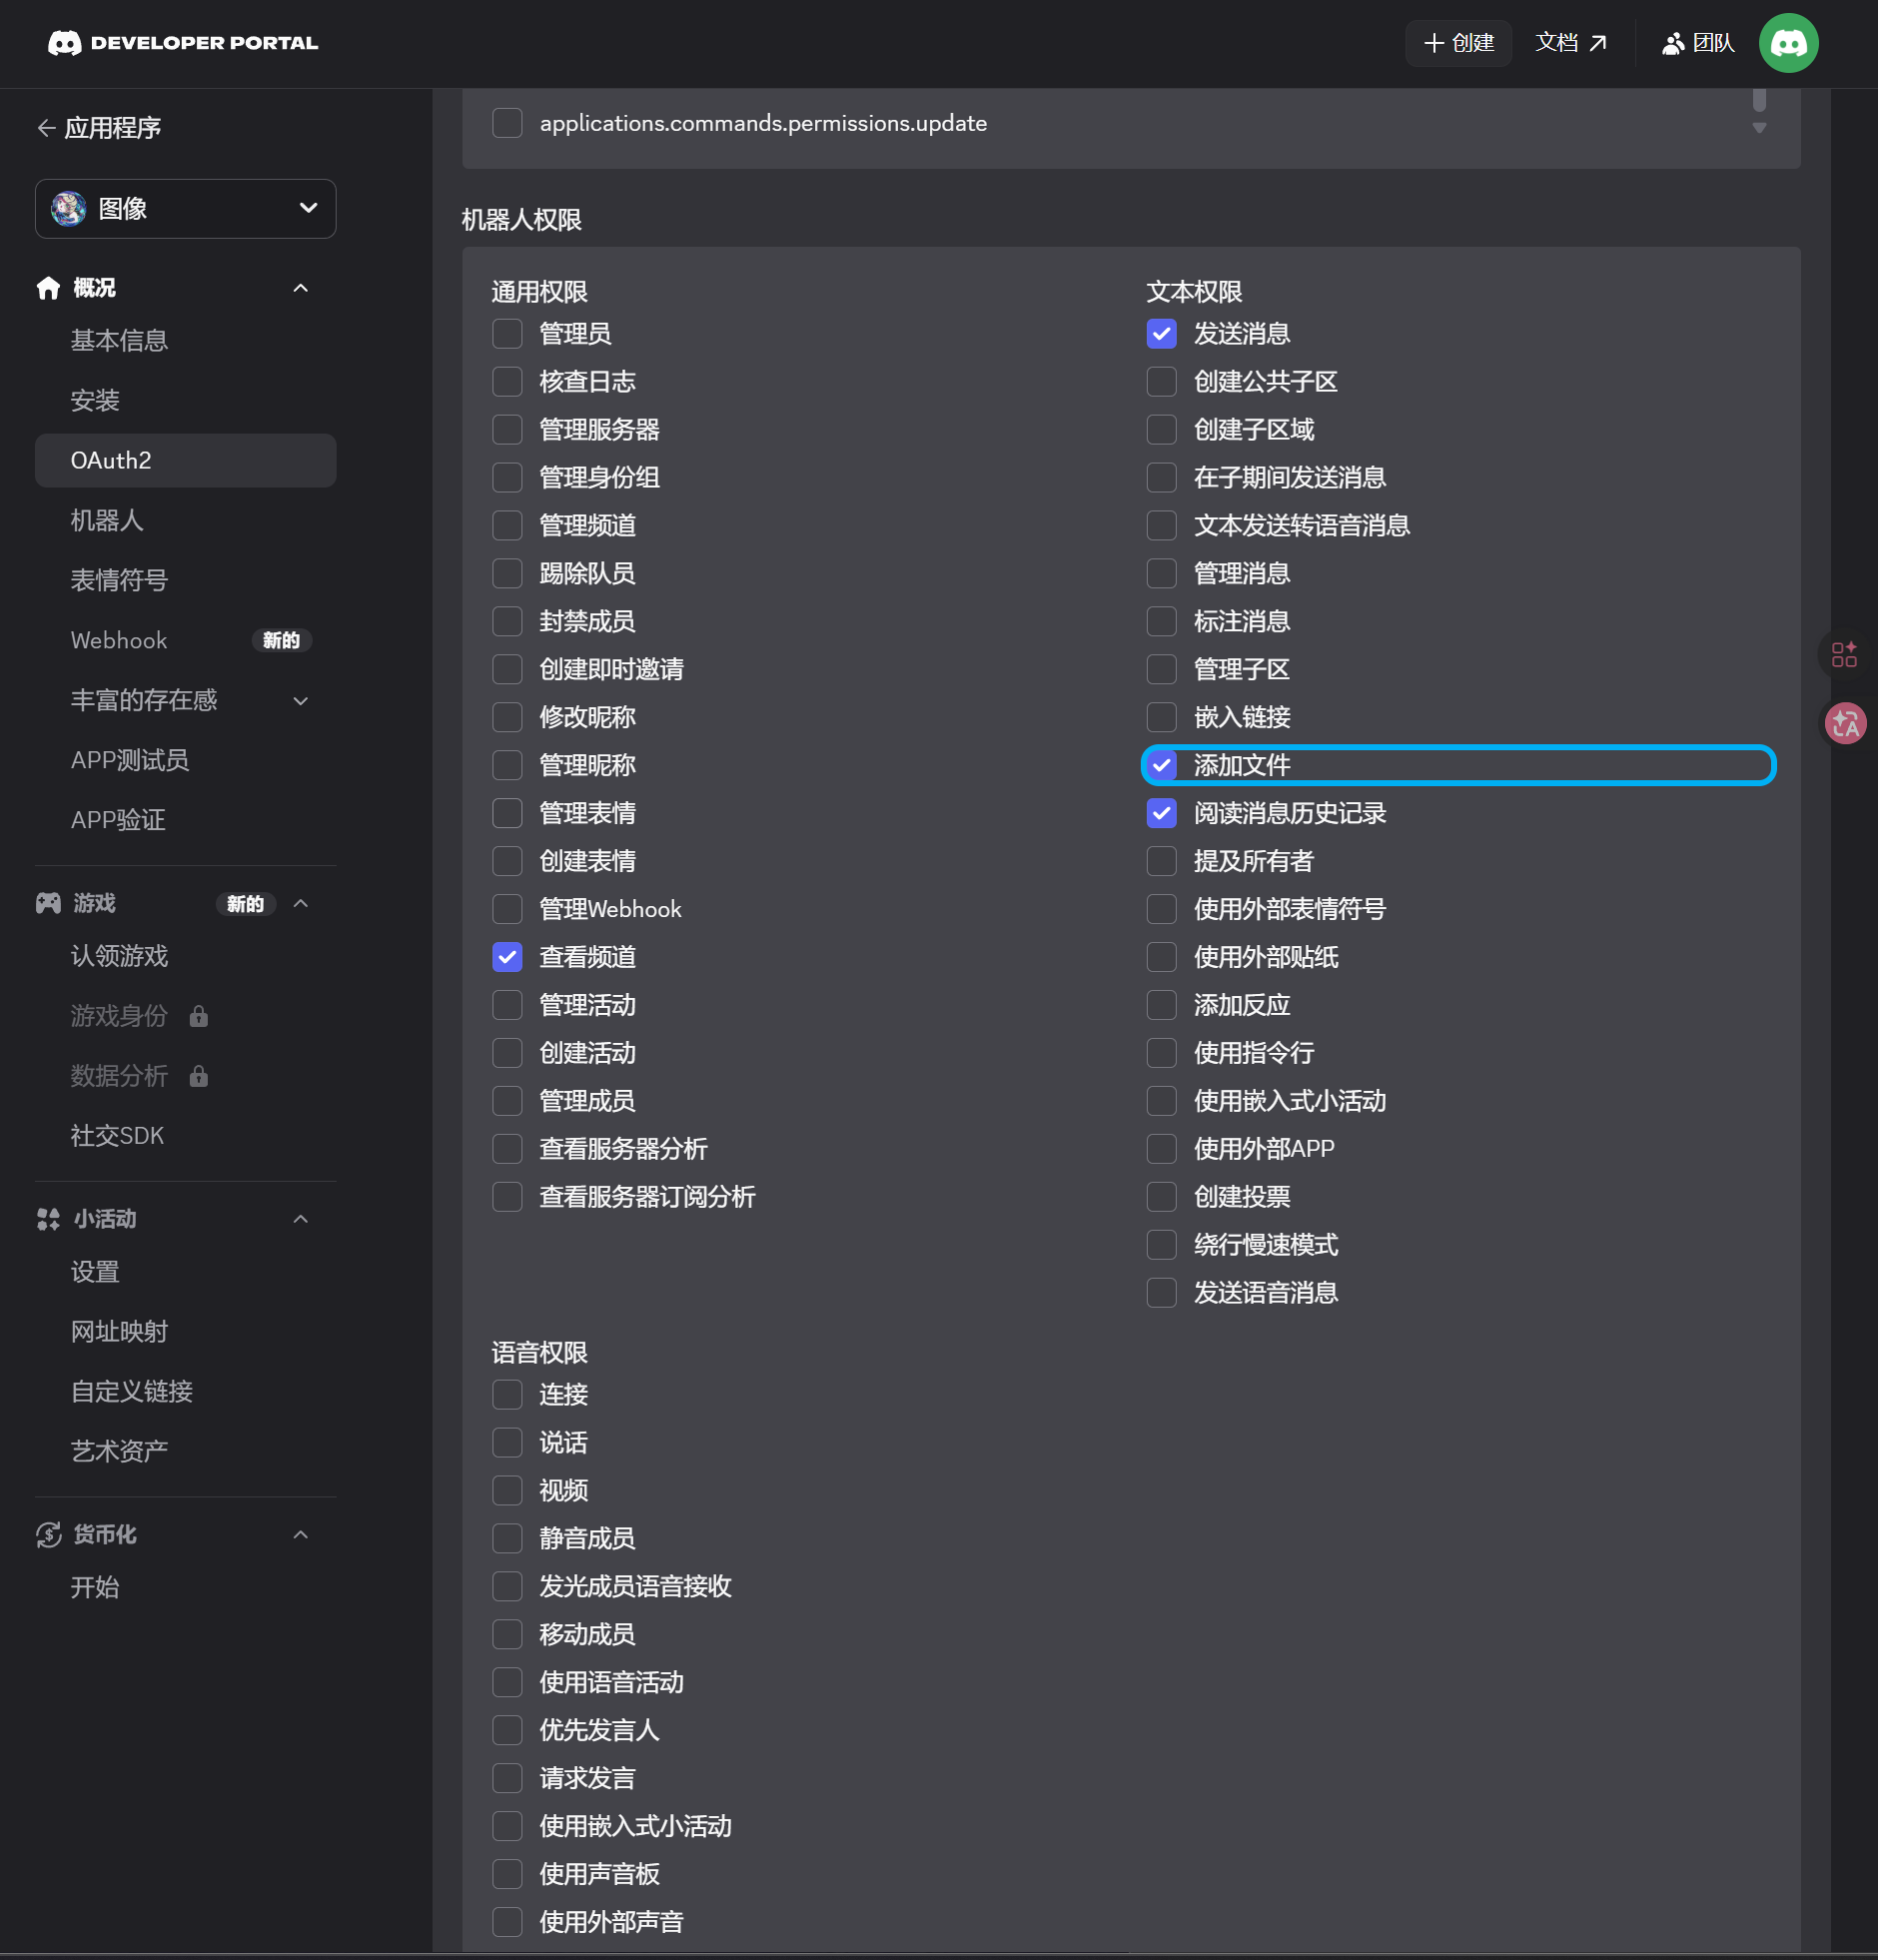
3. OAuth2 Invite Link உருவாக்கி Bot Install செய்யவும்
- left sidebar-ல்
OAuth2page திறக்கவும். - scopes பகுதியில்
botதேர்வு செய்யவும். - permission area-ல் இவற்றை enable செய்யவும்:
| Permission | Required |
|---|---|
| View Channels | Yes |
| Send Messages | Yes |
| Attach Files | Yes |
| Read Message History | Yes |
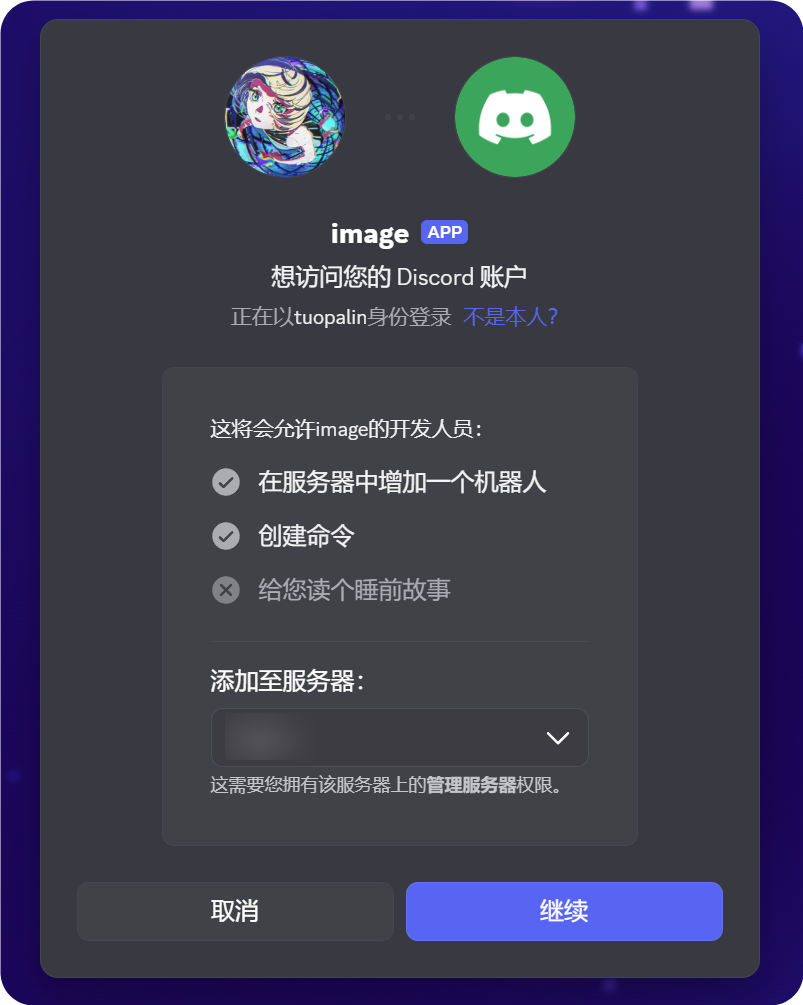
- page கீழே integration type
Guild Installஎன்பதைக் confirm செய்யவும். - generated URL copy செய்யவும்.
- browser-ல் அந்த URL திறக்கவும்.
- target server தேர்வு செய்யவும்.
- authorization flow முடிக்கவும்.
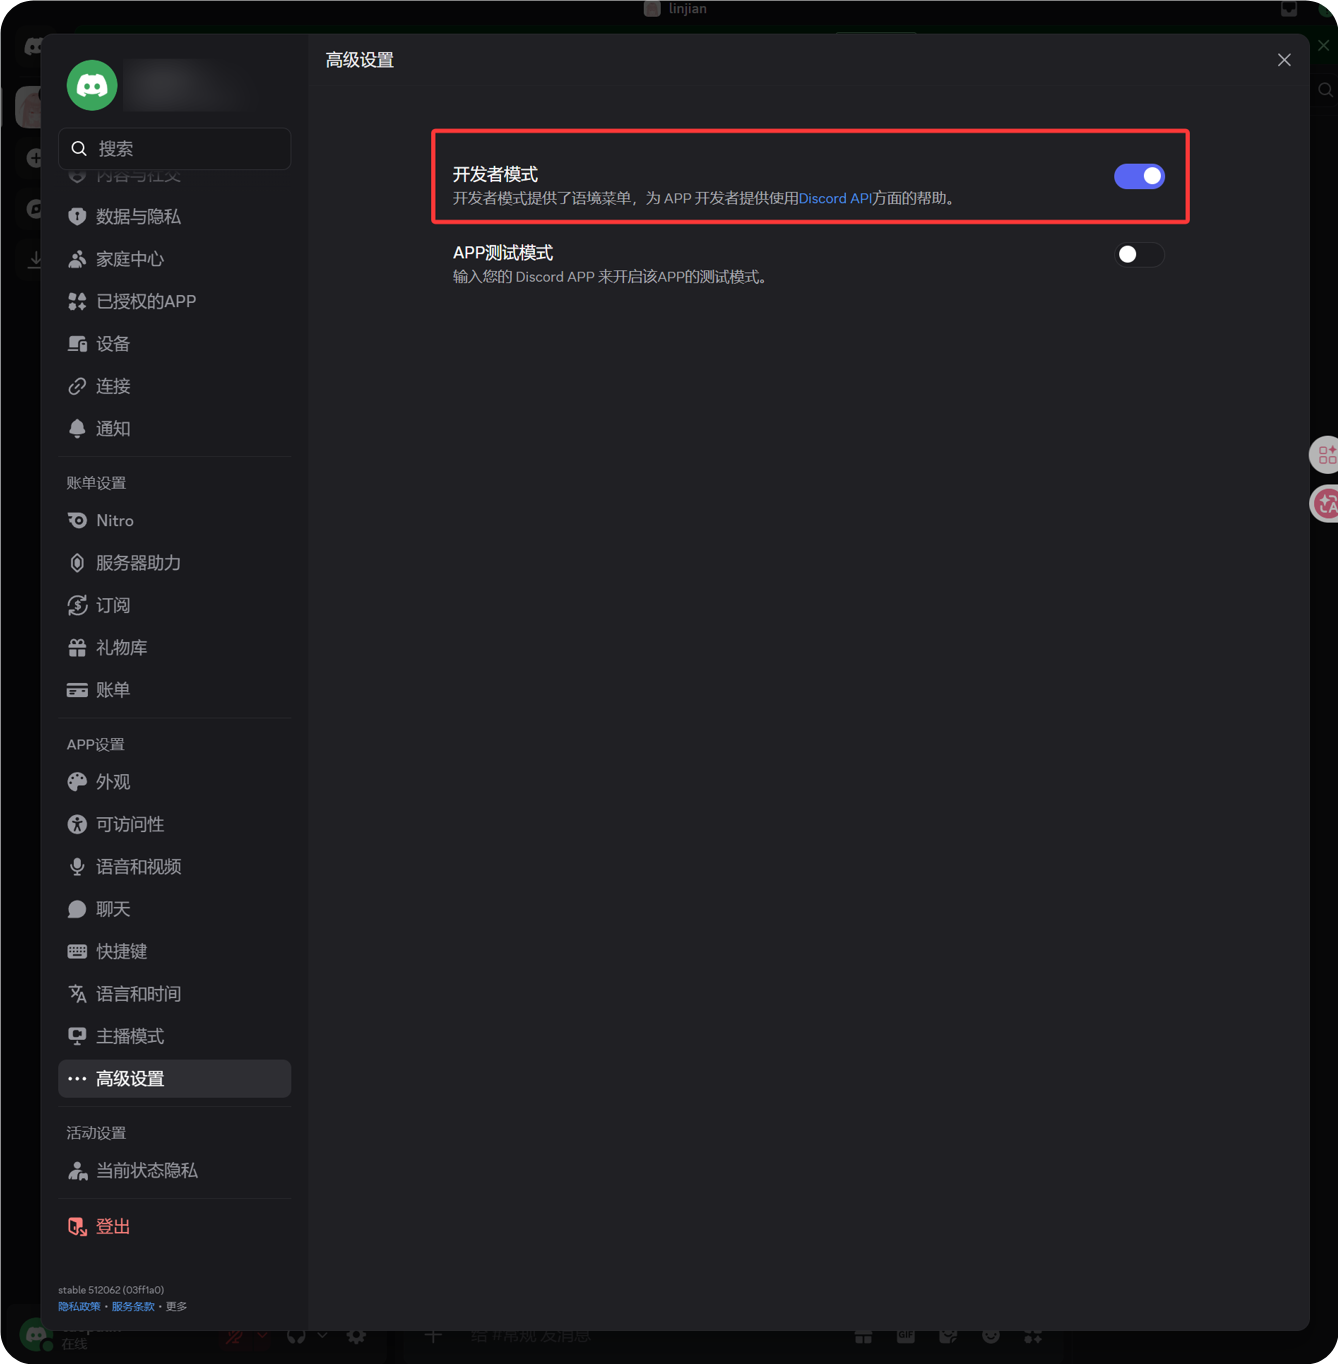
4. Developer Mode Enable செய்து Channel ID Copy செய்யவும்
- Discord கீழ் இடது பகுதியில் avatar அருகிலுள்ள gear icon கிளிக் செய்யவும்.
- left sidebar-ல் Advanced திறக்கவும்.
- Developer Mode enable செய்யவும்.
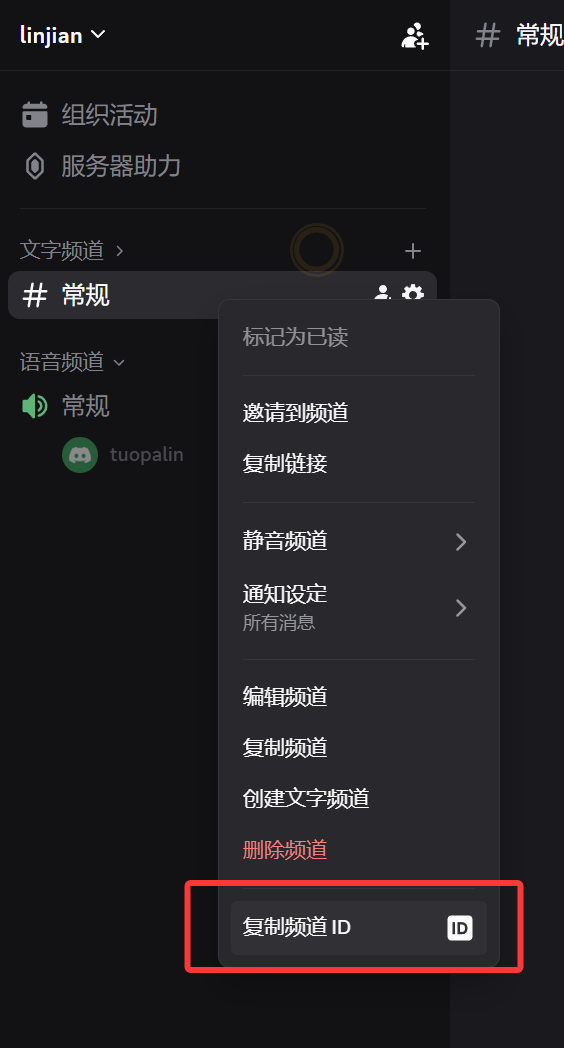
- target text channel-க்கு திரும்பவும்.
- channel name மீது right-click செய்யவும்.
- Copy Channel ID கிளிக் செய்யவும்.
copy செய்யப்பட்ட number தான் ImgBed-க்கு தேவையான Channel ID.
5. ImgBed-ல் Discord Channel நிரப்பவும்
configuration dialog-க்கு திரும்பி:
| UI Field | Value |
|---|---|
| Channel name | custom channel name, உதா. DiscordPrimary. |
| Bot Token | Discord Developer Portal Bot page-ல் சேமித்த token. |
| Channel ID | Discord-ல் copy செய்த channel ID. |
| Proxy URL (optional) | தேவைப்பட்டால் மட்டும், உதா. https://your-proxy.example.com. |
முடிந்ததும் Save கிளிக் செய்யவும்.

Verify செய்வது
| Check | சரிபார்ப்பு |
|---|---|
| Channel card appears | Save செய்த பிறகு Discord channel card தெரியும். |
| Channel can be enabled | Active switch on ஆக இருக்கும். |
| Configuration is saved | detail view-ல் Bot Token மற்றும் Channel ID saved என தெரியும். |
| Upload works | test image upload செய்து target Discord text channel-ல் வந்ததா பார்க்கவும். |
Quick Checklist
text
Discord server உருவாக்கவும்
-> text channel உருவாக்கவும்
-> Discord Developer Portal-ல் bot உருவாக்கவும்
-> Bot page-ல் Bot Token சேமிக்கவும்
-> OAuth2-ல் bot, View Channels, Send Messages, Attach Files, Read Message History தேர்வு செய்யவும்
-> generated URL copy செய்து target server-க்கு bot authorize செய்யவும்
-> target text channel permissions சரியா பார்க்கவும்
-> Developer Mode enable செய்யவும்
-> target text channel-ல் right-click செய்து Channel ID copy செய்யவும்
-> ImgBed-ல் Bot Token மற்றும் Channel ID நிரப்பவும்
-> Save செய்து test image upload செய்யவும்
References
- Discord Developers Getting Started: https://docs.discord.com/developers/quick-start/getting-started
- Discord Help - Where can I find my User/Server/Message ID: https://support.discord.com/hc/en-us/articles/206346498-Where-can-I-find-my-User-Server-Message-ID