Discord Channel شامل کریں
شروع کرنے سے پہلے کیا چاہیے
| ضرورت | مقصد |
|---|---|
| Discord account | server، channel، اور developer application بنانے کے لیے۔ |
| Discord server | bot کو channel تک access سے پہلے server join کرنا ہوگا۔ |
| Text channel | images اور files اسی channel میں بھیجی جائیں گی۔ |
| Discord Developer Portal | application بنانے، bot بنانے، اور Bot Token لینے کے لیے۔ |
کہاں شامل کریں
- سسٹم سیٹنگز کھولیں۔
- اپ لوڈ سیٹنگز میں جائیں۔
- اوپر دائیں طرف چینل شامل کریں پر کلک کریں۔
Discordمنتخب کریں۔
فیلڈز کی تفصیل
| فیلڈ | کام | ضروری |
|---|---|---|
| Channel name | اس channel کا واضح نام، مثلاً "Discord Primary"۔ | ضروری |
| Bot Token | Discord bot token۔ | ضروری |
| Channel ID | target text channel کی ID۔ | ضروری |
| Proxy URL (اختیاری) | صرف اس وقت استعمال کریں جب Discord CDN access unstable ہو۔ مکمل URL درج کریں، https:// سمیت۔ | اختیاری |
سیٹ اپ کے مراحل
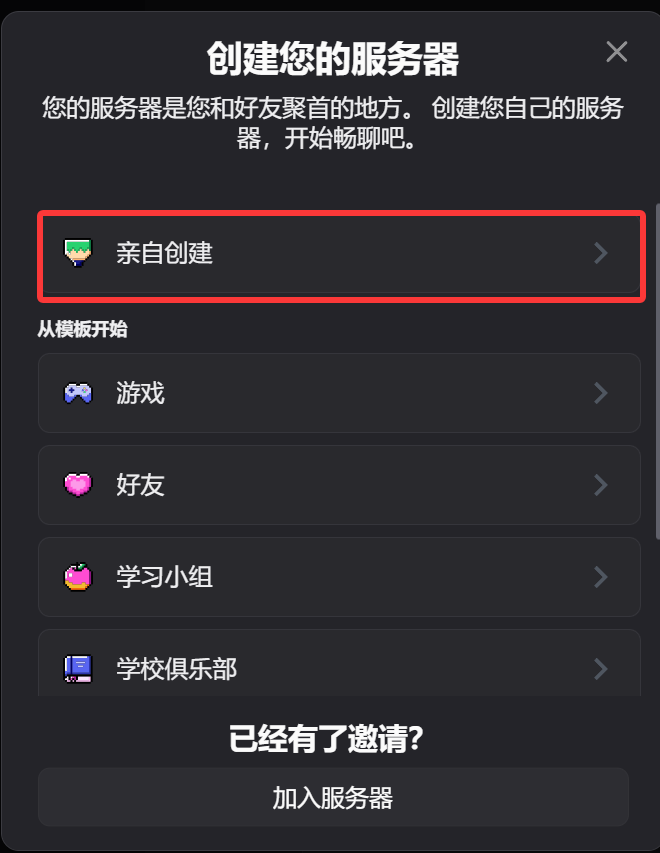
1. Discord Server اور Text Channel بنائیں
- Discord کھولیں۔
- نیا server بنائیں، یا اپنی ownership والا موجودہ server استعمال کریں۔
- اسی server میں text channel بنائیں۔
2. Discord Developer Portal میں Bot بنائیں
- Discord Developer Portal کھولیں:
https://discord.com/developers/applications New Applicationپر کلک کریں۔- application کا نام درج کریں اور بنائیں کریں۔
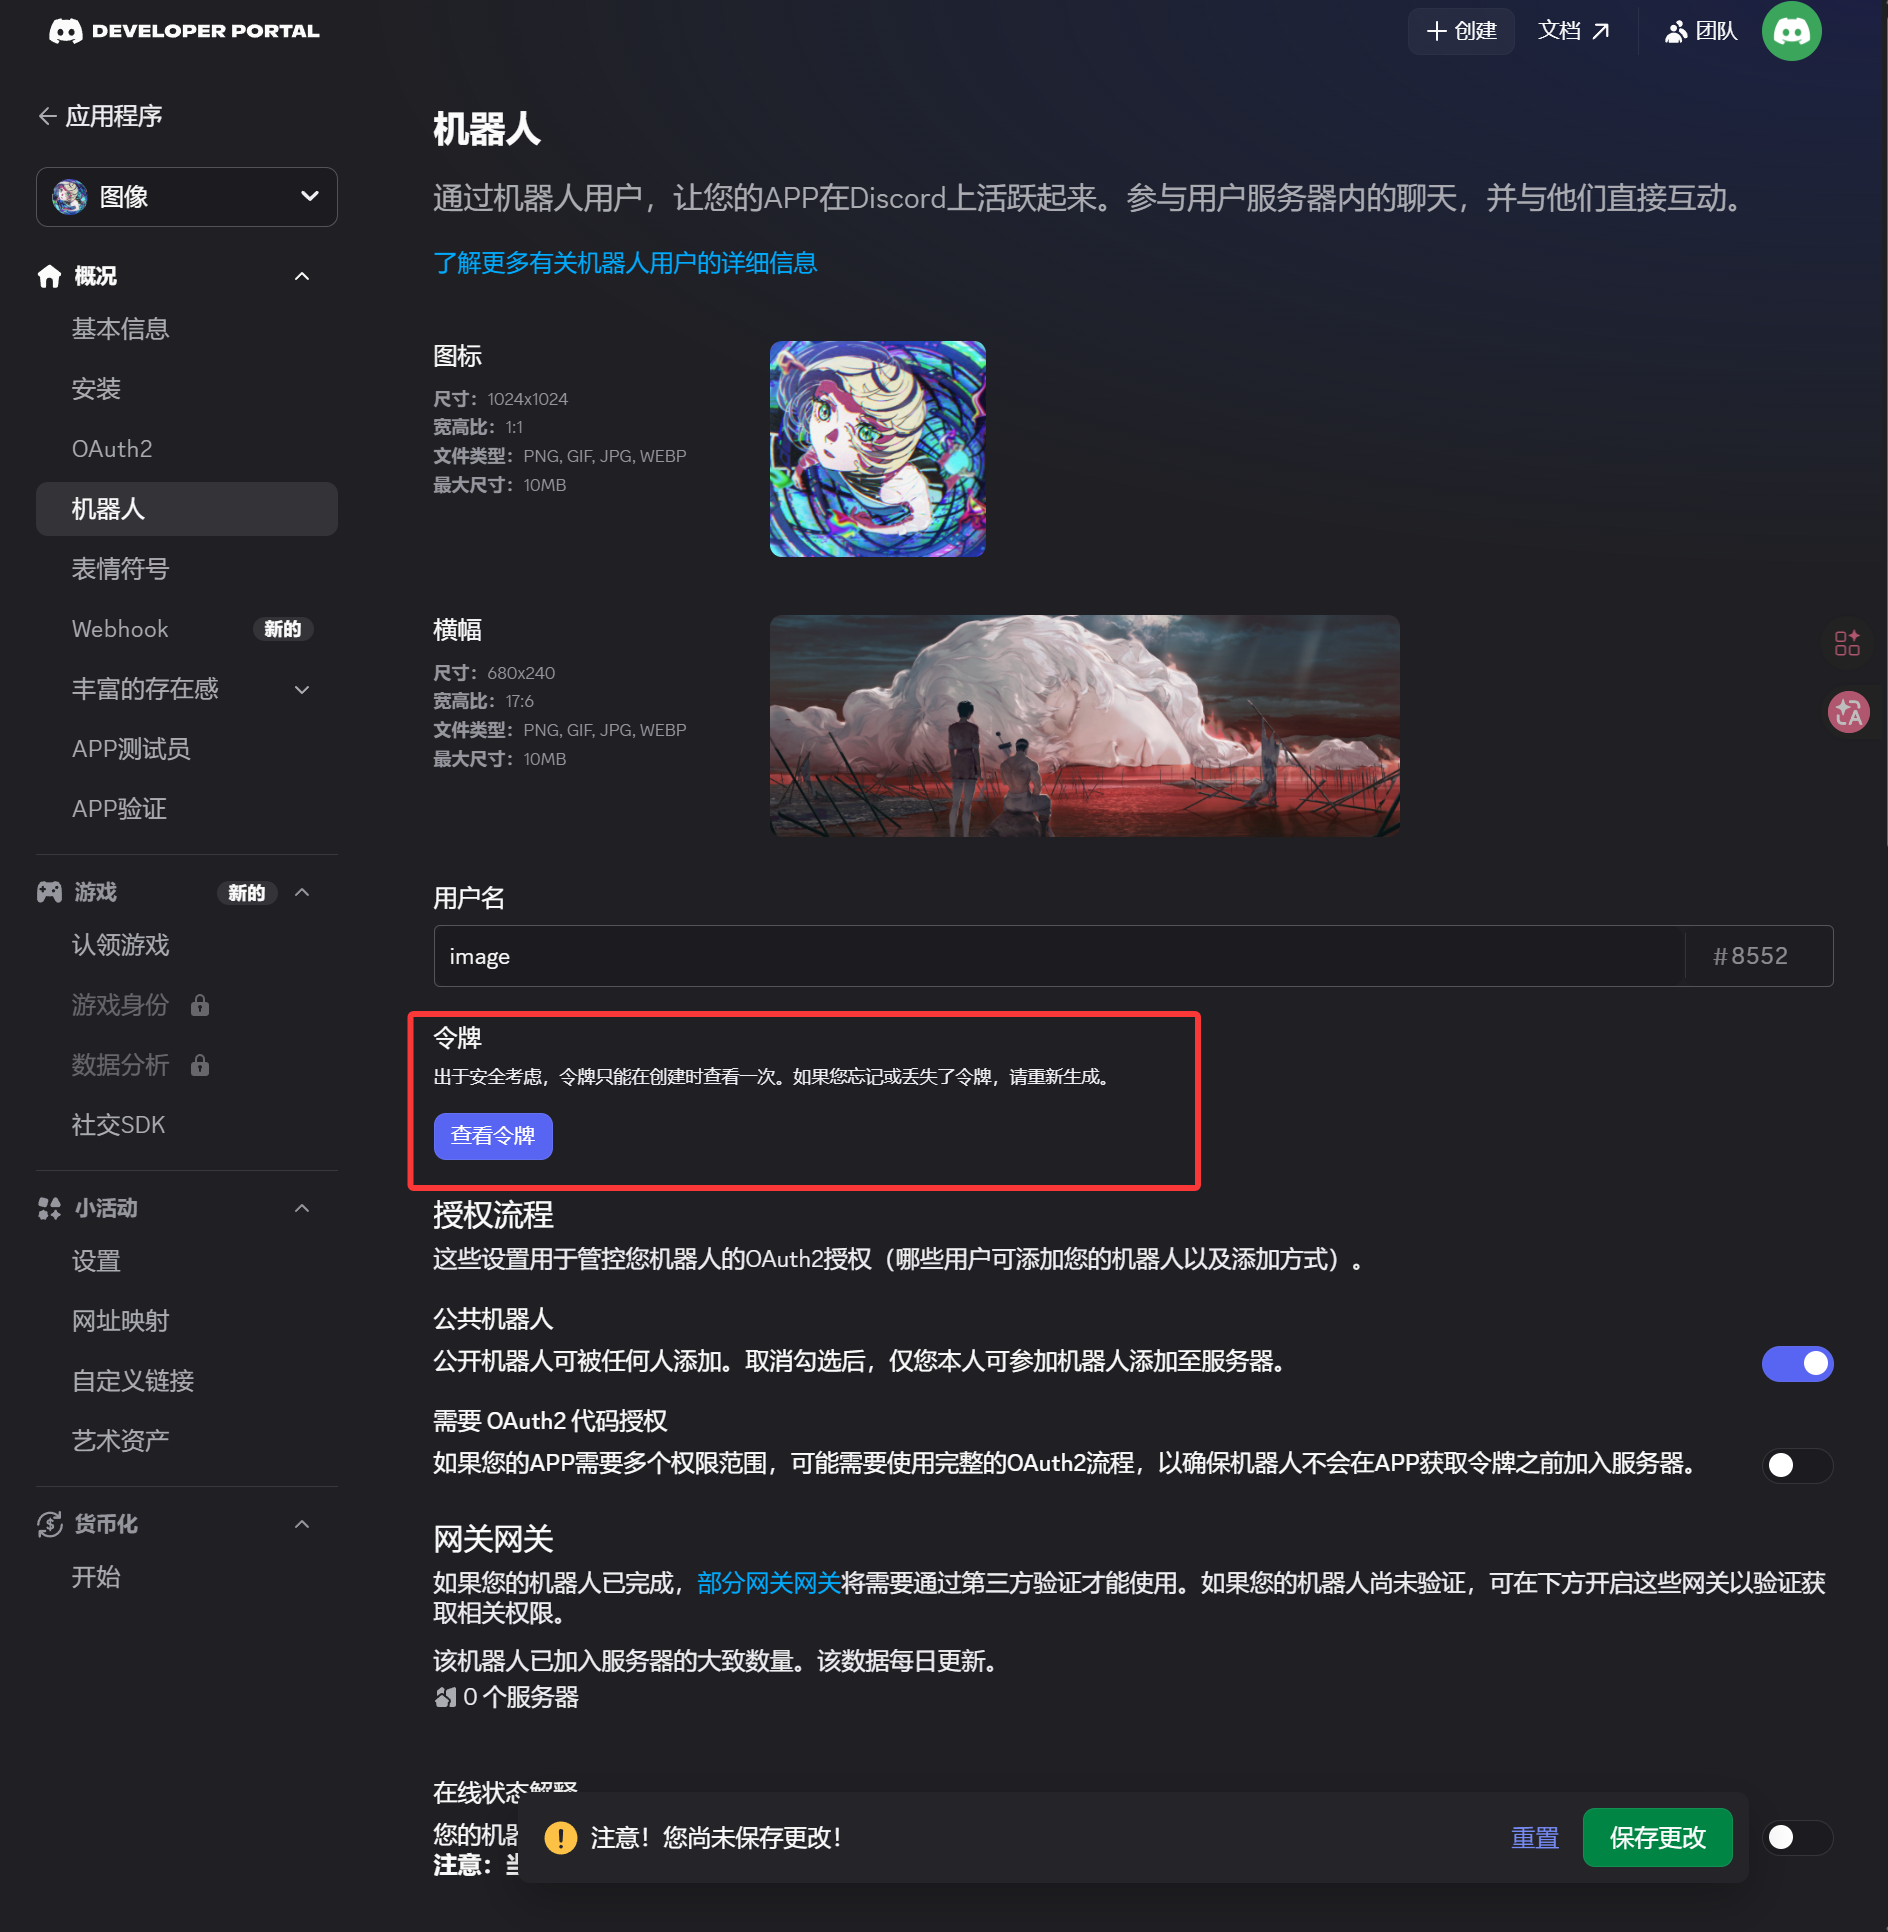
- left sidebar سے
Botصفحہ کھولیں۔ Botصفحہ پر token generate یا reset کریں۔- token محفوظ کریں۔
یہ token ImgHost میں Bot Token کے طور پر درج کرنا ہے۔
3. OAuth2 Invite Link بنائیں اور Bot Install کریں
- left sidebar سے
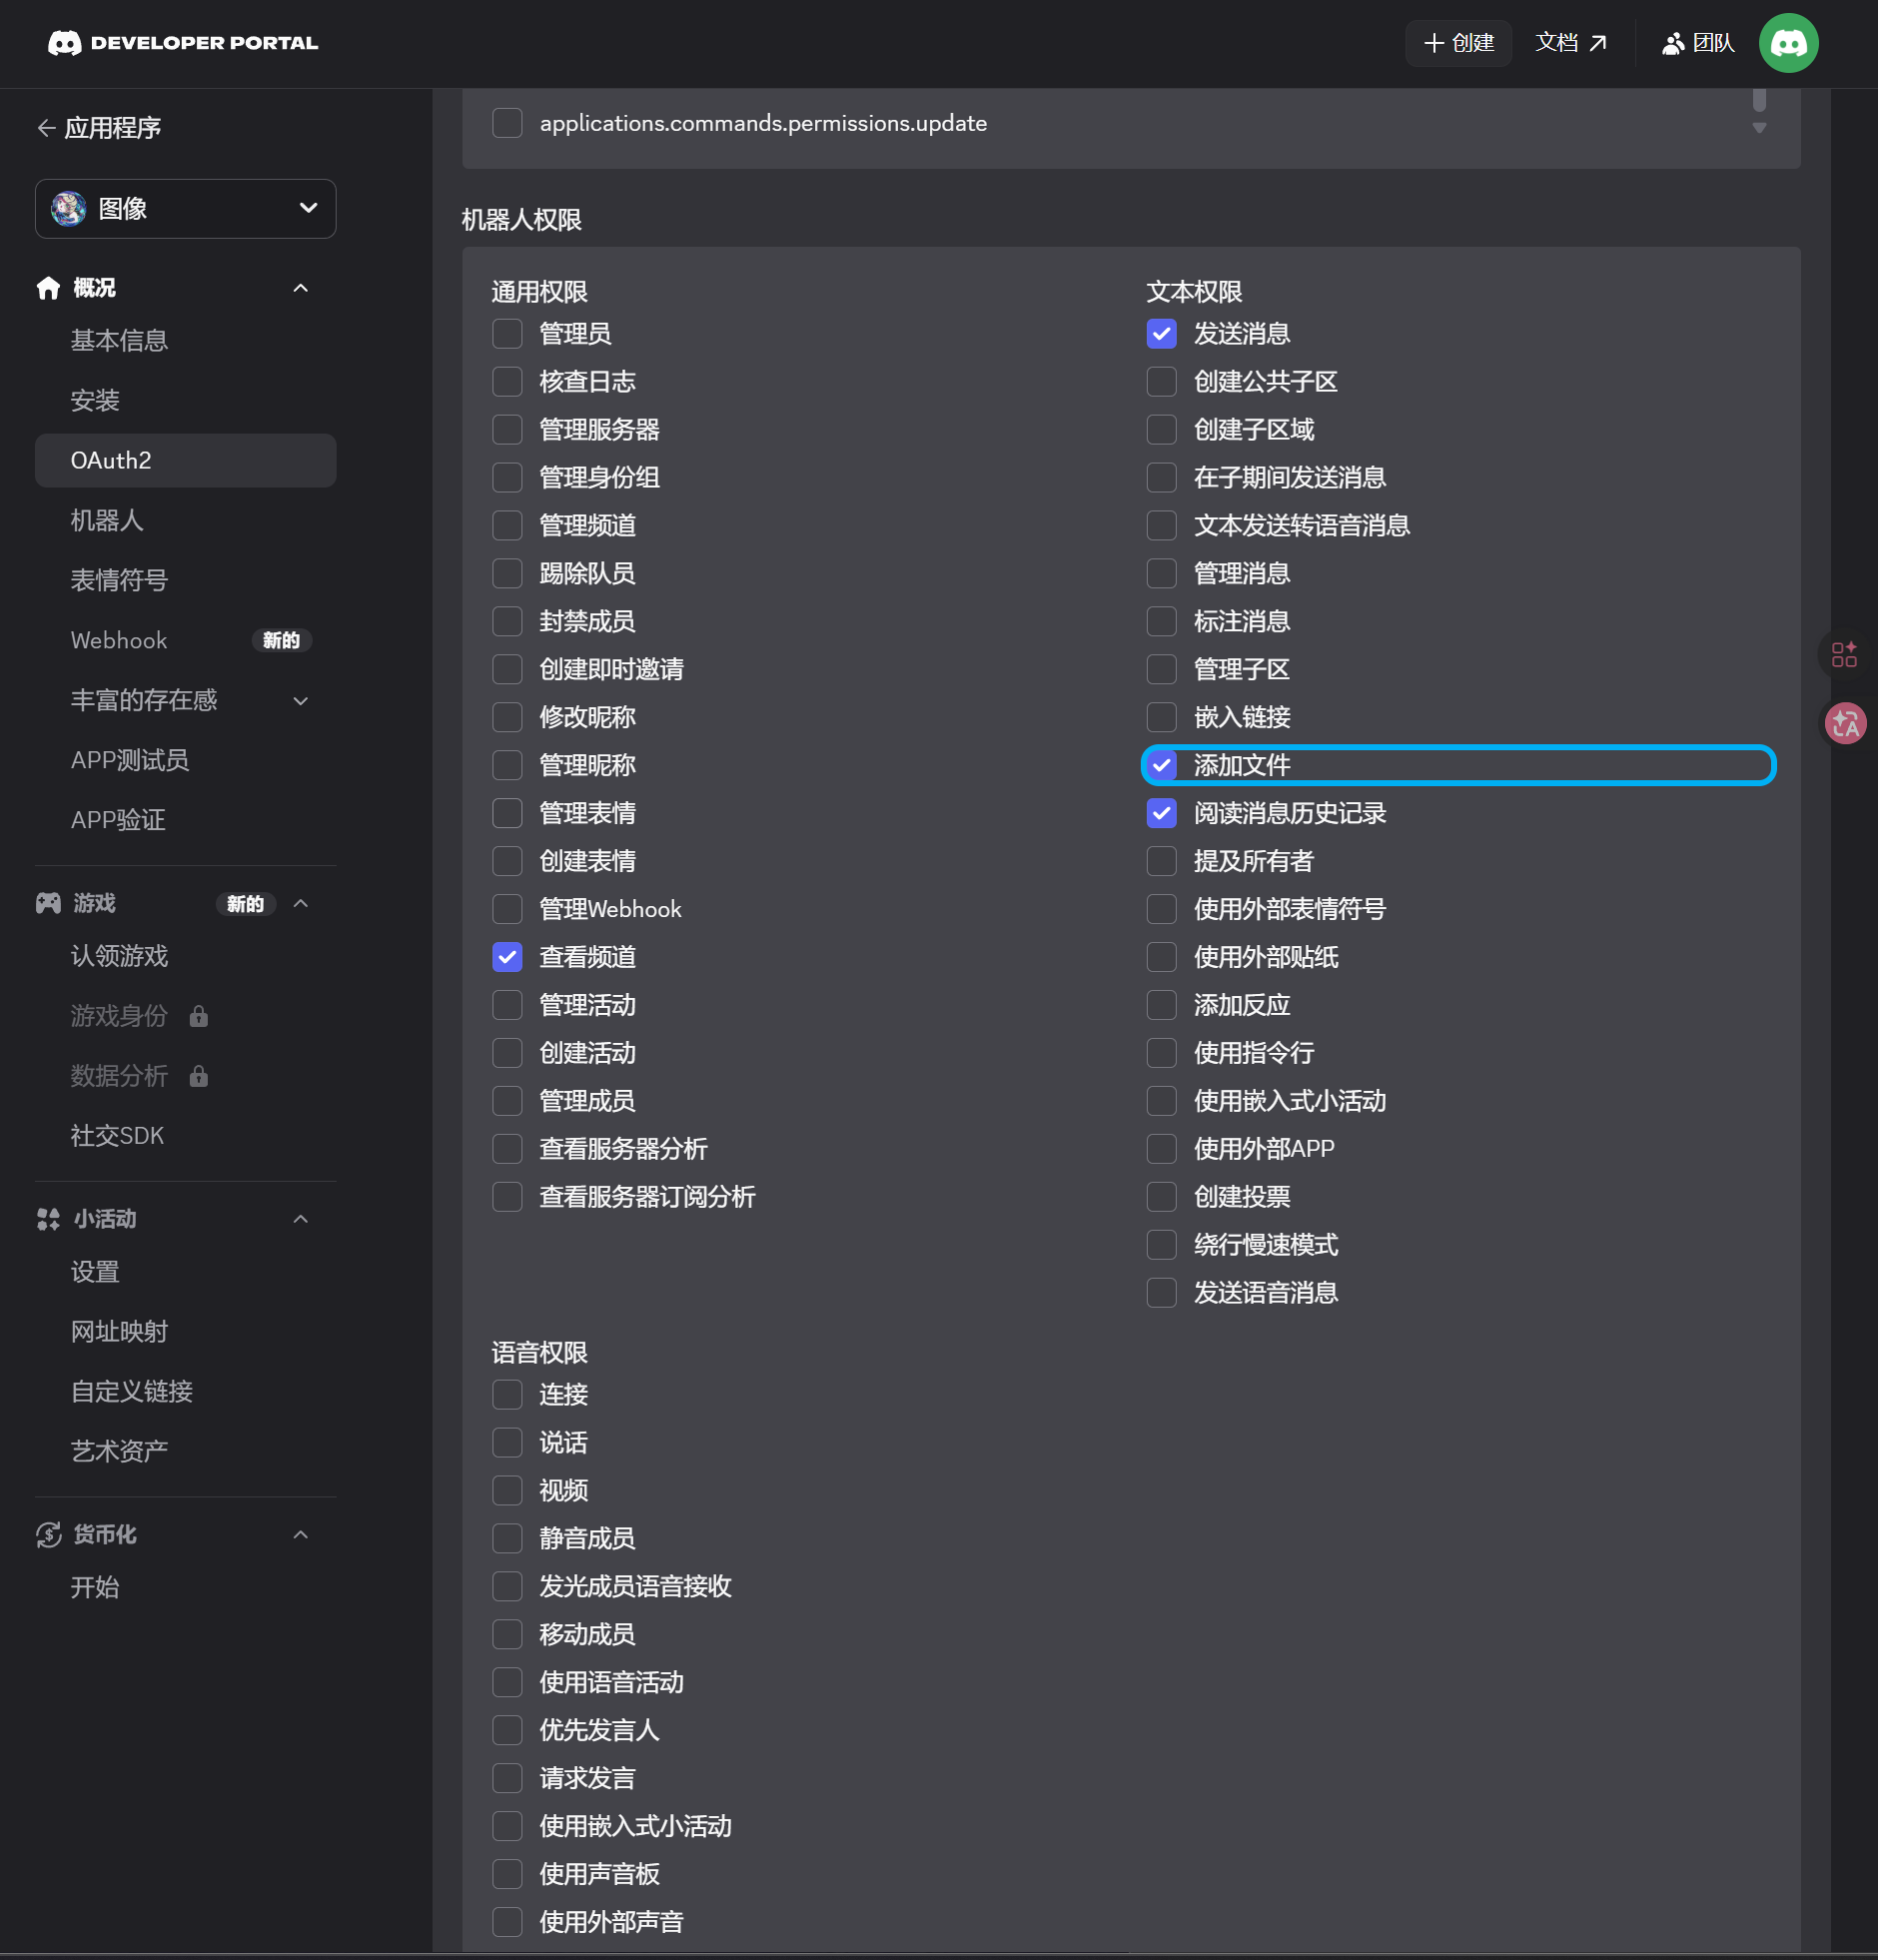
OAuth2صفحہ کھولیں۔ - scopes کے تحت
botمنتخب کریں۔ - permission area میں یہ permissions فعال کریں:
| اجازت | ضروری |
|---|---|
| View Channels | ہاں |
| Send Messages | ہاں |
| Attach Files | ہاں |
| Read Message History | ہاں |
- صفحہ کے نیچے تصدیق کریں کہ integration type
Guild Installہے۔ - بنایا گیا URL کاپی کریں۔
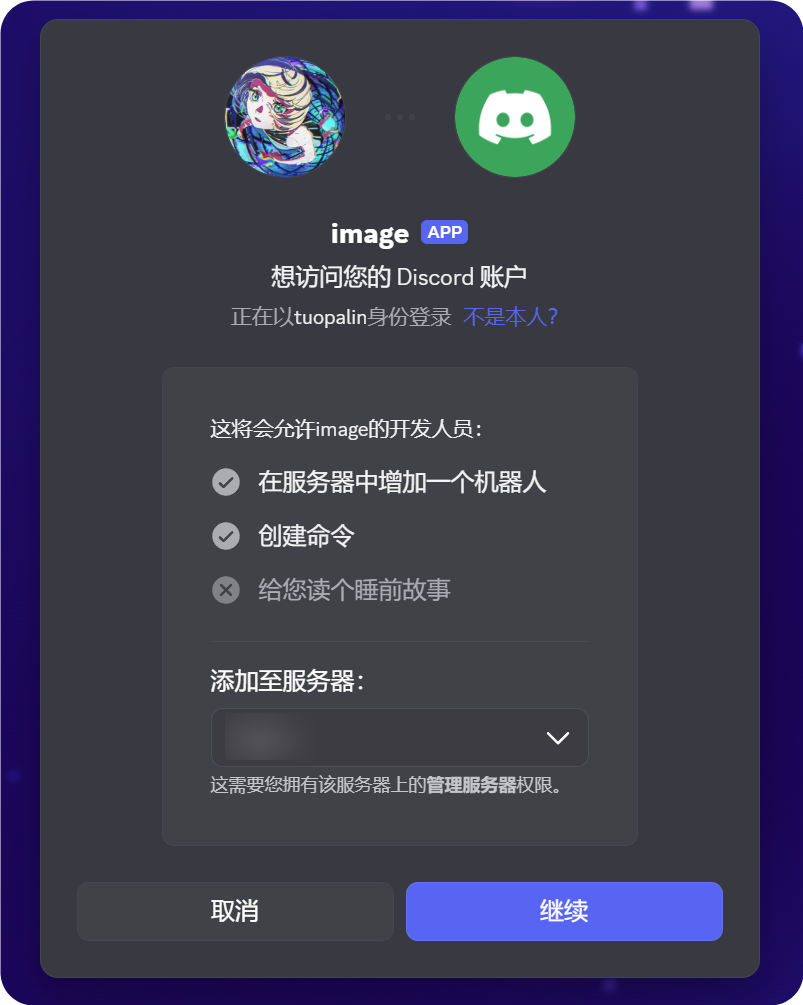
- اسے browser میں کھولیں۔
- target server منتخب کریں۔
- authorization flow مکمل کریں۔
4. Developer Mode Enable کریں اور Channel ID کاپی کریں
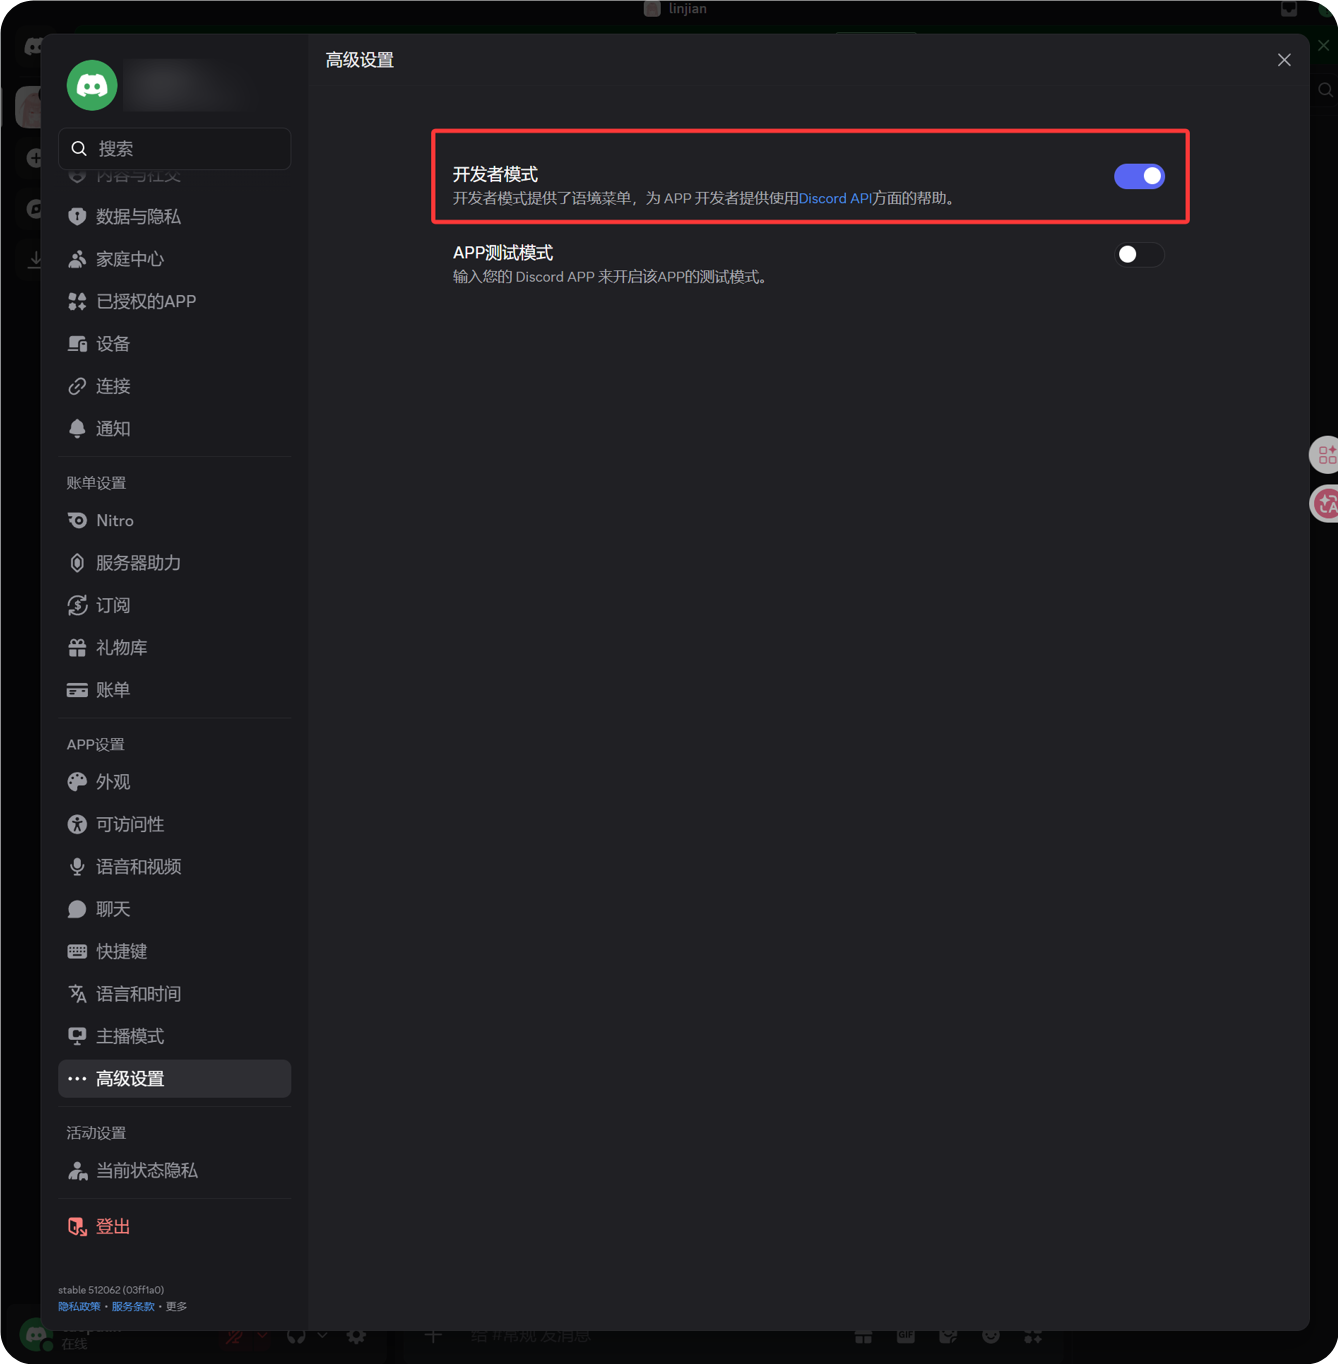
- Discord کے نیچے بائیں corner میں avatar کے پاس gear icon پر کلک کریں۔
- left sidebar سے Advanced کھولیں۔
- Developer Mode فعال کریں۔
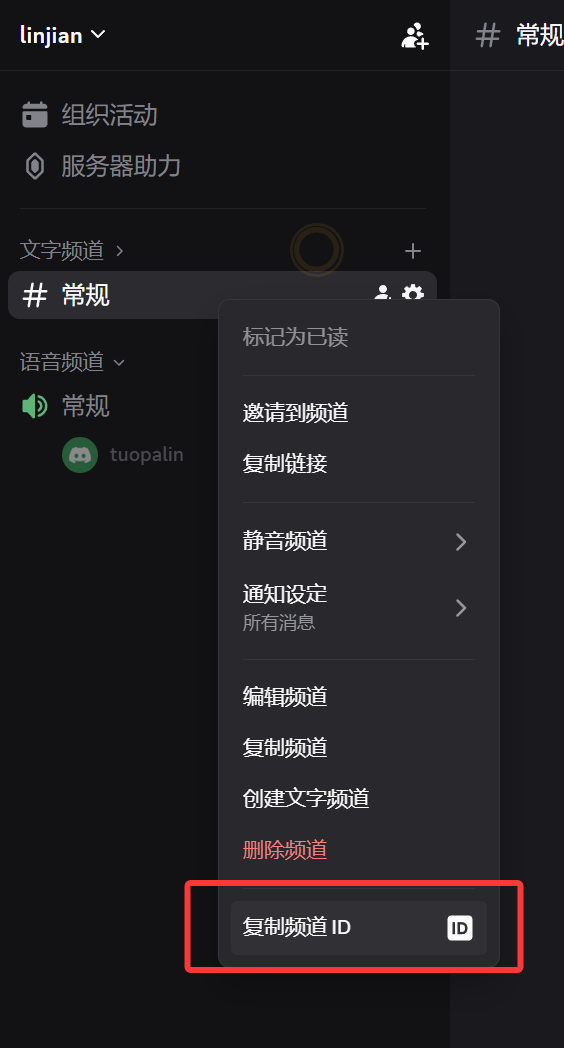
- target text channel پر واپس جائیں۔
- channel name پر right-click کریں۔
- کاپی Channel ID پر کلک کریں۔
کاپی کیا گیا number ImgHost کے لیے درکار Channel ID ہے۔
5. ImgHost میں Discord Channel بھریں
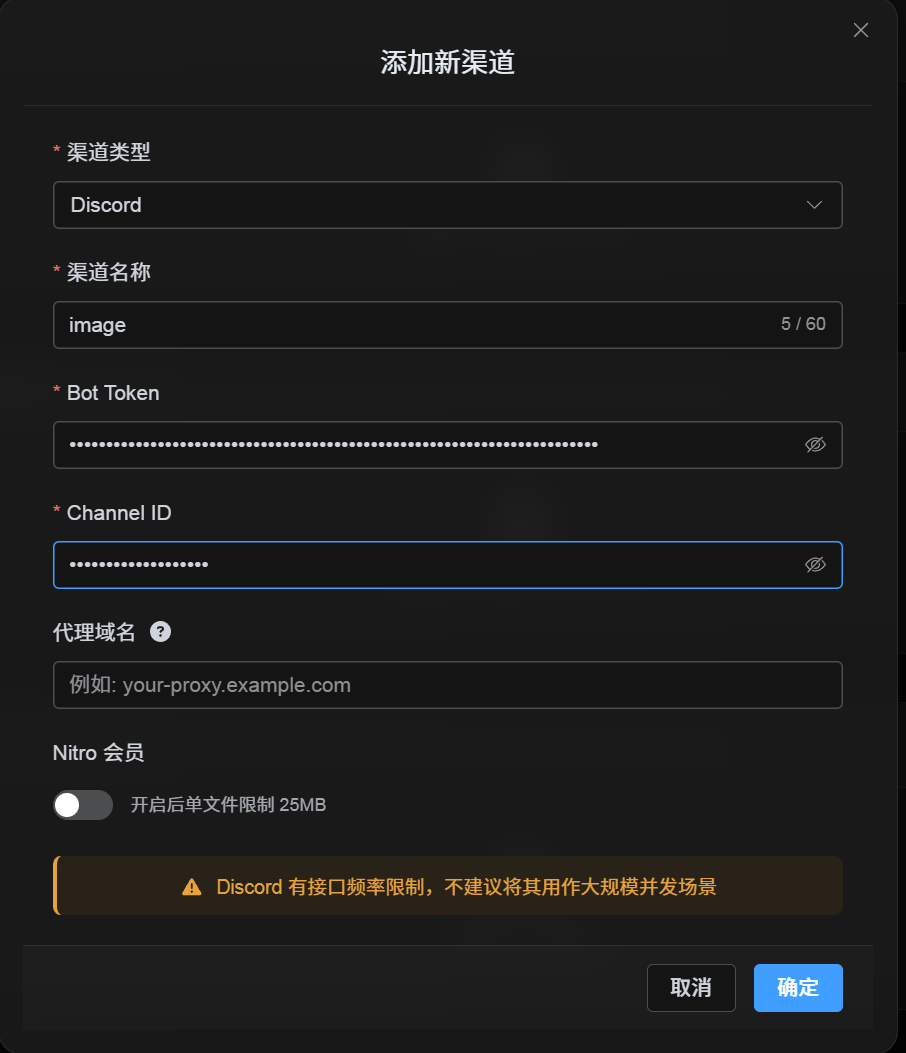
channel configuration dialog پر واپس آ کر فیلڈز یوں بھریں:
| UI فیلڈ | قدر |
|---|---|
| Channel name | custom channel name، مثلاً DiscordPrimary۔ |
| Bot Token | Discord Developer Portal کے Bot صفحہ سے محفوظ token۔ |
| Channel ID | Discord سے کاپی کی گئی channel ID۔ |
| Proxy URL (اختیاری) | صرف ضرورت ہو تو، مثلاً https://your-proxy.example.com. |
کام مکمل ہو جائے تو Save پر کلک کریں۔
Verify کیسے کریں
| جانچ | Verify کرنے کا طریقہ |
|---|---|
| چینل card ظاہر ہوتا ہے | محفوظ کرنے کے بعد اپ لوڈ سیٹنگز صفحہ پر Discord چینل card دکھائی دینا چاہیے۔ |
| Channel can be فعال | Active switch on رہنا چاہیے۔ |
| configuration محفوظ ہے | تفصیلی منظر میں Bot Token اور Channel ID محفوظ دکھنے چاہئیں۔ |
| Upload کام کرتا ہے | test image upload کریں اور تصدیق کریں کہ وہ target Discord text channel میں آتی ہے۔ |
فوری چیک لسٹ
text
Create a Discord server
-> Create a text channel
-> Create a bot in the Discord Developer Portal
-> Save the Bot Token from the Bot page
-> In OAuth2, select bot, View Channels, Send Messages, Attach Files, and Read Message History
-> Copy the generated URL and authorize the bot for the target server
-> Make sure the target text channel grants the same permissions
-> Enable Developer Mode
-> Right-click the target text channel and copy the Channel ID
-> Enter the Bot Token and Channel ID in ImgHost
-> Save and upload a test image
حوالہ جات
- Discord Developers Getting Started: https://docs.discord.com/developers/quick-start/getting-started
- Discord Help - Where can I find my User/Server/Message ID: https://support.discord.com/hc/en-us/articles/206346498-Where-can-I-find-my-User-Server-Message-ID