S3 Channel ထည့်သွင်းခြင်း
ဘယ်အချိန်မှာ သုံးသင့်လဲ
S3 channel ကို ဒီအခြေအနေတွေမှာသုံးပါ:
- Cloudflare R2, Backblaze B2, MinIO, AWS S3 သို့မဟုတ် S3-compatible object storage service တစ်ခုခုကို connect လုပ်ချင်လျှင်။
- standard S3 configuration model ဖြစ်တဲ့
Endpoint, Access Key, Secret Key ကိုသုံးချင်လျှင်။ - native Cloudflare R2 binding channel မသုံးချင်လျှင်၊ သို့မဟုတ် storage provider က Cloudflare R2 မဟုတ်လျှင်။
စမလုပ်ခင် လိုအပ်တာတွေ
| လိုအပ်ချက် | အသုံးပြုပုံ |
|---|---|
| S3 Endpoint | object storage service ရဲ့ S3 API endpoint။ |
| Bucket name | files တွေသိမ်းမယ့် bucket။ |
| Region | storage region။ Cloudflare R2 အတွက် များသောအားဖြင့် auto။ |
| Access Key ID | S3 access key ID။ |
| Secret Access Key | S3 secret access key။ |
| CDN domain | file access အတွက် optional custom domain။ |
Cloudflare R2 ကို S3 API ဖြင့်သုံးတဲ့ဥပမာ:
text
Endpoint: https://your-account-id.r2.cloudflarestorage.com
Bucket: your-r2-bucket-name
Region: auto
Access Key ID: copied from the Cloudflare R2 API token
Secret Access Key: copied from the Cloudflare R2 API token
ဘယ်နေရာမှာ ထည့်မလဲ
- System Settings ကိုဖွင့်ပါ။
- Upload Settings ကိုသွားပါ။
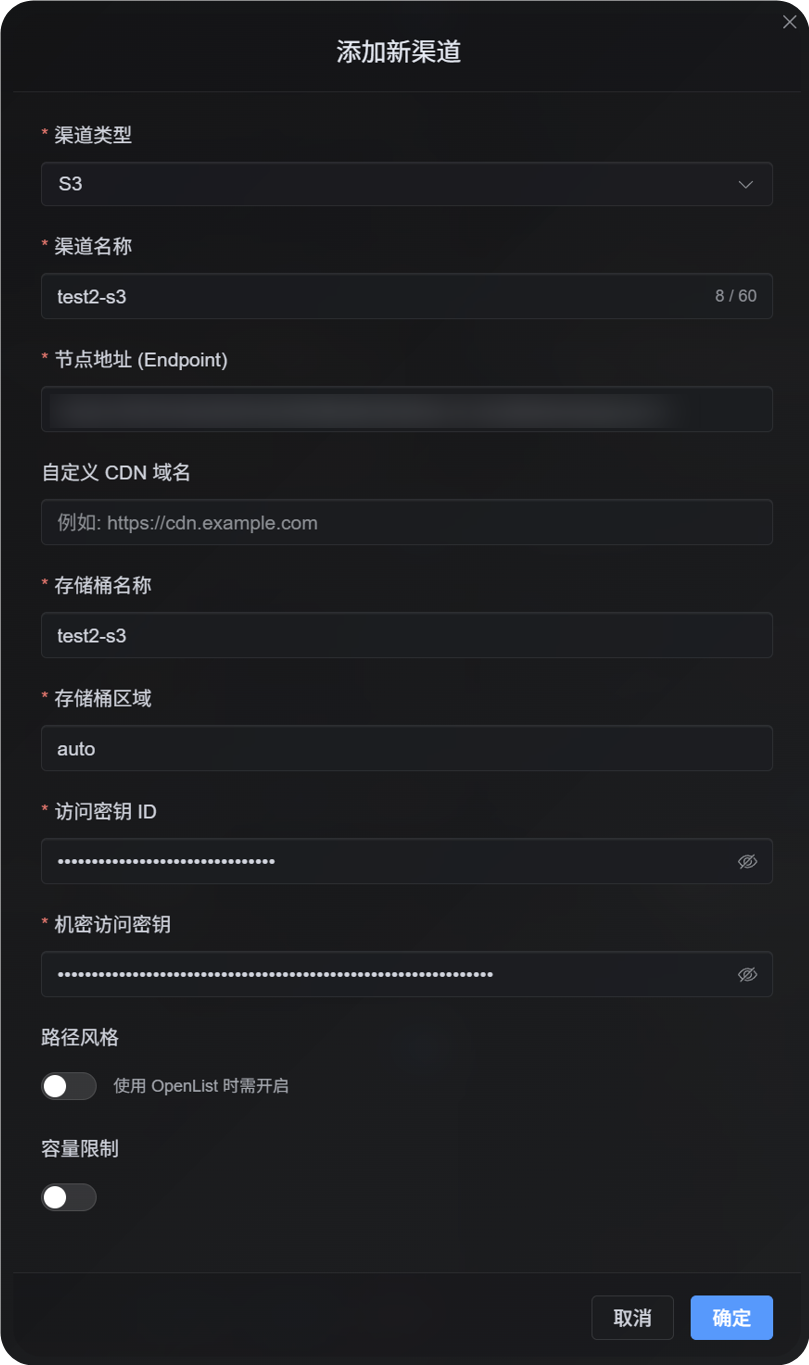
- ညာဘက်အပေါ်ထောင့်က Add Channel ကိုနှိပ်ပါ။
S3ကိုရွေးပါ။
Field Reference
| Field | အသုံးပြုပုံ | Required |
|---|---|---|
| Channel name | ဒီ S3 channel အတွက် မှတ်မိလွယ်တဲ့အမည်၊ ဥပမာ s3test သို့မဟုတ် R2-S3။ | Yes |
| Enable channel | ဒီ channel က upload selection ထဲပါမပါထိန်းချုပ်သည်။ | Recommended |
| Endpoint | https:// ပါတဲ့ S3 service endpoint အပြည့်အစုံ။ | Yes |
| Custom CDN domain | Optional။ set လုပ်ထားရင် generated file links က ဒီ domain ကိုဦးစားပေးသုံးသည်။ | No |
| Bucket name | bucket name၊ ဥပမာ s3test သို့မဟုတ် img-r2။ | Yes |
| Bucket region | Region။ Cloudflare R2 အတွက် များသောအားဖြင့် auto။ | Yes |
| Access Key ID | S3 access key ID။ | Yes |
| Secret Access Key | S3 secret access key။ | Yes |
| Path-style access | compatibility switch။ default off ဖြစ်သည်။ MinIO, OpenList, self-hosted S3 services အချို့မှာလိုနိုင်သည်။ | No |
| Quota limit | capacity အပေါ်မူတည်ပြီး ဒီ S3 channel က upload selection ထဲပါမပါထိန်းချုပ်သည်။ | No |
| Capacity limit | quota limit enabled ပြီးနောက်လိုအပ်သည်၊ ဥပမာ 10 GB။ | Required when quota limit is enabled |
| Threshold | usage က ဒီ percentage ရောက်ရင် write ရပ်သည်၊ ဥပမာ 90%။ | Required when quota limit is enabled |
| Remark | ကိုယ်တိုင် maintenance အတွက် notes။ | No |
Cloudflare R2 S3 API Keys ဖန်တီးပါ
- Cloudflare Dashboard ကိုဖွင့်ပါ။
R2 Object Storageကိုသွားပါ။Manage R2 API Tokensသို့မဟုတ် API token management entry ကိုရှာပါ။

- target bucket ကို access လုပ်နိုင်တဲ့ R2 API token ဖန်တီးပါ။
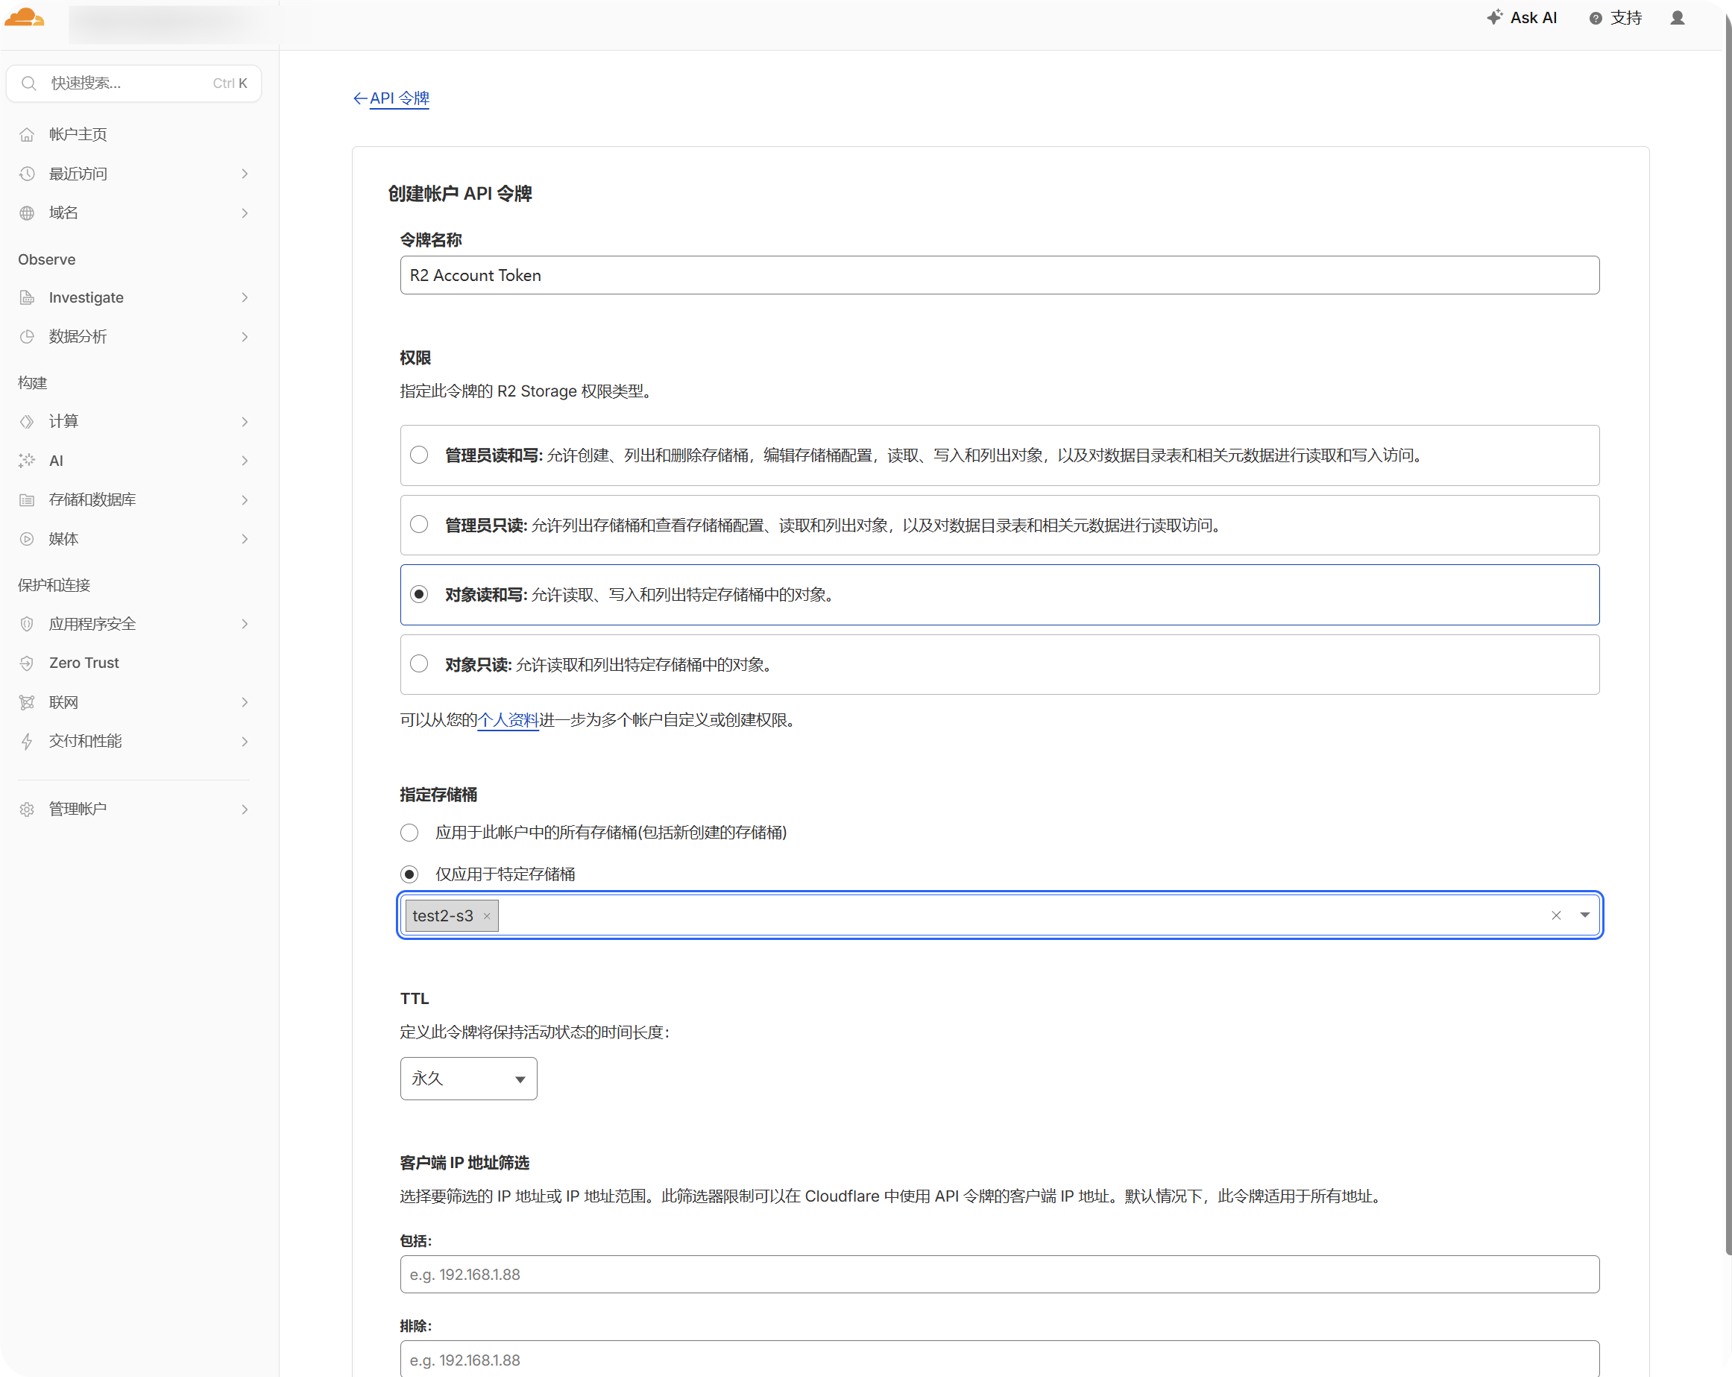
- generated
Access Key IDနဲ့Secret Access Keyကို copy လုပ်ပါ။
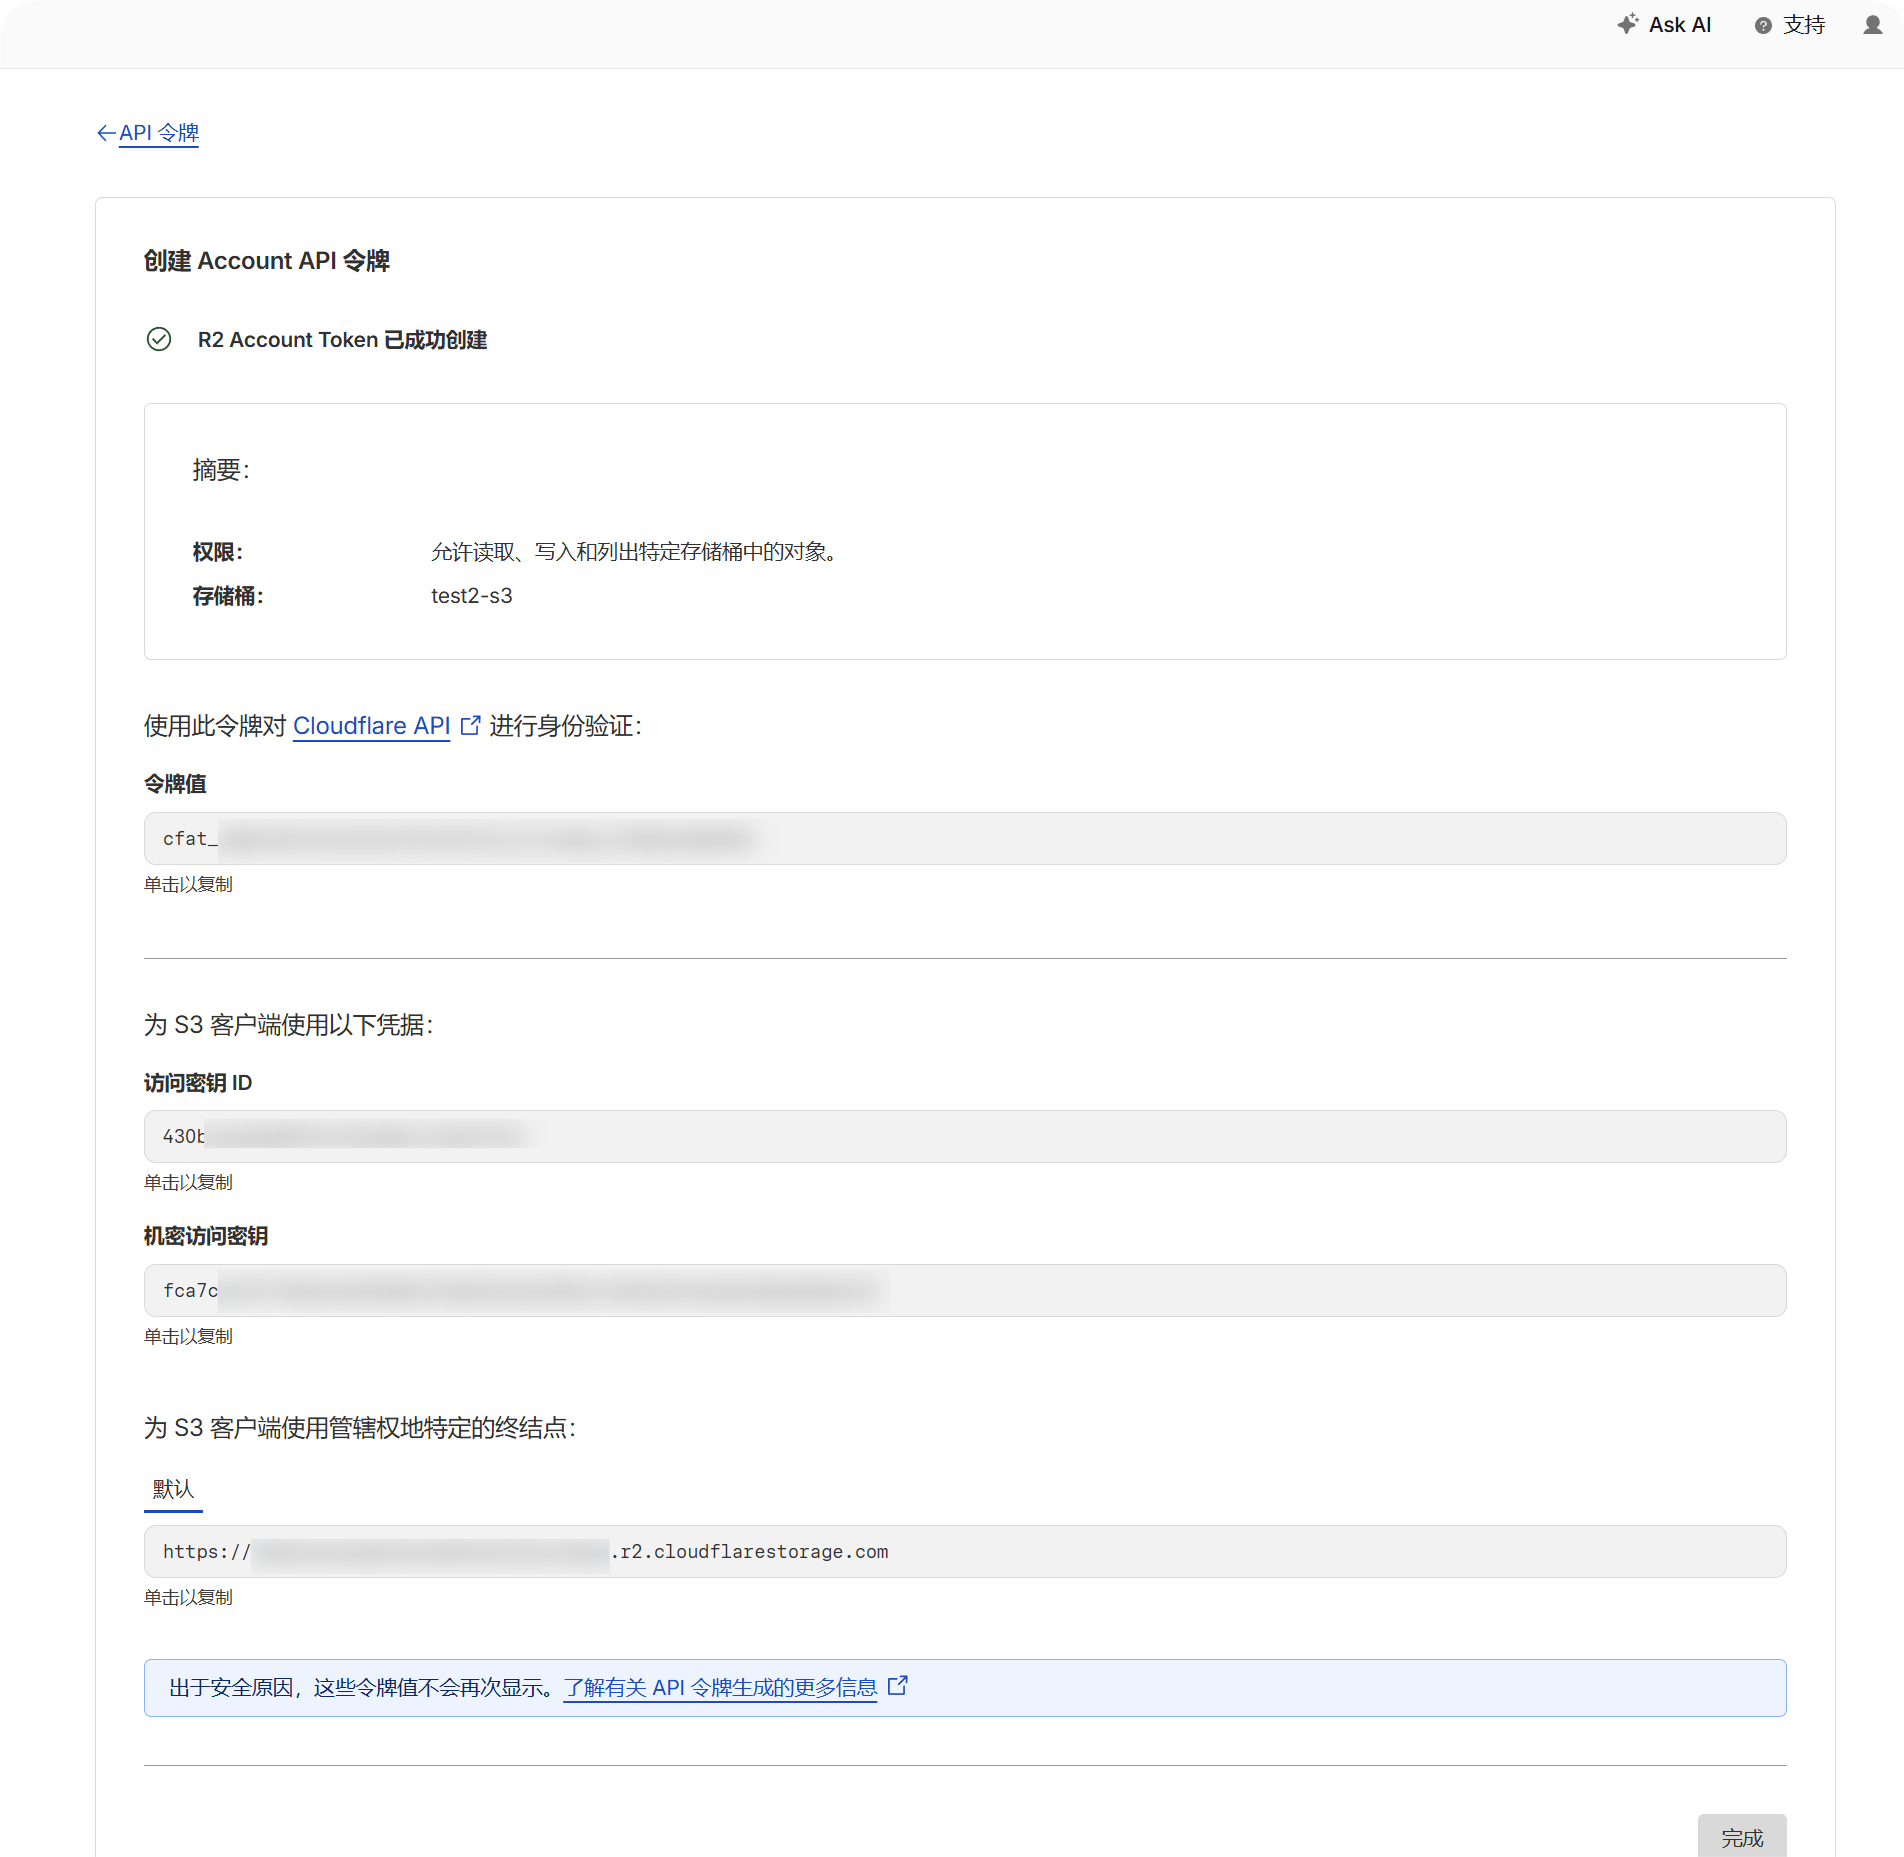
- R2 bucket page ကိုပြန်သွားပြီး bucket name ကို confirm လုပ်ပါ။
- account အတွက် S3 API endpoint ကိုမှတ်ပါ။ များသောအားဖြင့်ဒီလိုဖြစ်ပါတယ်:
text
https://your-account-id.r2.cloudflarestorage.comSetup Steps
- Upload Settings ကိုဖွင့်ပါ။
- Add Channel ကိုနှိပ်ပါ။
S3ကိုရွေးပါ။- မှတ်မိလွယ်တဲ့ channel name ထည့်ပါ၊ ဥပမာ
s3test။ Endpointထဲမှာ S3 API endpoint ထည့်ပါ။- custom CDN သုံးလျှင်
Custom CDN domainထဲထည့်ပါ၊ မသုံးလျှင်ဗလာထားပါ။ - bucket name ထည့်ပါ။
- region ထည့်ပါ။ Cloudflare R2 ဥပမာအတွက်
autoသုံးပါ။ - Access Key ID နဲ့ Secret Access Key ထည့်ပါ။
- provider ကတိတိကျကျမလိုအပ်ဘဲ path-style access ကို off ထားပါ။
- capacity control လိုချင်လျှင် quota limit enable လုပ်ပြီး capacity limit နဲ့ threshold ထည့်ပါ။
- Save ကိုနှိပ်ပါ။
စစ်ဆေးနည်း
| Check | စစ်ဆေးပုံ |
|---|---|
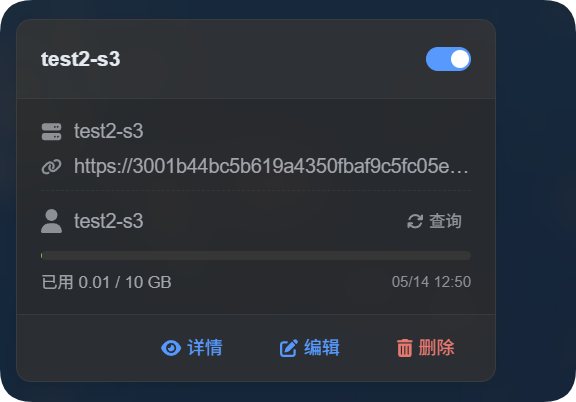
| Channel card appears | Save ပြီးနောက် Upload Settings မှာ S3 channel card ပေါ်လာရပါမယ်။ |
| Channel is enabled | card ရဲ့ညာဘက်အပေါ် switch က on ဖြစ်ရပါမယ်။ |
| Key fields are saved | detail view မှာ Endpoint, Bucket, Region, path-style access နဲ့ related fields တွေမြင်ရပါမယ်။ |
| Upload works | test image upload လုပ်ပြီး object က target bucket ထဲရောက်လားစစ်ပါ။ |
| Link opens | upload ပြီးနောက်ရတဲ့ image link ဖွင့်လို့ရရပါမယ်။ |
| Capacity display works | quota limit enabled ဖြစ်လျှင် card မှာ used capacity နဲ့ configured limit ပြရပါမယ်။ |
S3 capacity statistics က provider bucket ကို real time query မလုပ်ဘဲ ImgBed ရဲ့ local file records ကနေတွက်ချက်ပါတယ်။ S3 configuration save ပြီးနောက် system က current D1 records ကနေ quota ledger ကိုပြန်တွက်ပါမယ်။
FAQ
path-style access ကို enable လုပ်သင့်လား?
များသောအားဖြင့် မလိုပါ။
သင့် S3-compatible provider က virtual-hosted-style URLs မထောက်ပံ့တဲ့အခါ၊ သို့မဟုတ် provider documentation က path-style access ကိုတိတိကျကျလိုအပ်တယ်ဆိုတဲ့အခါသာ enable လုပ်ပါ။
CDN domain က ဘာအတွက်လဲ?
bucket ရှေ့မှာ CDN သို့မဟုတ် custom access domain ထားထားလျှင် ဒီမှာထည့်ပါ။
configure ပြီးနောက် generated file links က ဒီ domain ကိုဦးစားပေးသုံးပါမယ်။ CDN မသုံးလျှင်ဗလာထားပါ။
upload fail ဖြစ်ရင် ဘာစစ်ရမလဲ?
ပထမဦးဆုံး ဒီအချက်တွေစစ်ပါ:
- Endpoint မှာ
https://ပါတဲ့ URL အပြည့်အစုံရှိလား။ - bucket name မှန်လား။
- Region က provider requirement နဲ့ကိုက်လား။
- Access Key ID နဲ့ Secret Access Key ကိုအပြည့်အစုံ copy လုပ်ထားလား။
- key မှာ target bucket အတွက် write permission ရှိလား။
- provider က path-style access မလိုဘူးလား၊ လိုရင် enable လုပ်ထားလား။
Quick Checklist
text
S3 Endpoint, Bucket, Region, Access Key, Secret Key ပြင်ဆင်ပါ
-> Upload Settings ဖွင့်ပါ
-> Add Channel
-> S3 ရွေးပါ
-> Endpoint / Bucket / Region / Access Key / Secret Key ထည့်ပါ
-> လိုအပ်လျှင် CDN domain ထည့်ပါ
-> default အနေနဲ့ path-style access off ထားပါ
-> လိုအပ်လျှင် quota limit enable လုပ်ပါ
-> Save
-> test image upload လုပ်ပြီး result စစ်ပါ