WebDAV चैनल जोड़ना
कब सबसे सही है
WebDAV channel का उपयोग तब करें जब:
- आपके पास NAS, cloud drive या object storage service है जो WebDAV endpoint देती है।
- आप uploaded images को अपने WebDAV directory में रखना चाहते हैं।
- आप credentials को लंबे समय तक frontend में expose करने के बजाय D1
upload_channelstable में save करना चाहते हैं।
शुरू करने से पहले क्या चाहिए
| ज़रूरत | उपयोग |
|---|---|
| WebDAV Endpoint | server-side WebDAV URL, जैसे https://nas.example.com/dav। |
| Username | WebDAV service में sign in करने के लिए। |
| Password | WebDAV service में sign in करने के लिए। |
| Authentication mode | default Basic है। Digest या auto negotiation केवल तब use करें जब server मांगे। |
| Storage directory | files store करने की directory। default imgbed। |
कहाँ जोड़ें
- System Settings खोलें।
- Upload Settings पर जाएँ।
- ऊपर दाएँ कोने में Add Channel पर क्लिक करें।
WebDAVचुनें।
फ़ील्ड संदर्भ
| Field | क्या करता है | आवश्यक |
|---|---|---|
| Channel name | WebDAV channel का आसान नाम, जैसे koofr या nas। | हाँ |
| Endpoint | https:// सहित पूरा WebDAV endpoint। | हाँ |
| Username | WebDAV login username। | हाँ |
| Password | WebDAV login password। | हाँ |
| Authentication mode | आम तौर पर Basic; server digest authentication मांगे तो Digest use करें। | हाँ |
| Storage directory | जहाँ files रखी जाती हैं। default imgbed। | नहीं |
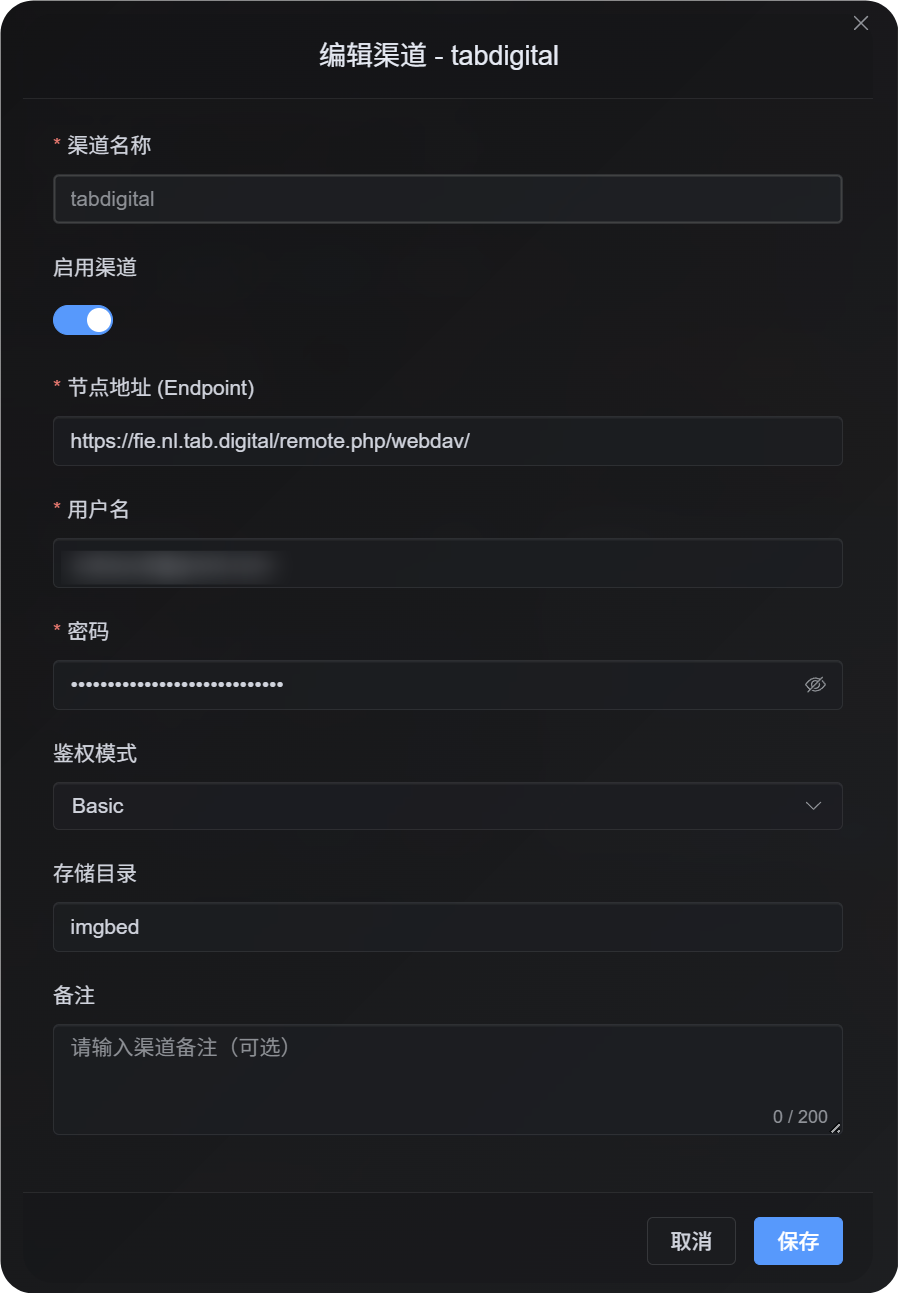
उदाहरण: fie.nl.tab.digital
1. App Password बनाएँ
अपने account security settings खोलें, application passwords खोजें, और नया app password बनाएँ।
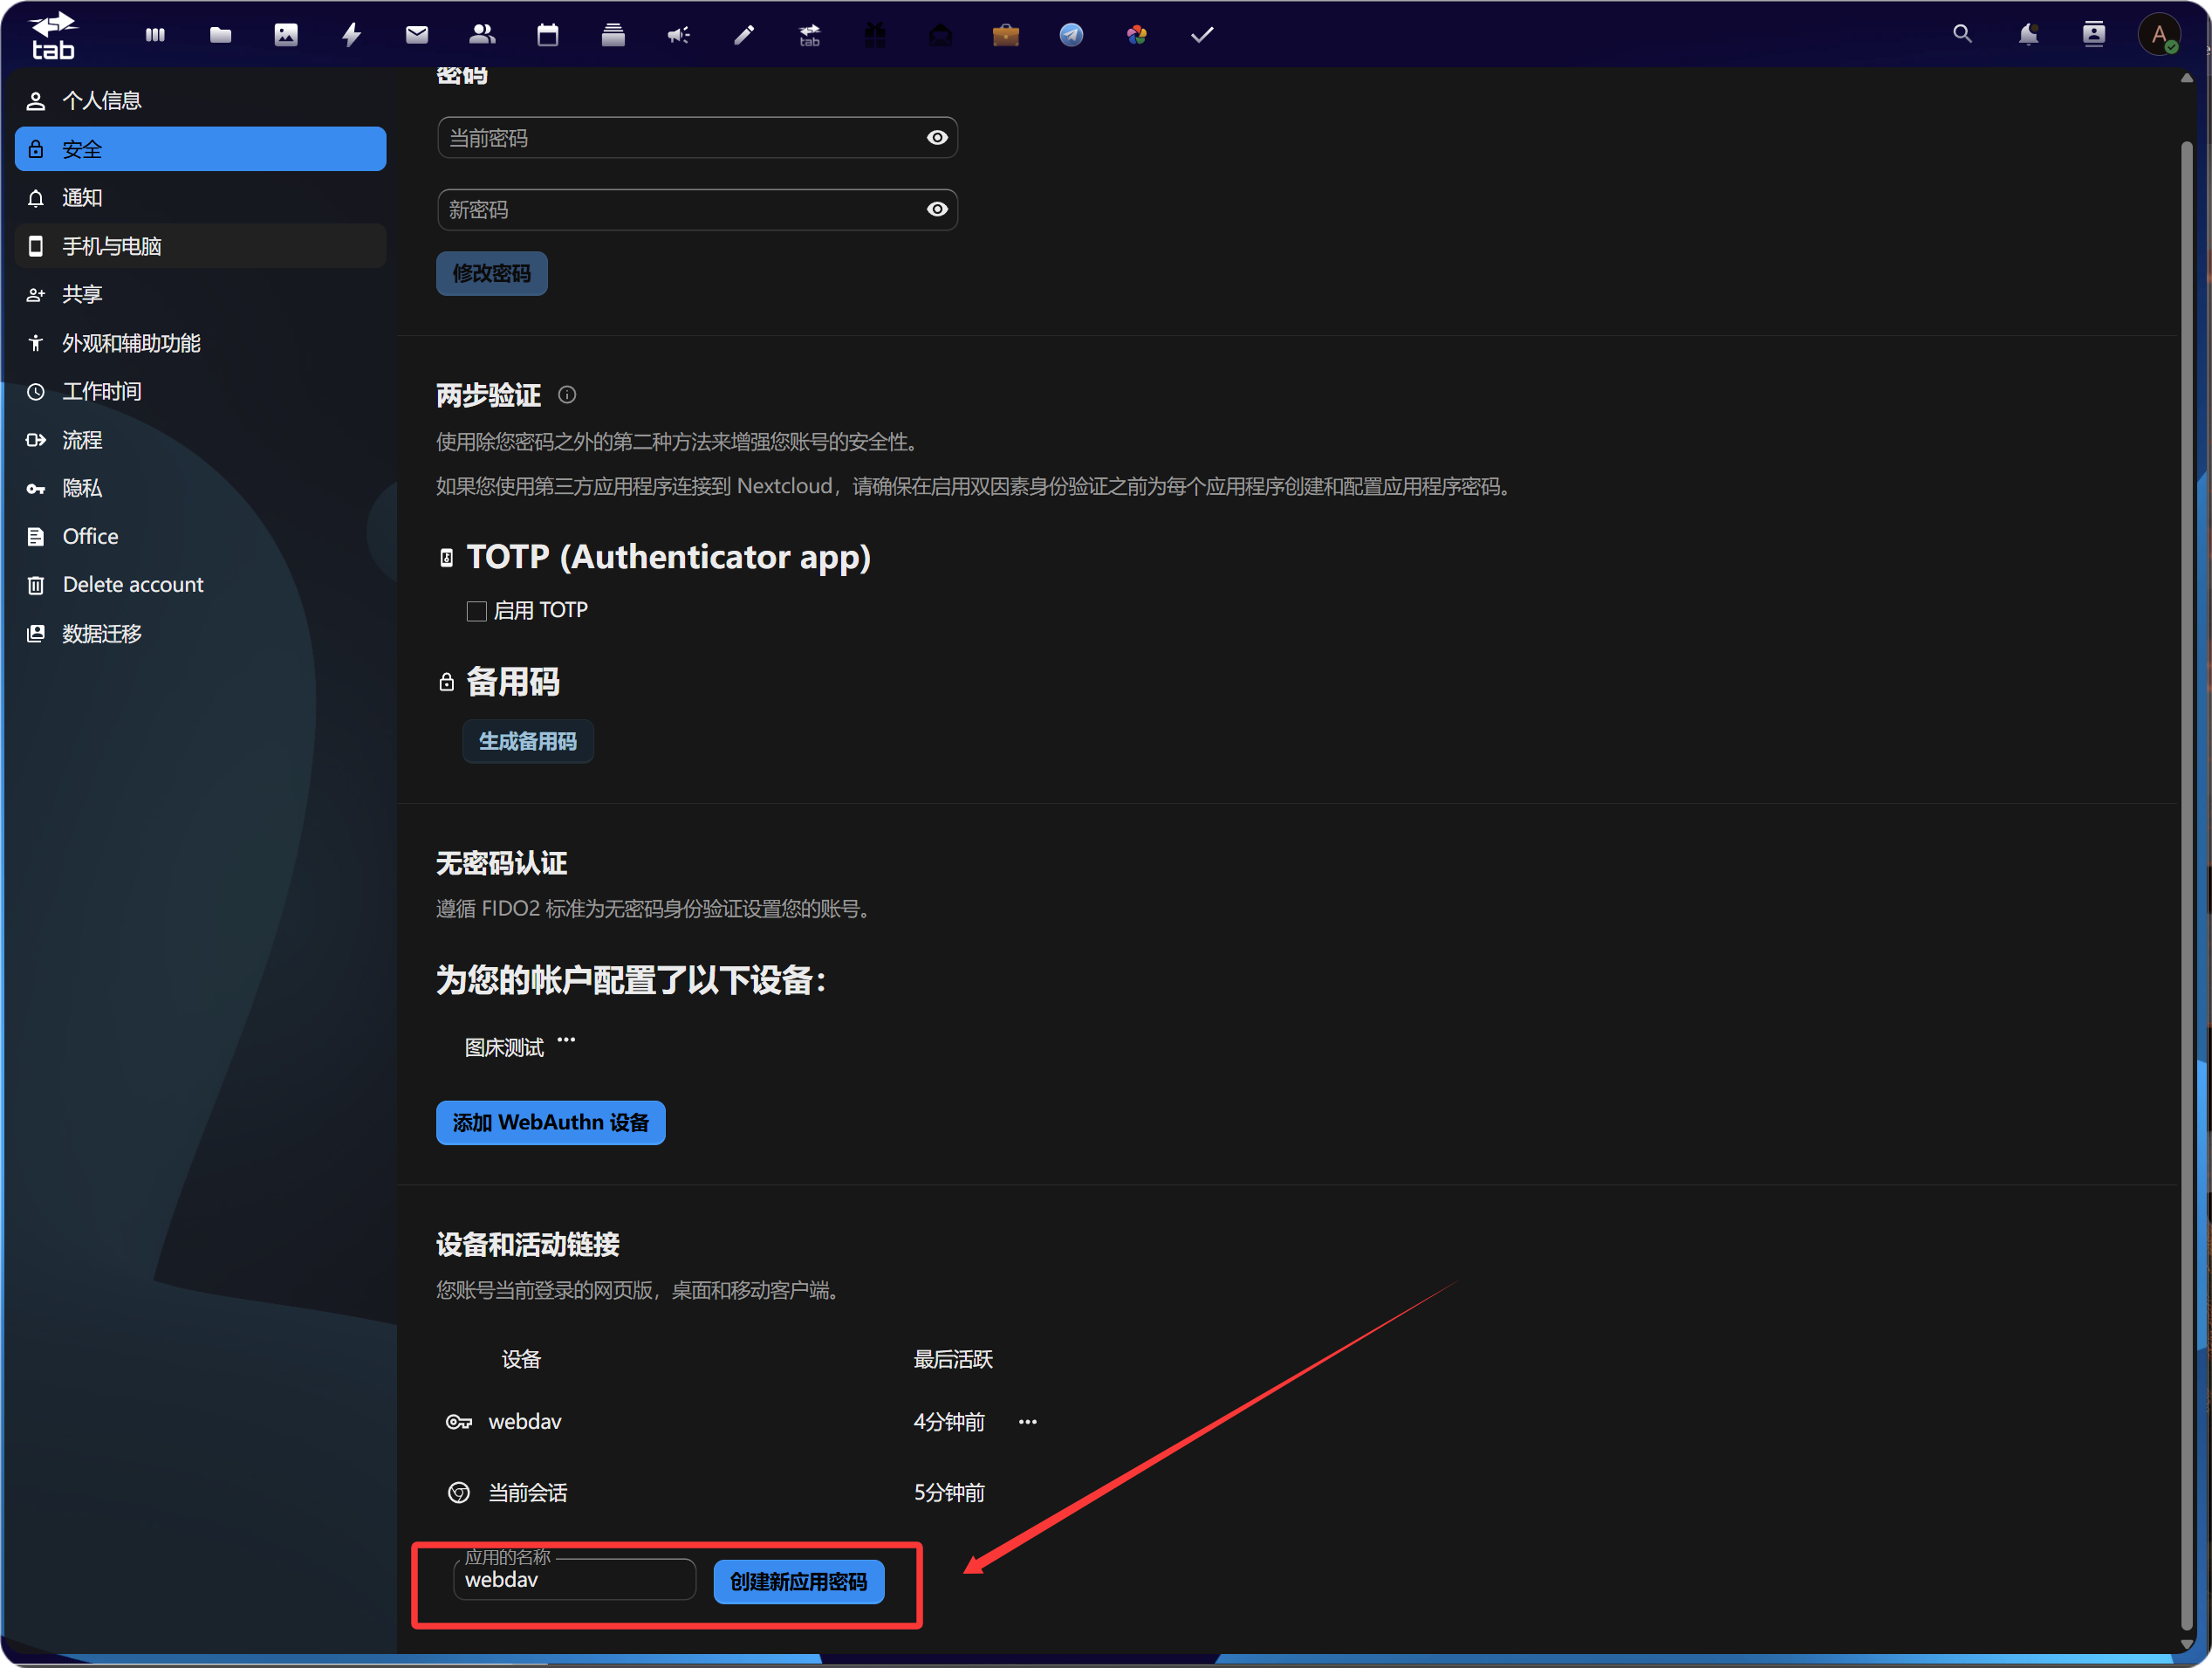
बनने के बाद नया app password copy और save करें। यह आम तौर पर केवल एक बार दिखता है।

2. ImgBed में WebDAV configuration भरें
ImgBed पर लौटें और WebDAV channel जोड़ें:
| UI Field | Value |
|---|---|
| Endpoint | https://fie.nl.tab.digital/ द्वारा दिया गया WebDAV URL। |
| Username | आपका WebDAV username। |
| Password | अभी बनाया गया app password। |
| Authentication mode | अधिकतर मामलों में Basic से शुरू करें। |
| Storage directory | default imgbed; चाहें तो custom directory use करें। |
बड़ी फ़ाइलों का upload behavior
WebDAV channel अब real session-based chunked upload का उपयोग करता है।
छोटी files एक complete file के रूप में upload होती हैं। 64 MiB से बड़ी files लगभग 10 MiB chunks में अपने आप split होकर remote chunk directory में upload होती हैं।
WebDAV service को partial update या offset-based writes support करने की ज़रूरत नहीं है। ImgBed remote server पर chunks को एक बड़ी file में merge नहीं करता। इसके बजाय chunk manifest store करता है और file request होने पर chunks को क्रम से पढ़ता है।
व्यवहार में:
| File Size | Upload Method | Remote Storage Layout |
|---|---|---|
| 64 MiB या कम | Normal upload | एक complete file |
| 64 MiB से अधिक | Real session chunked upload | कई chunk files वाली chunk directory |
chunk directory केवल remote storage layout को प्रभावित करती है। ImgBed में file URL नहीं बदलता। उपयोगकर्ता file को वही original /file/... link से access करते हैं।
Setup Steps
- Upload Settings खोलें।
- Add Channel पर क्लिक करें।
WebDAVचुनें।- पहचानने लायक channel name डालें, जैसे
koofr। - WebDAV endpoint डालें, जैसे
https://app.koofr.net/dav/Koofr। - username और password डालें।
- authentication mode default रूप से
Basicरखें। - storage directory को
imgbedरखें, या अपनी directory डालें। - Save पर क्लिक करें।
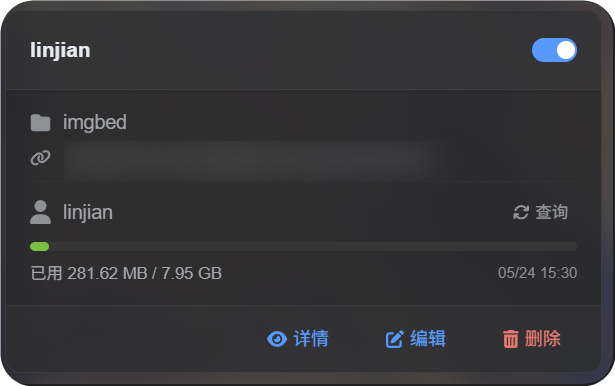
- save के बाद channel card जाँचें, उपलब्ध हो तो capacity query करें, और test file upload करें।
कैसे जाँचें
| जाँच | कैसे verify करें |
|---|---|
| Channel card दिखता है | save करने के बाद Upload Settings page में WebDAV channel card दिखना चाहिए। |
| Channel enabled है | card के ऊपर दाएँ switch को on रहना चाहिए। |
| Credentials save हैं | detail view में Endpoint, username, authentication mode और storage directory दिखने चाहिए। |
| छोटी file upload होती है | test image upload करें और file WebDAV directory में दिखाई दे। |
| बड़ी file rule काम करता है | 64 MiB से बड़ी files chunked upload use करती हैं और remote chunk directory बनाती हैं। |
| Capacity query काम करती है | server capacity info support करता हो तो query used और total capacity दिखाएगी। |
FAQ
बड़ी WebDAV files chunk directory क्यों बनाती हैं?
यह बड़ी files के लिए वर्तमान storage method है।
64 MiB से बड़ी files एक बड़ी remote file में merge नहीं होतीं। वे chunk directory के रूप में रखी जाती हैं। ImgBed chunk manifest record करता है और chunks को क्रम से पढ़कर पूरा content लौटाता है।
बड़ी file upload fail हो तो पहले क्या जाँचें?
पहले Endpoint, username, password और storage directory जाँचें। फिर confirm करें कि WebDAV service directory creation, file writing और file reading allow करती है।
अगर capacity query fail हो लेकिन छोटी file upload काम करे, तो server शायद capacity reporting support नहीं करता या restrict करता है। इसका मतलब upload unavailable होना ज़रूरी नहीं।
कौन सा authentication mode इस्तेमाल करें?
Basic से शुरू करें।
server स्पष्ट रूप से digest authentication मांगे तो Digest use करें।
अगर unsure हों, automatic negotiation use करें।
Quick Checklist
text
WebDAV endpoint, username और password तैयार करें
-> Upload Settings खोलें
-> Add Channel
-> WebDAV चुनें
-> Endpoint / username / password डालें
-> authentication mode को default Basic रखें
-> storage directory को default imgbed रखें
-> Save
-> capacity query करें
-> test file upload करें