Thêm WebDAV Channel
Phù hợp nhất khi nào
Dùng WebDAV channel khi:
- Bạn có NAS, cloud drive hoặc object storage service cung cấp WebDAV endpoint.
- Bạn muốn uploaded images được lưu trong WebDAV directory của riêng mình.
- Bạn muốn credentials được lưu trong D1
upload_channelstable thay vì expose lâu dài ở frontend.
Cần chuẩn bị gì trước khi bắt đầu
| Requirement | Purpose |
|---|---|
| WebDAV Endpoint | Server-side WebDAV URL, ví dụ https://nas.example.com/dav. |
| Username | Dùng để sign in vào WebDAV service. |
| Password | Dùng để sign in vào WebDAV service. |
| Authentication mode | Mặc định là Basic. Chỉ dùng Digest hoặc auto negotiation nếu server yêu cầu. |
| Storage directory | Directory dùng để lưu files. Mặc định là imgbed. |
Thêm ở đâu
- Mở System Settings.
- Vào Upload Settings.
- Nhấn Add Channel ở góc trên bên phải.
- Chọn
WebDAV.
Field Reference
| Field | Tác dụng | Required |
|---|---|---|
| Channel name | Tên dễ nhận biết cho WebDAV channel, ví dụ koofr hoặc nas. | Yes |
| Endpoint | Full WebDAV endpoint, bao gồm https://. | Yes |
| Username | WebDAV login username. | Yes |
| Password | WebDAV login password. | Yes |
| Authentication mode | Thường dùng Basic; dùng Digest nếu server yêu cầu digest authentication. | Yes |
| Storage directory | Directory nơi files được lưu. Mặc định là imgbed. | No |
Example: fie.nl.tab.digital
1. Tạo App Password
Mở account security settings, tìm application passwords và tạo app password mới.
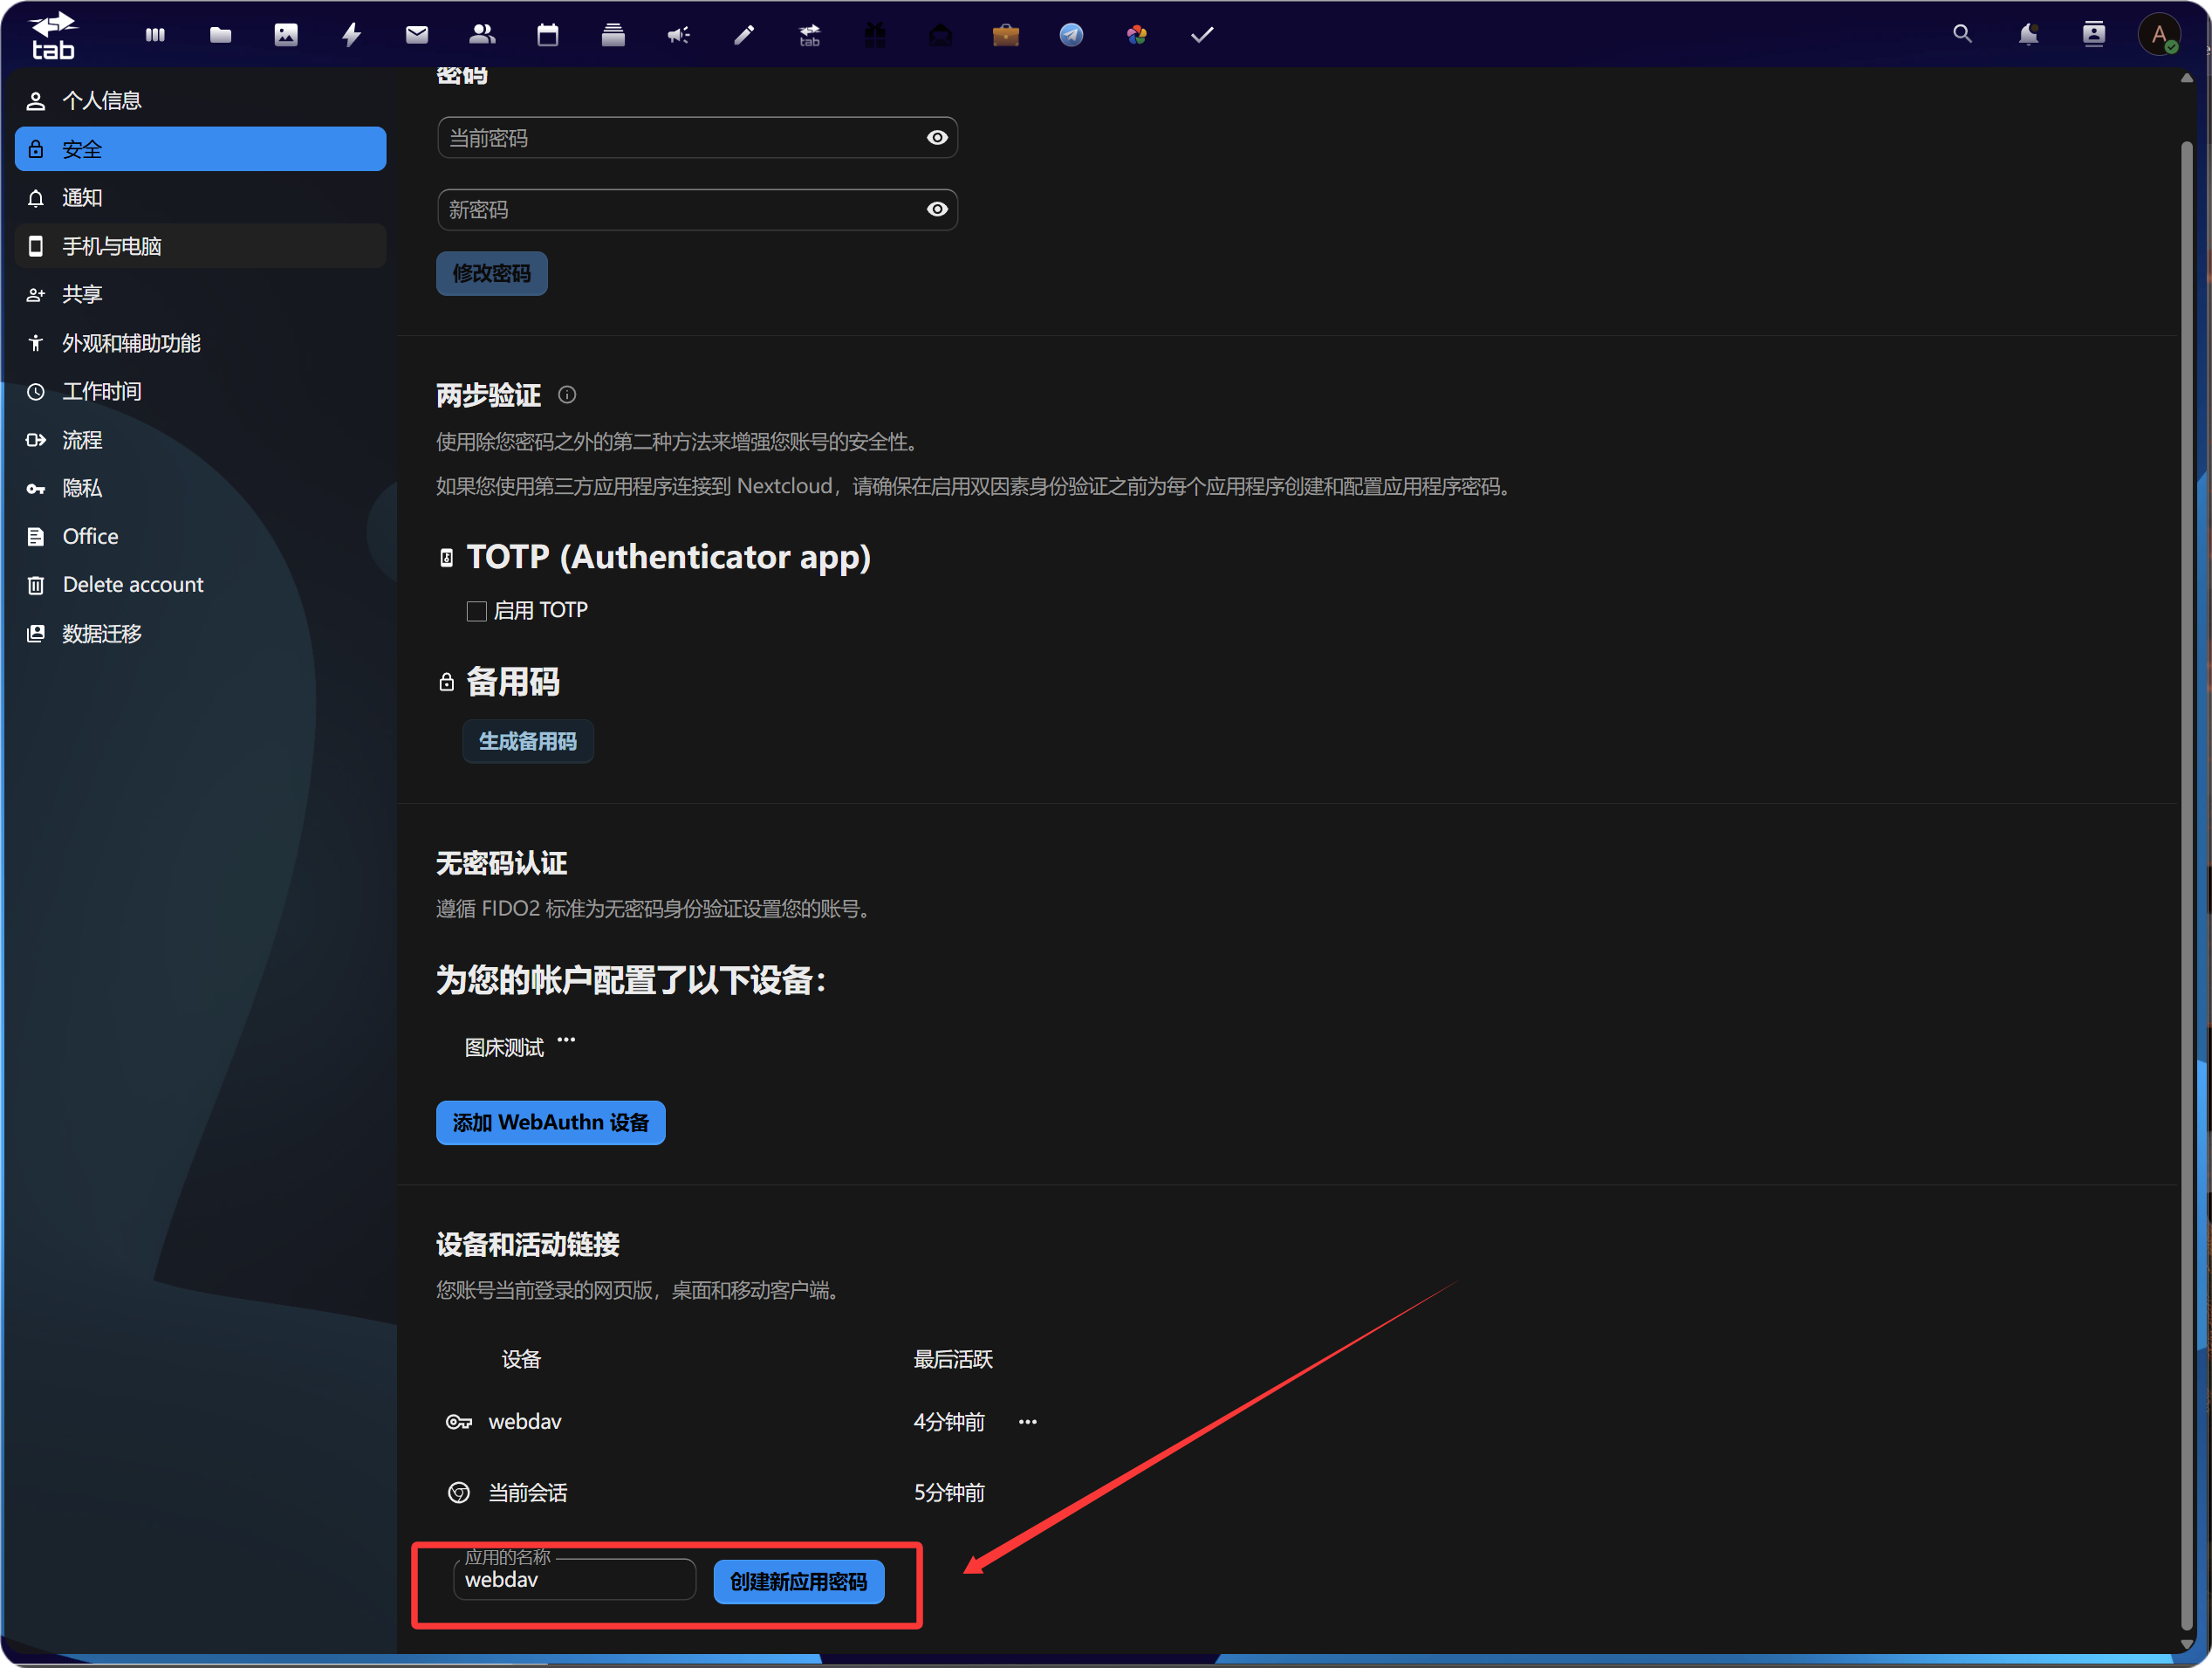
Sau khi tạo, copy và lưu app password mới. Thường password này chỉ hiện một lần.

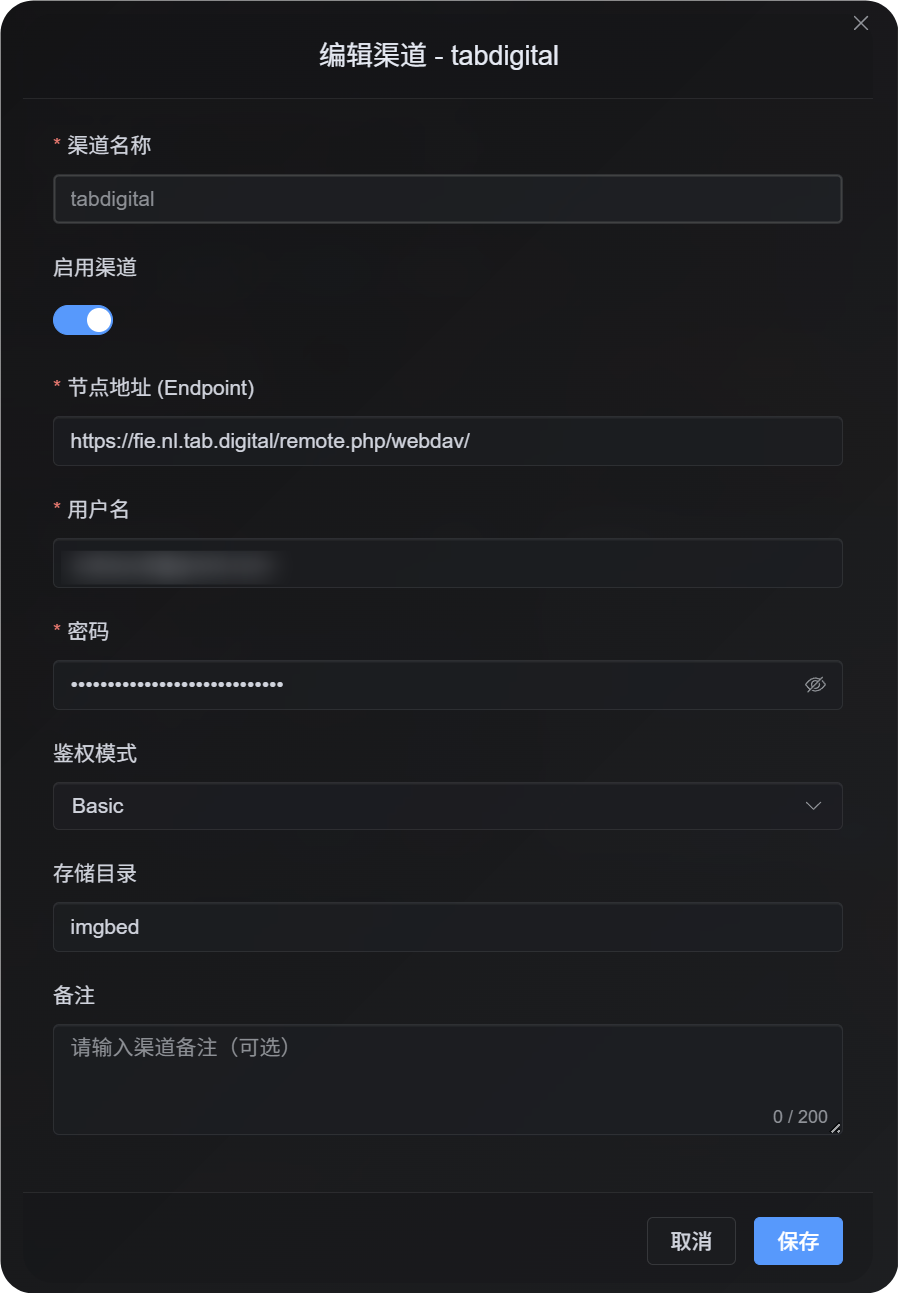
2. Điền WebDAV Configuration trong ImgBed
Quay lại ImgBed và thêm WebDAV channel:
| UI Field | Value |
|---|---|
| Endpoint | WebDAV URL do https://fie.nl.tab.digital/ cung cấp. |
| Username | WebDAV username của bạn. |
| Password | App password vừa tạo. |
| Authentication mode | Hầu hết trường hợp bắt đầu với Basic. |
| Storage directory | Mặc định là imgbed; cũng có thể dùng custom directory. |
Hành vi upload file lớn
WebDAV channel hiện dùng real session-based chunked upload.
Files nhỏ được upload dưới dạng một complete file. Files lớn hơn 64 MiB sẽ tự động được chia thành chunks khoảng 10 MiB và upload vào remote chunk directory.
WebDAV service không cần hỗ trợ partial update hoặc offset-based writes. ImgBed không merge chunks thành một large file trên remote server. Thay vào đó, ImgBed lưu chunk manifest và đọc chunks theo thứ tự khi file được request.
Thực tế:
| File Size | Upload Method | Remote Storage Layout |
|---|---|---|
| 64 MiB hoặc nhỏ hơn | Normal upload | Một complete file |
| Lớn hơn 64 MiB | Real session chunked upload | Một chunk directory chứa nhiều chunk files |
Chunk directory chỉ ảnh hưởng đến remote storage layout. File URL trong ImgBed không đổi. Users vẫn access file bằng link /file/... ban đầu.
Các bước thiết lập
- Mở Upload Settings.
- Nhấn Add Channel.
- Chọn
WebDAV. - Nhập channel name dễ nhận biết, ví dụ
koofr. - Nhập WebDAV endpoint, ví dụ
https://app.koofr.net/dav/Koofr. - Nhập username và password.
- Giữ authentication mode là
Basictheo mặc định. - Giữ storage directory là
imgbed, hoặc đổi sang directory của bạn. - Nhấn Save.
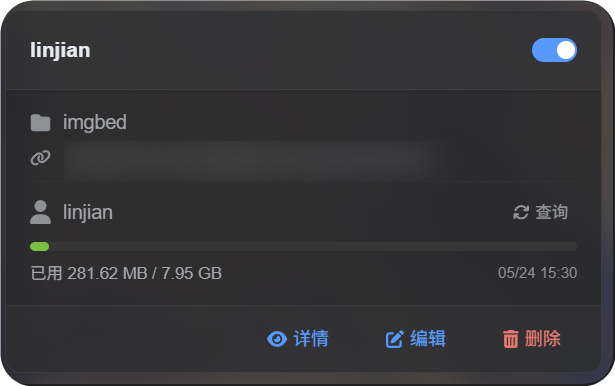
- Sau khi save, kiểm tra channel card, query capacity nếu có, và upload test file.
Cách kiểm tra
| Check | Cách kiểm tra |
|---|---|
| Channel card xuất hiện | Sau khi save, trang Upload Settings cần hiển thị WebDAV channel card. |
| Channel enabled | Switch ở góc trên bên phải card nên ở trạng thái on. |
| Credentials đã lưu | Detail view cần hiển thị Endpoint, username, authentication mode và storage directory. |
| Small file upload hoạt động | Upload test image và xác nhận file xuất hiện trong WebDAV directory. |
| Large file rule hoạt động | Files lớn hơn 64 MiB dùng chunked upload và tạo remote chunk directory. |
| Capacity query hoạt động | Nếu server hỗ trợ capacity information, query sẽ hiển thị used và total capacity. |
FAQ
Vì sao large WebDAV files tạo chunk directory?
Đây là storage method hiện tại cho large files.
Files lớn hơn 64 MiB không được merge thành một remote file lớn. Chúng được lưu dưới dạng chunk directory. ImgBed ghi chunk manifest và trả về complete content bằng cách đọc chunks theo thứ tự.
Large file upload fail thì nên kiểm tra gì trước?
Trước hết kiểm tra Endpoint, username, password và storage directory. Sau đó xác nhận WebDAV service cho phép tạo directory, ghi file và đọc file.
Nếu capacity query fail nhưng small file upload vẫn hoạt động, server có thể đơn giản là không hỗ trợ hoặc giới hạn capacity reporting. Điều đó không nhất thiết có nghĩa upload không dùng được.
Nên dùng authentication mode nào?
Bắt đầu với Basic.
Nếu server yêu cầu digest authentication rõ ràng, dùng Digest.
Nếu không chắc, dùng automatic negotiation.
Quick Checklist
text
Chuẩn bị WebDAV endpoint, username và password
-> Mở Upload Settings
-> Add Channel
-> Chọn WebDAV
-> Nhập Endpoint / username / password
-> Giữ authentication mode là Basic theo mặc định
-> Giữ storage directory là imgbed theo mặc định
-> Save
-> Query capacity
-> Upload test file