WebDAV Channel যোগ করা
কখন সবচেয়ে উপযোগী
WebDAV channel ব্যবহার করুন যখন:
- আপনার NAS, cloud drive বা object storage service WebDAV endpoint দেয়।
- Uploaded images নিজের WebDAV directory-তে সংরক্ষণ করতে চান।
- Credentials দীর্ঘমেয়াদে frontend-এ expose না করে D1
upload_channelstable-এ save করতে চান।
শুরু করার আগে যা লাগবে
| Requirement | Purpose |
|---|---|
| WebDAV Endpoint | Server-side WebDAV URL, যেমন https://nas.example.com/dav। |
| Username | WebDAV service-এ sign in করতে লাগে। |
| Password | WebDAV service-এ sign in করতে লাগে। |
| Authentication mode | Default Basic। Server চাইলে শুধু Digest বা auto negotiation ব্যবহার করুন। |
| Storage directory | Files সংরক্ষণের directory। Default imgbed। |
কোথায় যোগ করবেন
- System Settings খুলুন।
- Upload Settings-এ যান।
- উপরের ডান পাশে Add Channel ক্লিক করুন।
WebDAVনির্বাচন করুন।
Field Reference
| Field | কাজ | Required |
|---|---|---|
| Channel name | WebDAV channel-এর চেনা যায় এমন নাম, যেমন koofr বা nas। | Yes |
| Endpoint | https://-সহ full WebDAV endpoint। | Yes |
| Username | WebDAV login username। | Yes |
| Password | WebDAV login password। | Yes |
| Authentication mode | সাধারণত Basic; server digest authentication চাইলে Digest ব্যবহার করুন। | Yes |
| Storage directory | Files যেখানে রাখা হবে। Default imgbed। | No |
Example: fie.nl.tab.digital
1. App Password তৈরি করুন
Account security settings খুলুন, application passwords খুঁজুন এবং নতুন app password তৈরি করুন।
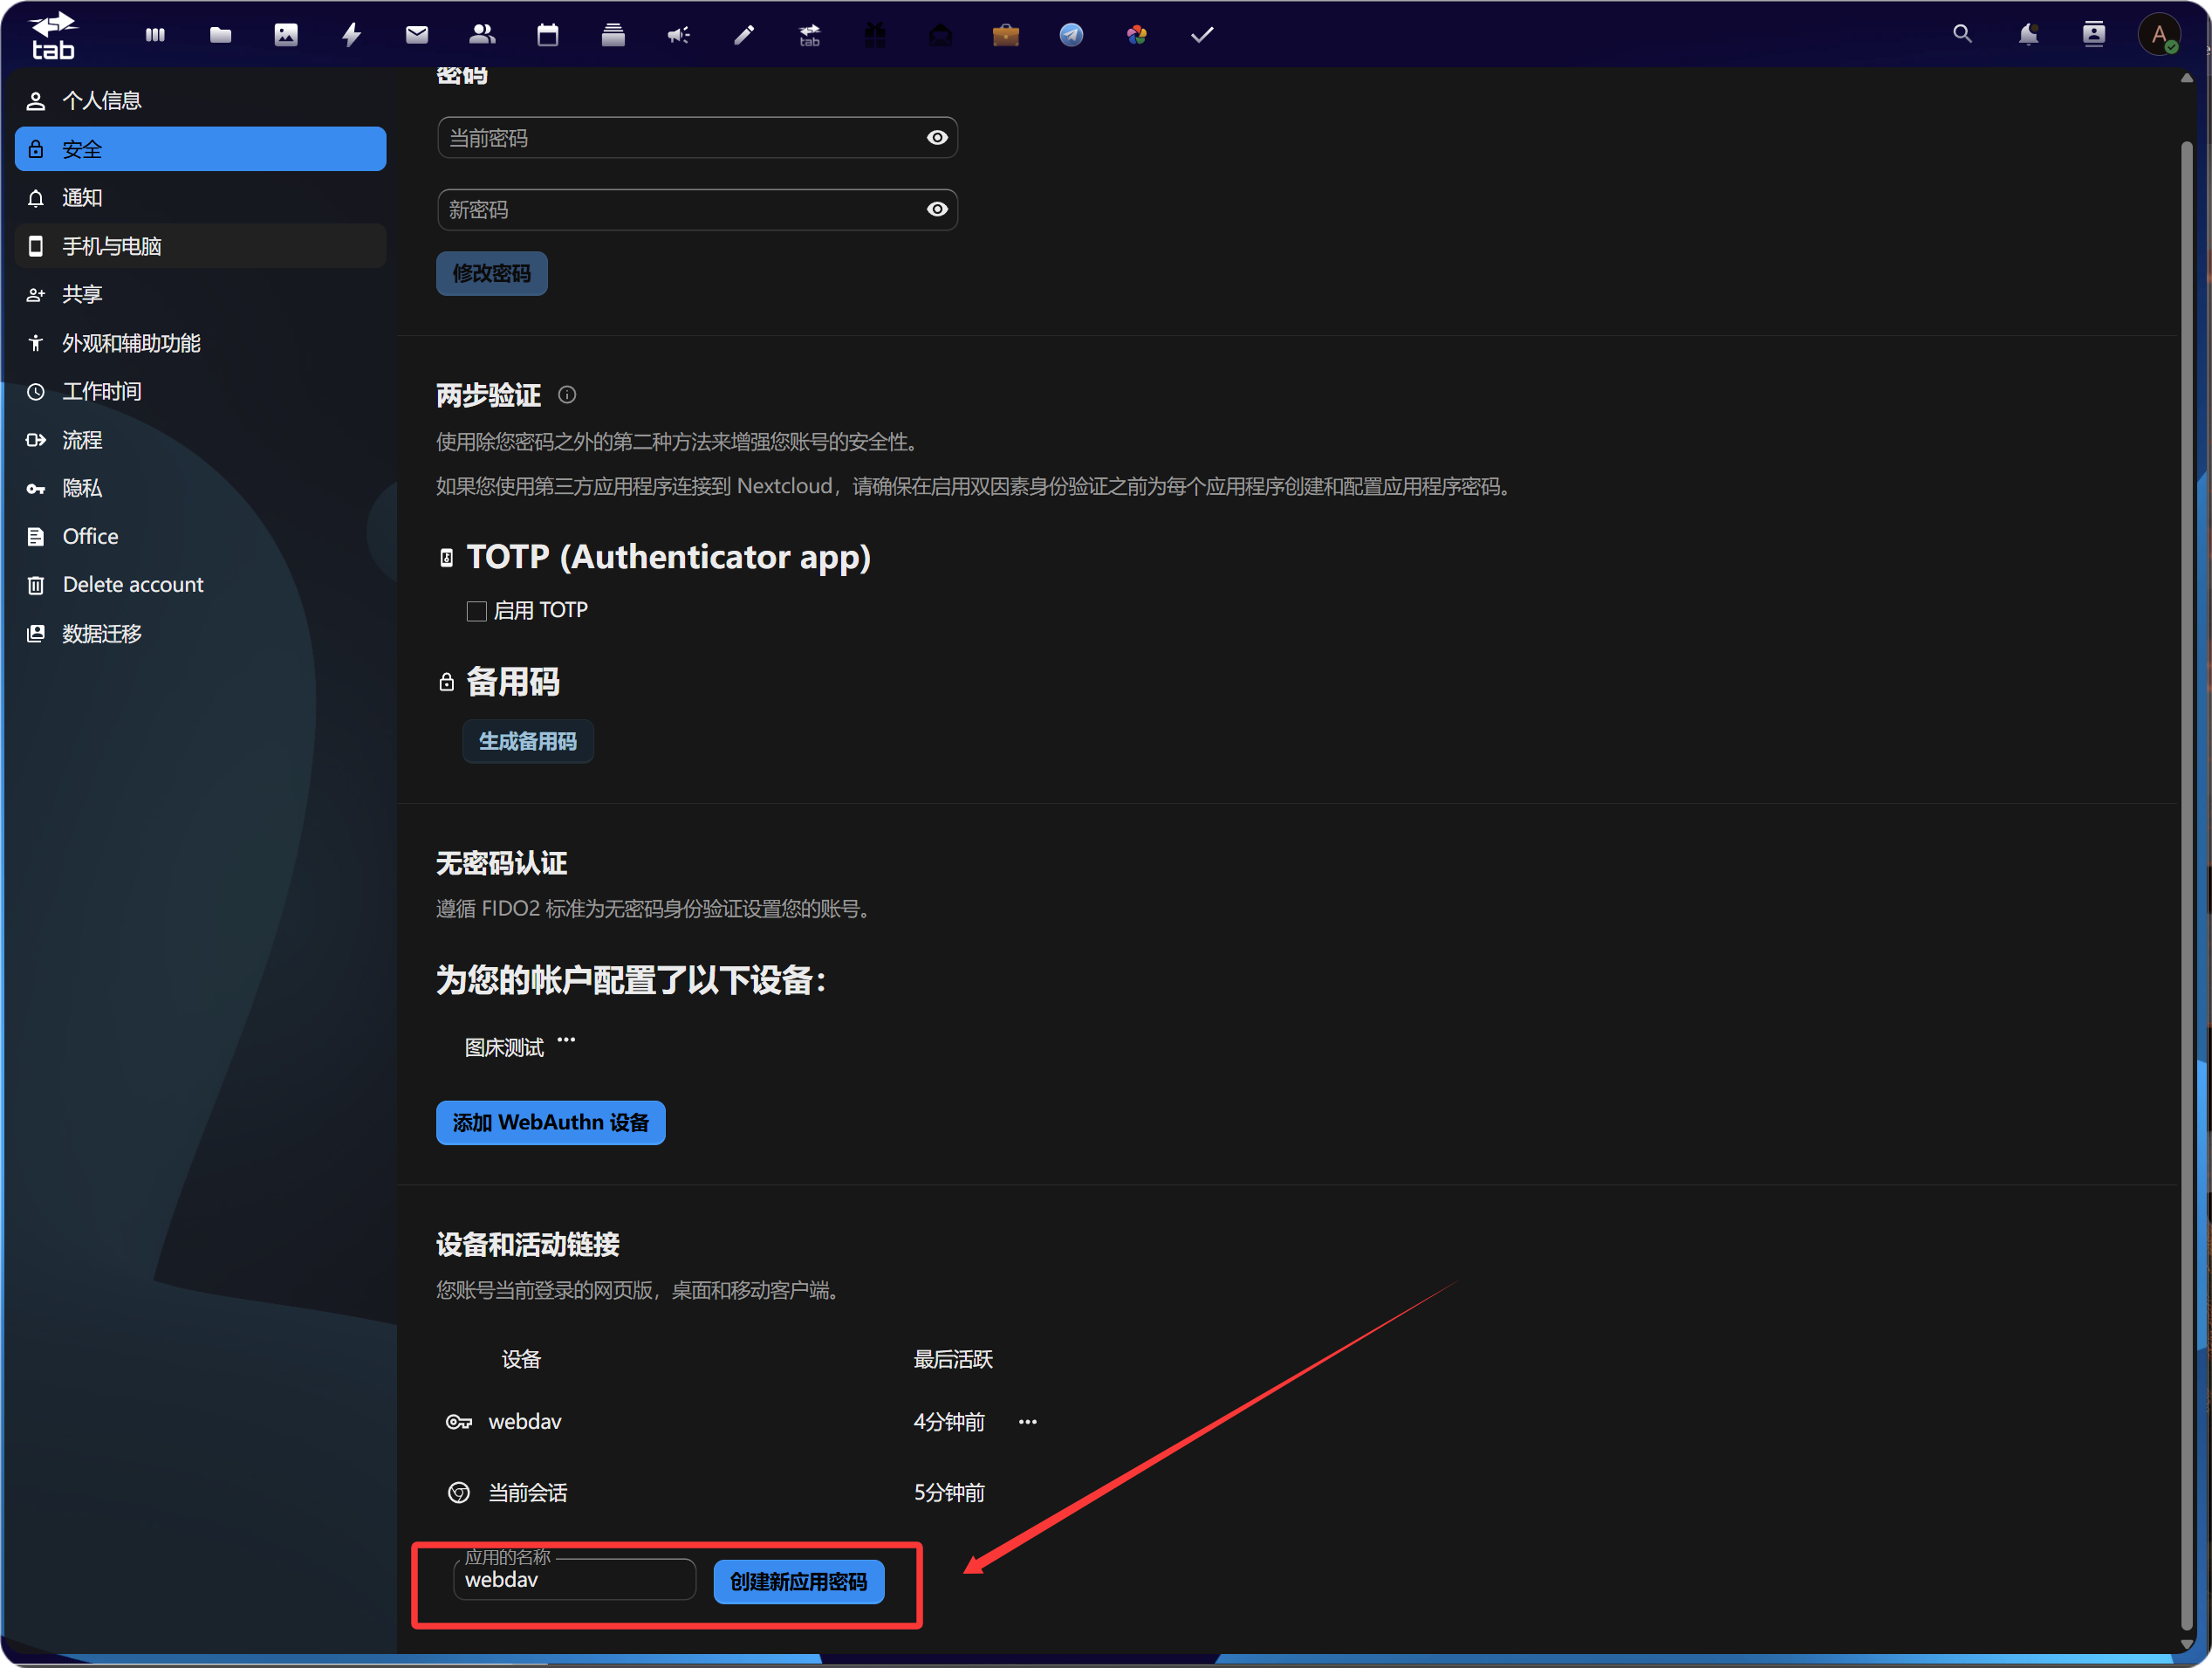
তৈরি হওয়ার পর নতুন app password copy করে save করুন। সাধারণত এটি একবারই দেখানো হয়।

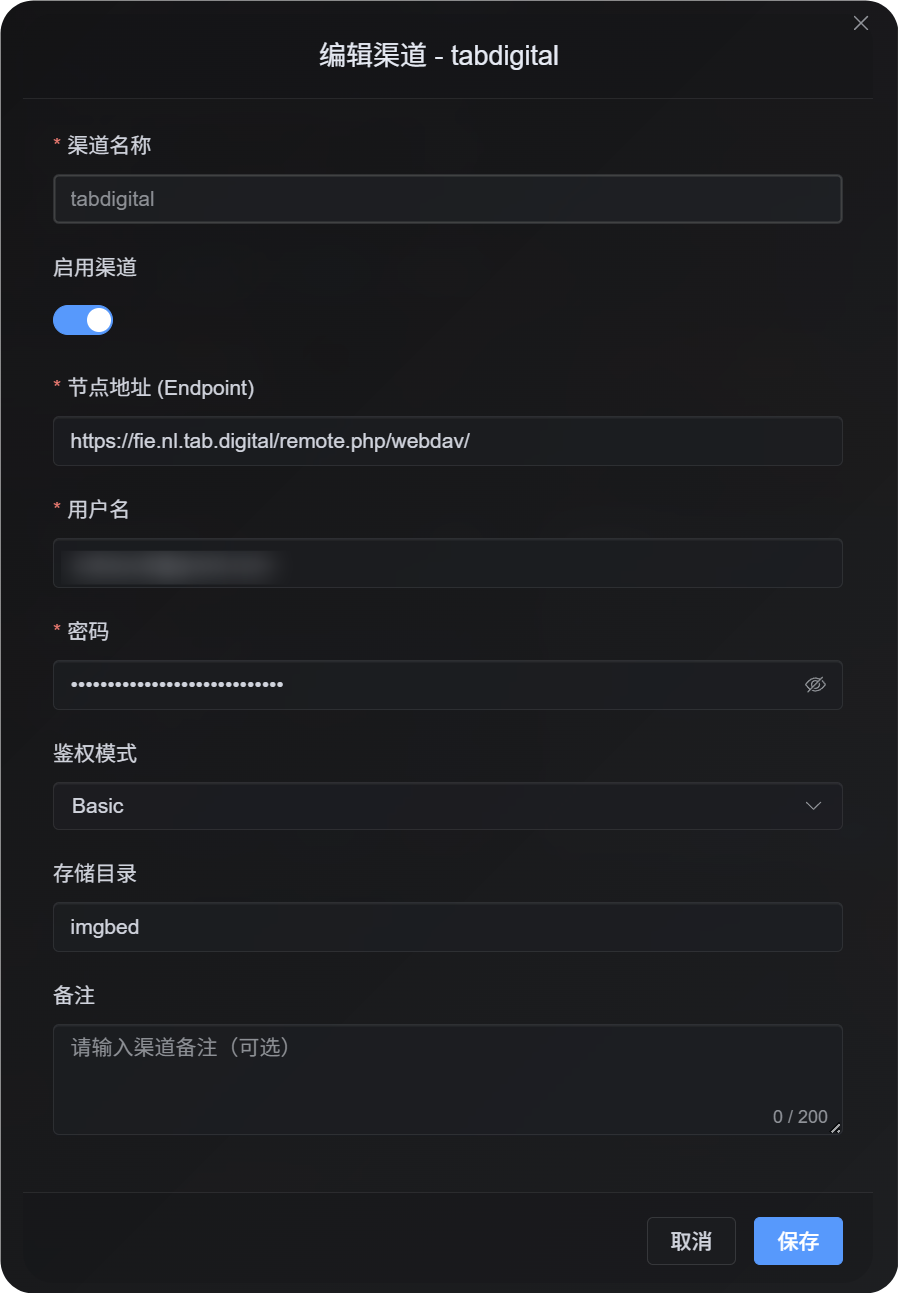
2. ImgBed-এ WebDAV Configuration পূরণ করুন
ImgBed-এ ফিরে WebDAV channel যোগ করুন:
| UI Field | Value |
|---|---|
| Endpoint | https://fie.nl.tab.digital/ থেকে পাওয়া WebDAV URL। |
| Username | আপনার WebDAV username। |
| Password | সদ্য তৈরি করা app password। |
| Authentication mode | বেশিরভাগ ক্ষেত্রে Basic দিয়ে শুরু করুন। |
| Storage directory | Default imgbed; চাইলে custom directory ব্যবহার করতে পারেন। |
Large File Upload Behavior
WebDAV channel এখন real session-based chunked upload ব্যবহার করে।
ছোট files একটিমাত্র complete file হিসেবে upload হয়। 64 MiB-এর বড় files automatically প্রায় 10 MiB করে chunks-এ ভাগ হয়ে remote chunk directory-তে upload হয়।
WebDAV service-এর partial update বা offset-based writes support করার দরকার নেই। ImgBed remote server-এ chunks merge করে একটিমাত্র বড় file বানায় না। এর বদলে chunk manifest store করে এবং file request হলে chunks ক্রমানুসারে পড়ে।
বাস্তবে:
| File Size | Upload Method | Remote Storage Layout |
|---|---|---|
| 64 MiB বা কম | Normal upload | একটি complete file |
| 64 MiB-এর বেশি | Real session chunked upload | Multiple chunk files থাকা chunk directory |
Chunk directory শুধু remote storage layout-এ প্রভাব ফেলে। ImgBed-এর file URL বদলায় না। Users আগের মতো original /file/... link দিয়েই file access করে।
Setup Steps
- Upload Settings খুলুন।
- Add Channel ক্লিক করুন।
WebDAVনির্বাচন করুন।- চেনা যায় এমন channel name দিন, যেমন
koofr। - WebDAV endpoint দিন, যেমন
https://app.koofr.net/dav/Koofr। - Username এবং password দিন।
- Default হিসেবে authentication mode
Basicরাখুন। - Storage directory
imgbedরাখুন, বা নিজের directory দিন। - Save ক্লিক করুন।
- Save করার পর channel card check করুন, capacity available হলে query করুন, এবং test file upload করুন।
কীভাবে যাচাই করবেন
| Check | কীভাবে যাচাই করবেন |
|---|---|
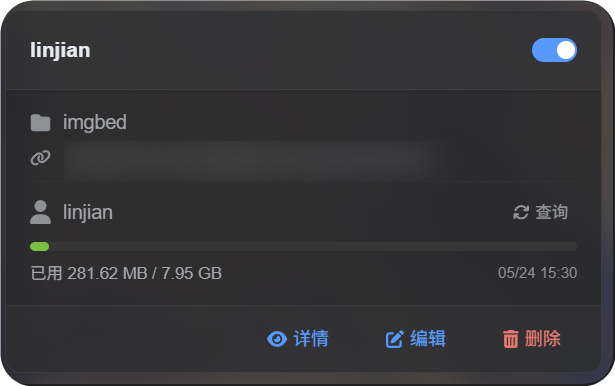
| Channel card দেখা যায় | Save করার পর Upload Settings পেজে WebDAV channel card দেখা উচিত। |
| Channel enabled | Card-এর upper-right switch on থাকা উচিত। |
| Credentials save হয়েছে | Detail view-তে Endpoint, username, authentication mode এবং storage directory দেখা উচিত। |
| Small file upload কাজ করে | Test image upload করে WebDAV directory-তে file এসেছে কি না দেখুন। |
| Large file rule কাজ করে | 64 MiB-এর বড় files chunked upload ব্যবহার করে এবং remote chunk directory তৈরি করে। |
| Capacity query কাজ করে | Server capacity information support করলে query used এবং total capacity দেখাবে। |
FAQ
Large WebDAV files কেন chunk directory তৈরি করে?
এটাই large files-এর বর্তমান storage method।
64 MiB-এর বড় files একটিমাত্র large remote file-এ merge হয় না। এগুলো chunk directory হিসেবে store হয়। ImgBed chunk manifest record করে এবং content ফেরত দেওয়ার সময় chunks ক্রমানুসারে পড়ে।
Large file upload fail হলে আগে কী দেখব?
আগে Endpoint, username, password এবং storage directory check করুন। তারপর WebDAV service directory creation, file writing এবং file reading allow করে কি না confirm করুন।
Capacity query fail হলেও small file upload কাজ করলে server হয়তো capacity reporting support করে না বা restrict করে। তার মানে upload unavailable, এমন নয়।
কোন authentication mode ব্যবহার করব?
Basic দিয়ে শুরু করুন।
Server explicitly digest authentication চাইলে Digest ব্যবহার করুন।
নিশ্চিত না হলে automatic negotiation ব্যবহার করুন।
Quick Checklist
text
WebDAV endpoint, username এবং password প্রস্তুত করুন
-> Upload Settings খুলুন
-> Add Channel
-> WebDAV নির্বাচন করুন
-> Endpoint / username / password দিন
-> Default হিসেবে authentication mode Basic রাখুন
-> Default হিসেবে storage directory imgbed রাখুন
-> Save
-> Query capacity
-> Test file upload করুন