เพิ่ม WebDAV Channel
เหมาะกับกรณีไหน
ใช้ WebDAV channel เมื่อ:
- คุณมี NAS, cloud drive หรือ object storage service ที่มี WebDAV endpoint
- ต้องการให้ uploaded images ถูกเก็บใน WebDAV directory ของคุณเอง
- ต้องการให้ credentials ถูกบันทึกใน D1
upload_channelstable แทนการ expose ระยะยาวใน frontend
สิ่งที่ต้องเตรียมก่อนเริ่ม
| Requirement | Purpose |
|---|---|
| WebDAV Endpoint | Server-side WebDAV URL เช่น https://nas.example.com/dav |
| Username | ใช้ sign in เข้า WebDAV service |
| Password | ใช้ sign in เข้า WebDAV service |
| Authentication mode | ค่าเริ่มต้นคือ Basic ใช้ Digest หรือ auto negotiation เฉพาะเมื่อ server ต้องการ |
| Storage directory | Directory สำหรับเก็บ files ค่าเริ่มต้นคือ imgbed |
เพิ่มได้จากที่ไหน
- เปิด System Settings
- ไปที่ Upload Settings
- คลิก Add Channel ที่มุมขวาบน
- เลือก
WebDAV
Field Reference
| Field | ใช้ทำอะไร | Required |
|---|---|---|
| Channel name | ชื่อที่จำง่ายสำหรับ WebDAV channel เช่น koofr หรือ nas | Yes |
| Endpoint | Full WebDAV endpoint รวม https:// | Yes |
| Username | WebDAV login username | Yes |
| Password | WebDAV login password | Yes |
| Authentication mode | โดยปกติใช้ Basic; ใช้ Digest หาก server ต้องการ digest authentication | Yes |
| Storage directory | Directory สำหรับเก็บ files ค่าเริ่มต้นคือ imgbed | No |
Example: fie.nl.tab.digital
1. สร้าง App Password
เปิด account security settings หา application passwords แล้วสร้าง app password ใหม่
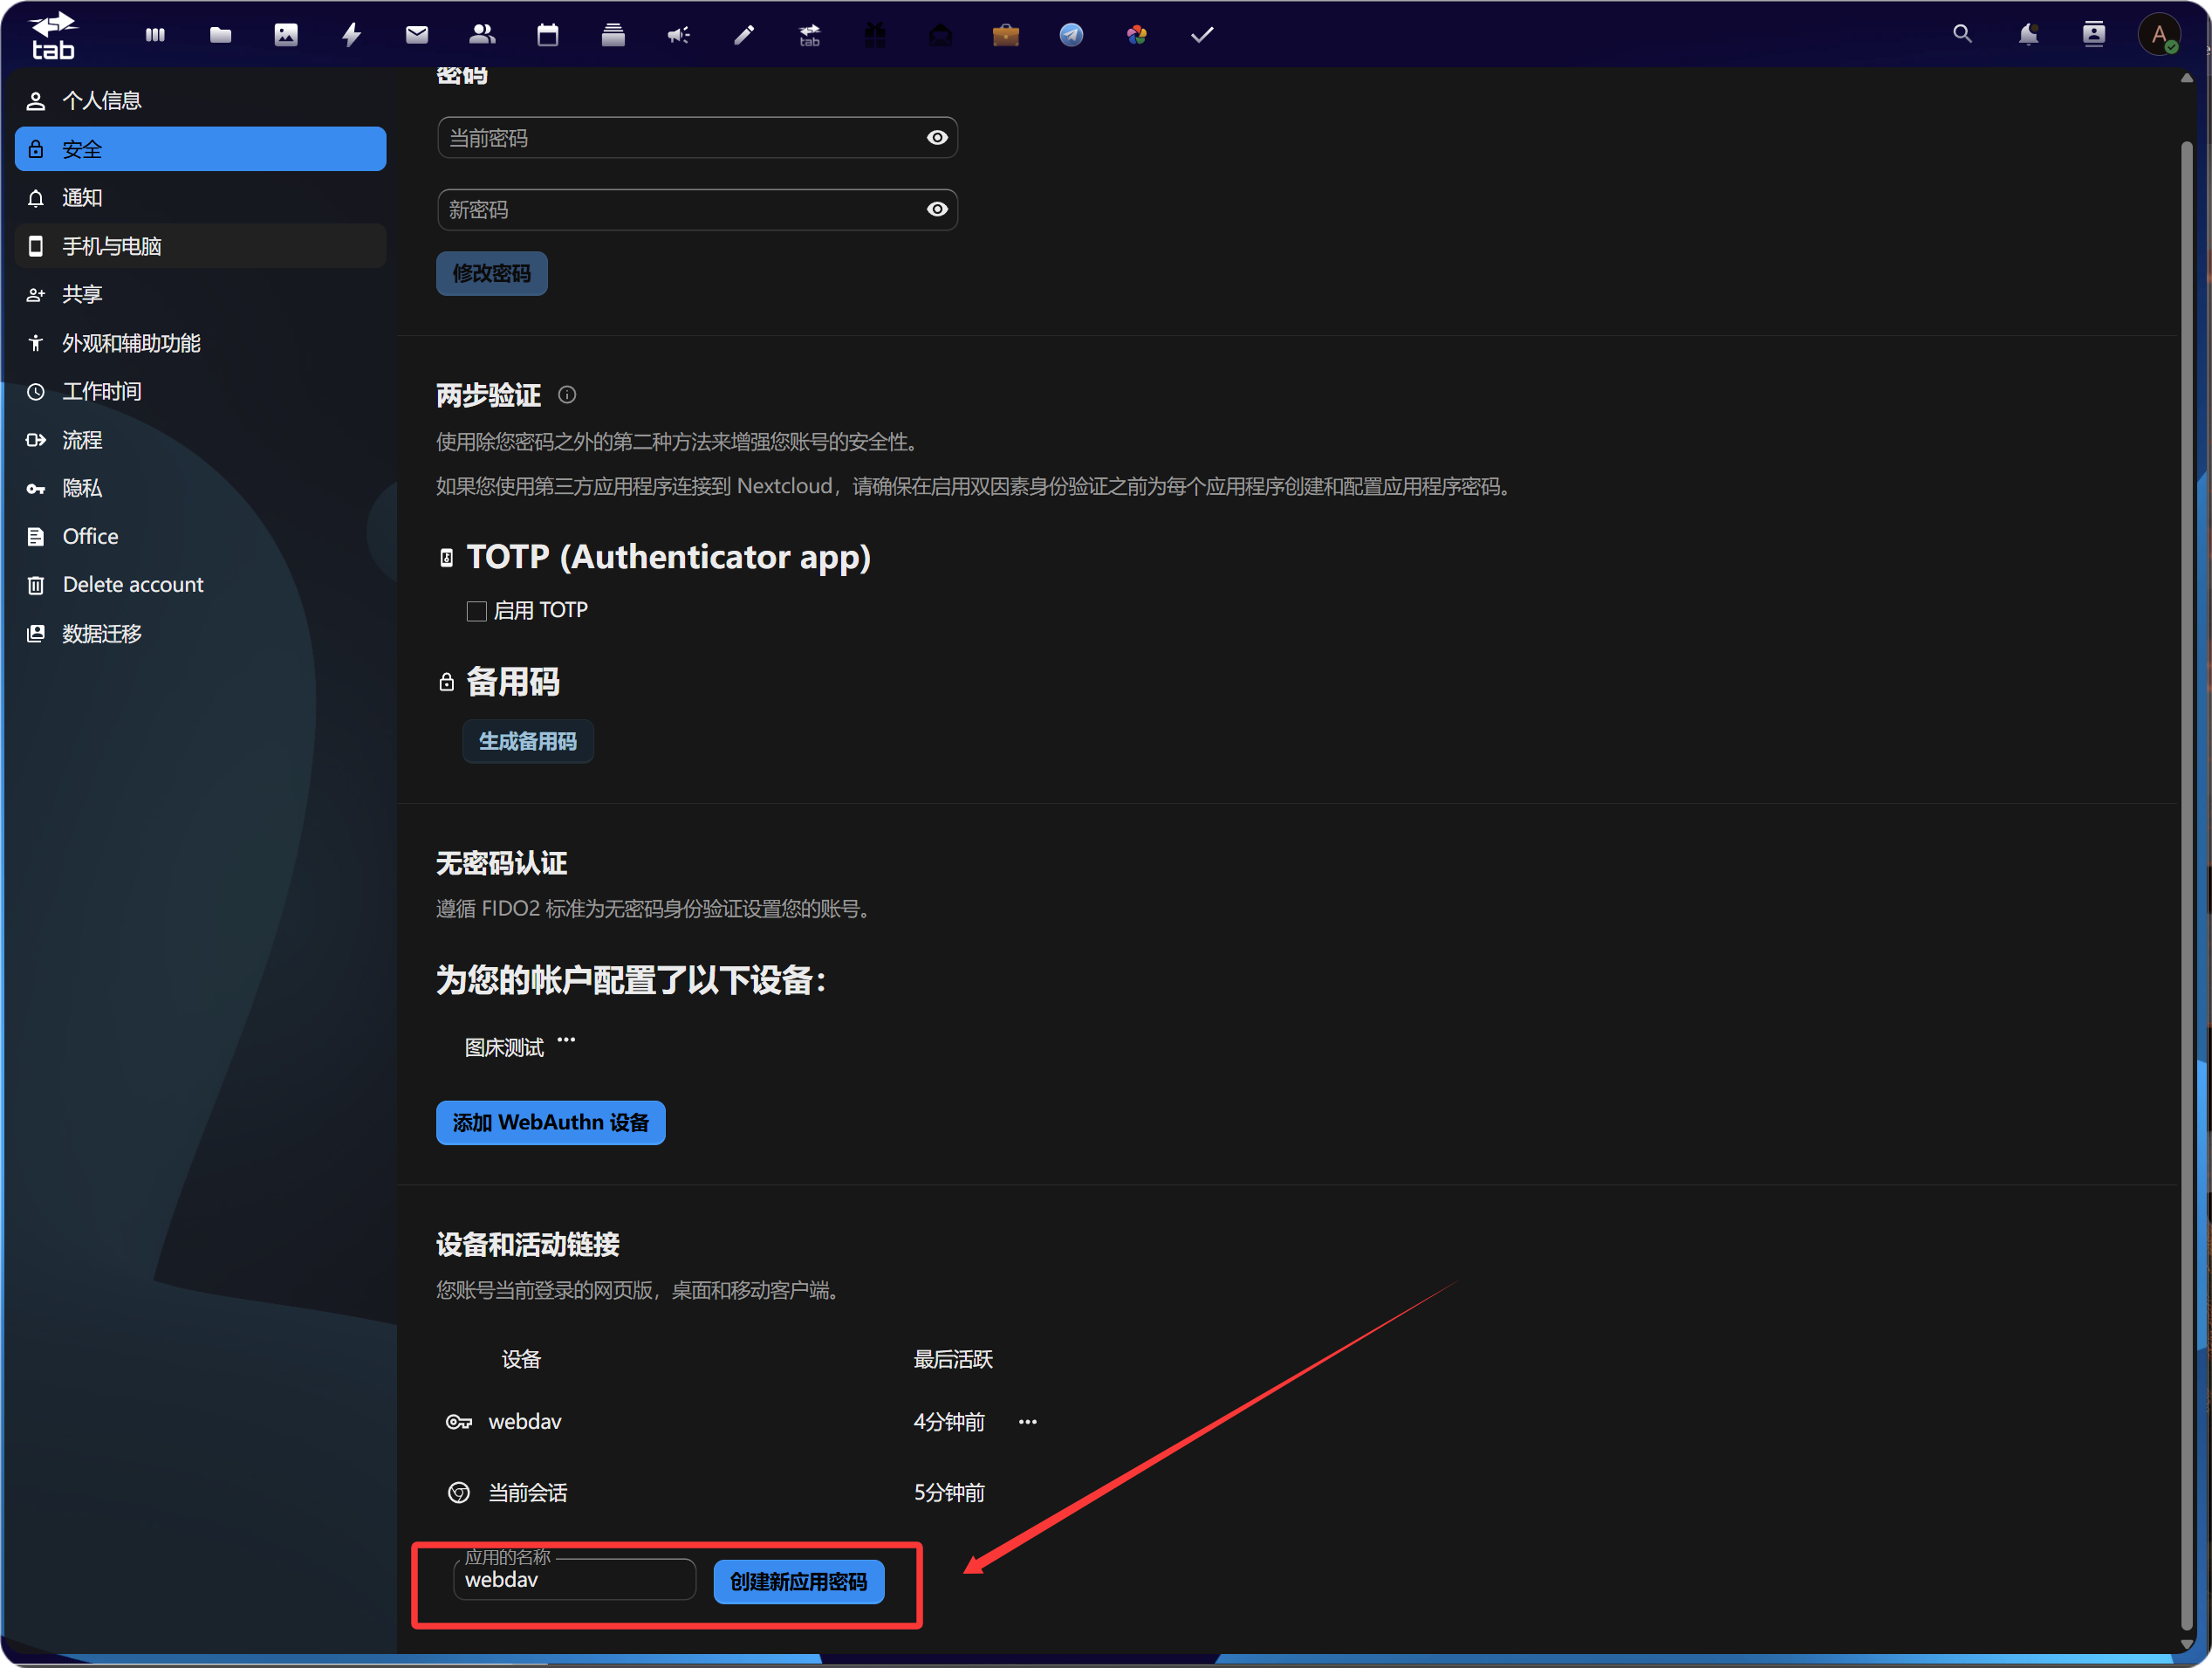
หลังสร้างแล้วให้ copy และ save app password ใหม่ไว้ โดยปกติจะแสดงเพียงครั้งเดียว

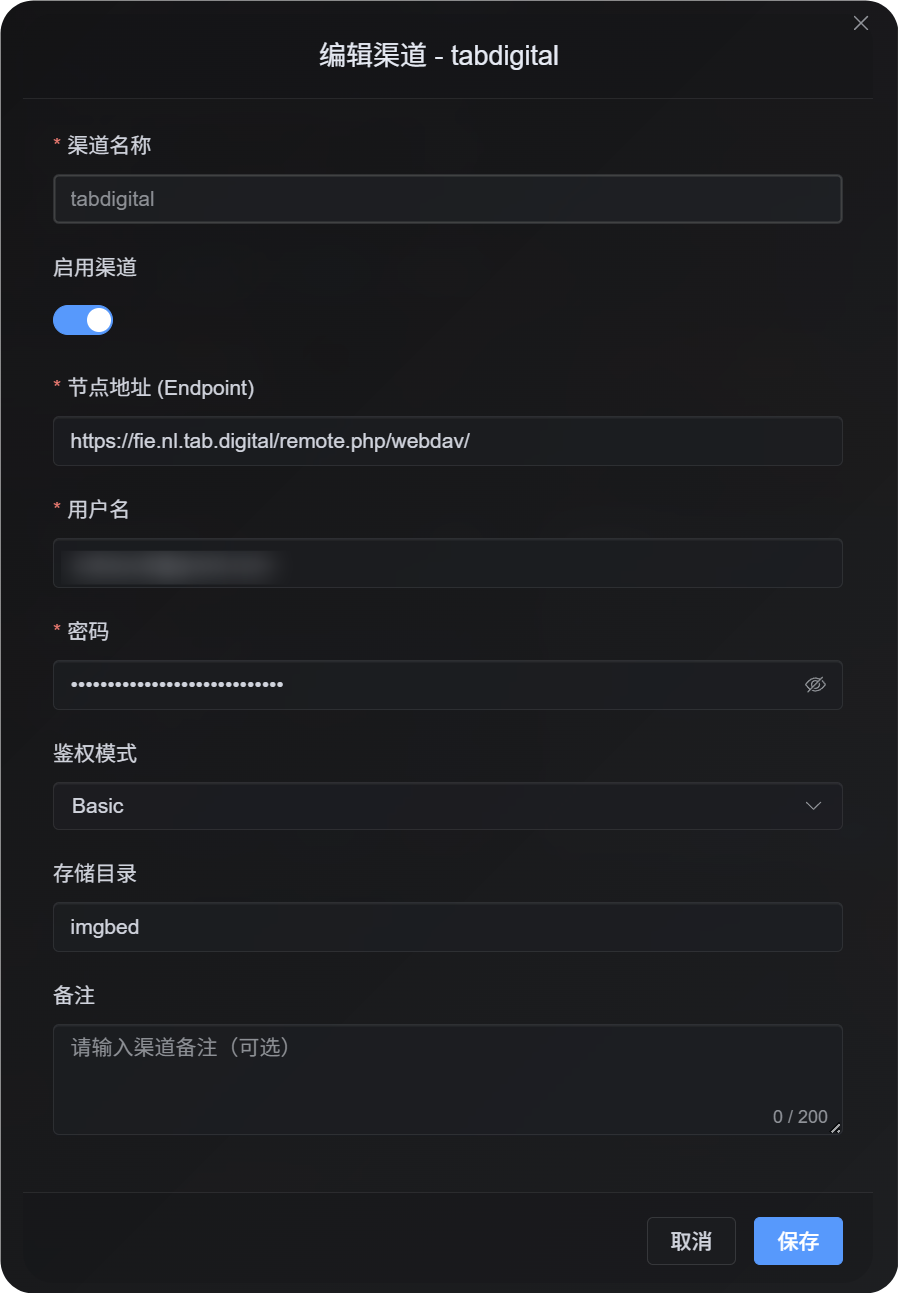
2. ใส่ WebDAV Configuration ใน ImgBed
กลับไปที่ ImgBed แล้วเพิ่ม WebDAV channel:
| UI Field | Value |
|---|---|
| Endpoint | WebDAV URL ที่ได้จาก https://fie.nl.tab.digital/ |
| Username | WebDAV username ของคุณ |
| Password | App password ที่เพิ่งสร้าง |
| Authentication mode | ส่วนใหญ่เริ่มด้วย Basic |
| Storage directory | ค่าเริ่มต้นคือ imgbed; หรือใช้ custom directory ได้ |
พฤติกรรมการ Upload Large File
WebDAV channel ตอนนี้ใช้ real session-based chunked upload
Small files จะถูก upload เป็น complete file ไฟล์เดียว Files ที่ใหญ่กว่า 64 MiB จะถูกแบ่งเป็น chunks ประมาณ 10 MiB อัตโนมัติ แล้ว upload ไปยัง remote chunk directory
WebDAV service ไม่จำเป็นต้องรองรับ partial update หรือ offset-based writes ImgBed จะไม่ merge chunks เป็น large file เดียวบน remote server แต่จะเก็บ chunk manifest และอ่าน chunks ตามลำดับเมื่อมี request file
ในทางปฏิบัติ:
| File Size | Upload Method | Remote Storage Layout |
|---|---|---|
| 64 MiB หรือน้อยกว่า | Normal upload | Complete file ไฟล์เดียว |
| มากกว่า 64 MiB | Real session chunked upload | Chunk directory ที่มีหลาย chunk files |
Chunk directory มีผลเฉพาะ remote storage layout ไม่เปลี่ยน file URL ใน ImgBed Users ยัง access file ผ่าน original /file/... link เหมือนเดิม
ขั้นตอนตั้งค่า
- เปิด Upload Settings
- คลิก Add Channel
- เลือก
WebDAV - ใส่ channel name ที่จำได้ เช่น
koofr - ใส่ WebDAV endpoint เช่น
https://app.koofr.net/dav/Koofr - ใส่ username และ password
- ปล่อย authentication mode เป็น
Basicเป็นค่าเริ่มต้น - ปล่อย storage directory เป็น
imgbedหรือเปลี่ยนเป็น directory ของคุณเอง - คลิก Save
- หลัง save ให้ตรวจ channel card, query capacity ถ้ามี และ upload test file
วิธีตรวจสอบ
| Check | วิธีตรวจสอบ |
|---|---|
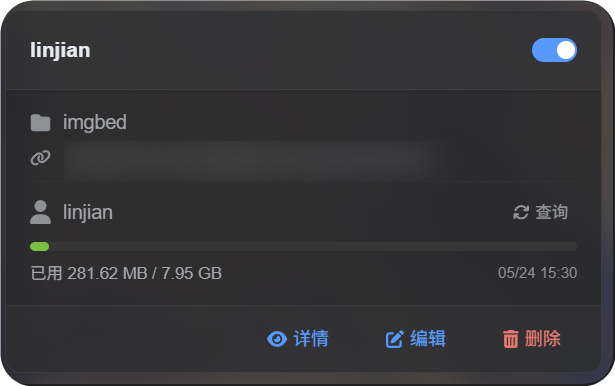
| เห็น channel card | หลัง save หน้า Upload Settings ควรแสดง WebDAV channel card |
| Channel enabled | Switch มุมขวาบนของ card ควรอยู่ on |
| Credentials ถูกบันทึก | Detail view ควรแสดง Endpoint, username, authentication mode และ storage directory |
| Small file upload ใช้งานได้ | Upload test image แล้วตรวจว่า file อยู่ใน WebDAV directory |
| Large file rule ใช้งานได้ | Files ใหญ่กว่า 64 MiB ใช้ chunked upload และสร้าง remote chunk directory |
| Capacity query ใช้งานได้ | ถ้า server รองรับ capacity information query จะแสดง used และ total capacity |
FAQ
ทำไม large WebDAV files ถึงสร้าง chunk directory?
นี่คือ storage method ปัจจุบันสำหรับ large files
Files ที่ใหญ่กว่า 64 MiB จะไม่ถูก merge เป็น remote file ขนาดใหญ่ไฟล์เดียว แต่จะเก็บเป็น chunk directory ImgBed บันทึก chunk manifest และคืน content ที่สมบูรณ์โดยอ่าน chunks ตามลำดับ
Large file upload fail ควรตรวจอะไรก่อน?
ตรวจ Endpoint, username, password และ storage directory ก่อน จากนั้น confirm ว่า WebDAV service อนุญาต directory creation, file writing และ file reading
ถ้า capacity query fail แต่ small file upload ใช้งานได้ server อาจไม่รองรับหรือจำกัด capacity reporting ไม่ได้แปลว่า upload ใช้งานไม่ได้
ควรใช้ authentication mode ไหน?
เริ่มจาก Basic
ถ้า server ระบุว่าต้องใช้ digest authentication ให้ใช้ Digest
ถ้าไม่แน่ใจ ใช้ automatic negotiation
Quick Checklist
text
เตรียม WebDAV endpoint, username และ password
-> เปิด Upload Settings
-> Add Channel
-> เลือก WebDAV
-> ใส่ Endpoint / username / password
-> ปล่อย authentication mode เป็น Basic
-> ปล่อย storage directory เป็น imgbed
-> Save
-> Query capacity
-> Upload test file